I got a call last Thursday from our contractor asking if they could start working on the window on Friday. While this may be rather short notice for most people, I had already told them our schedule was very flexible since Matt and I are both sitting at home with a newborn for 3 months. I was actually thrilled to hear to they could get working on it!
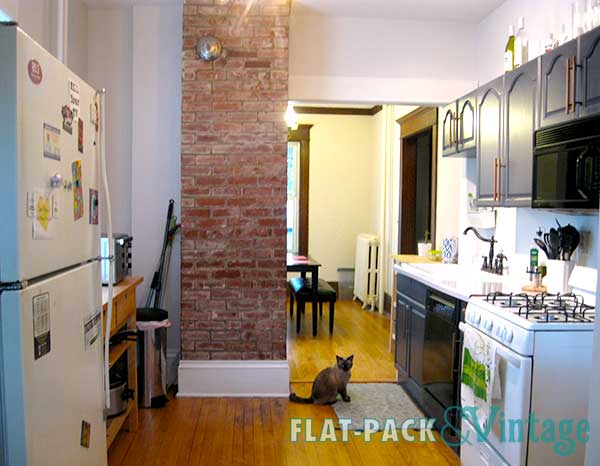
So here it is, one last look at our current kitchen. (Ok, these pics are actually a little old but I didn’t have a chance to take new ones and it looks more-or-less the same, we just upgraded the appliances since then).
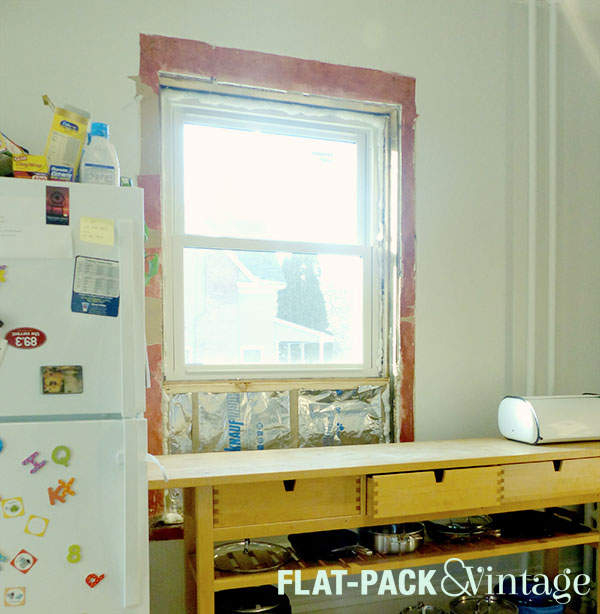
Time to say buh-bye to the old window and helloooo window that will allow for cabinetry!
Isn’t it lovely? Very industrial-chic. Not to worry though, there will (obviously) be more finishing work happening.
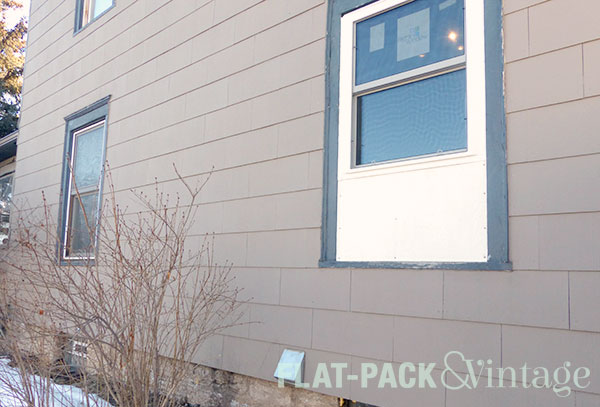
The outside looks a little less classy at the moment. Because we have asbestos siding, the contractor had to do a little bit of a hack fix to avoid disturbing it. We’re going to paint the filler panel to match the window trim for now, but I’m thinking about adding window boxes to help hide the panel and visually balance both windows.
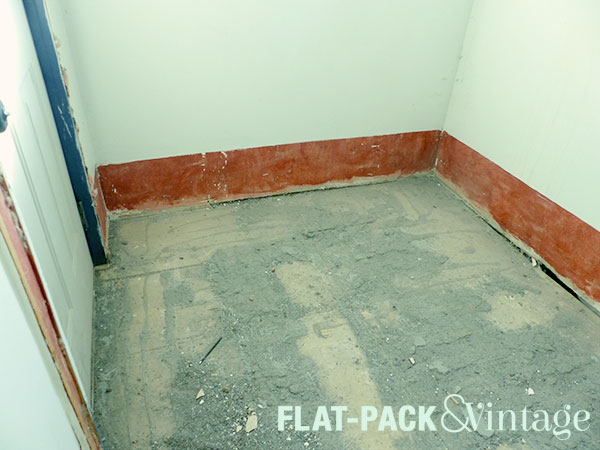
They also demo-ed the mudroom tile while they were here! It’s hard to see in the Before pictures, but it was an unfortunate pinky-beige and I am VERY glad to have it gone.
Apparently this was some very stubborn tile and they had to pretty much pulverize it in order to remove it. Bad news: there is a coating of dust that permeated most of the house. Good news: this is probably the worst (read: dirtiest) part of the demo work.
“Week” One was really only one day since they started on Friday, but I’m already happy with the progress!
Now that baby Elsie has finally joined us, we’re back to picking up steam on the kitchen remodel. We’ve finalized the sink and light fixture so now we’re moving on to counters and tile!
For counters, I knew I wanted something that resembled marble, but wasn’t marble. Some people are cool with the maintenance and inevitable staining that comes with a true marble countertop, but I am not one of those people. This meant my options were a quartz composite or solid surface (ok, there are lots of marble-patterned laminates too, but we didn’t really want to do with a laminate).
Silestone’s Et Satuario is pretty close to the look I’m going for as is MSI’s Calacatta Bontanica. We wanted to make sure we considered Cambria as well since they’re a Minnesota company, but unfortunately I wasn’t really feeling any of their options.
The way our remodeling company works if that they estimated a certain amount for the countertops in our initial quote. Countertop prices depend on the fabricators so these were the options I sent to them for quotes and hopefully at least one of them falls within our budget!
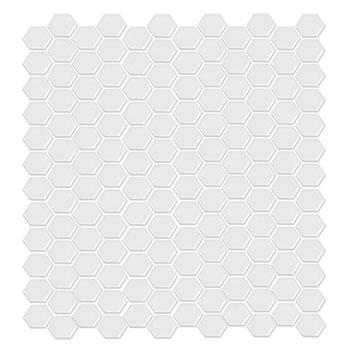
Today we also got ourselves out of the house to make a final decision on tile. The mudroom tile was an easy choice–I knew I wanted a white, penny hex tile because it’s pretty traditional for houses of this era. Added bonus: it’s also really cheap!
Backsplash was a bit of a dilemma. I had originally found an amazing starburst pattern at Lowes. Buuuut when we actually got to a point where I would consider ordering it it was listed as “no longer available.” I even chatted with a sales associate to see if there was any chance of it coming back in stock before January, but they didn’t have any information on it. Googling the brand and pattern didn’t get me anywhere either. SO BUMMED! It was such a nice combination of visually interesting without being over-powering.
Unfortunately I haven’t been able to find anything with a similar feel so I had to re-think my plan. I knew I wanted a ceramic or porcelain for the same reason I don’t want a natural marble counter. Glass tiles are cool too, but just not the look I’m going for. I also wanted a solid white so it won’t compete with the counter pattern. After thinking about it for a while, I decided that an arabesque or subway tile would probably be the best fit for the house and we ended up going with a handmade-looking subway tile. It’s a classic shape with a little bit of texture and organic-ness so I think it will work out very nicely.
Last week we had our pre-construction meeting with our contractor. It was actually a little more chaotic than I had imagined. The meeting was at our house and involved the sales manager and designer we had already been working with, plus our project manager, plumber, and electrician. I went over material selection planning with the designer while everyone else poked around the house trying to figure out exactly what would be involved for the minor plumbing and electrical work being done.
Shockingly the electrician thought everything looked straightforward on his end. He was even pretty un-phased by this hot mess concealed behind an innocuous wood panel in our kitchen wall.
Because this is an old house, of course something had to be jacked up…in our case it was the venting for the kitchen sink (which no one had actually expected to be an issue). Turns out that our sink is not properly vented, BUT if you take a quick look at the plumbing in the basement it looks like it should be vented…the second pipe just doesn’t actually vent.
Goody.
Now, to fix the venting issue, they’re going to need to rip out a chunk of the wall and section of the ceiling. Yay…. It’s going to add to our cost, but because it’s a code issue it can’t be skipped. The upside (?) to this is that we know the toilet in our upstairs bathroom has some plumbing issues that can only be fixed by ripping a hole in our kitchen ceiling…the same part of our ceiling that will already be getting a hole ripped in it. So we’re going to see if it’s possible for the plumber to fix that issue while the area is accessible. This will of course add even more $$$, but it would be less than if we had to rip a second hole into our ceiling later on.
The other fun thing we learned is that based on their current timeline, demo is estimated to start in mid January. For those of you not following along, baby #2 is due in mid January. My sister just also started her own kitchen renovation less than a month before Christmas so clearly this kind of planning is a family trait.
Thankfully nothing else is standing out as a glaring problem. In the next week or so I need to meet with the designer to sign off on the final cabinet plan, door styles, and cabinet colors. I’ve already got our sink ordered so next up is deciding on a countertop since that will require time to be fabricated.
Whelp, we did it! Last week we signed the contract for our kitchen remodel! It’s a little scary since it’s quite a big investment, but I think it’s going to be awesome and MUCH more functional once everything is done. Right now we’re waiting on the contractors to get the necessary permits from the city before anything else goes forward, so in the meantime I’ll be sharing more of the planning process.
Phase 1: Pre-Planning
Before we even started getting quotes from contractors we had figure out a general idea of what we were planning. Even if you plan on DIYing, this is still a good starting point. I started out by putting together a mood board of my general design plan.
Then, based on the design ideas, we put together lists of Need to Have and Nice to Have and established our ideal budget and max budget. You can also start with your lists and come up with a design second, I just happen to be more visual (and we also had a general idea of our goals).
Need To Have:
Replace all existing cabinets
Add base cabinets along window wall
Add cabinets to the left of the sink
Replace countertops
Replace sink
Update ceiling light
Some solution to the too-low window
Move/cleanup existing outlets
Tile backsplash
Nice to Have
Extend existing wall of cabinets to the ceiling
Glass doors on upper cabinets
Replace window with shorter window to clear countertops
Apron-front sink
Replace mudroom tile and add insulation under the floor
Add a proper (exterior venting) range hood
Add exterior light above the back door
I had a fairly detailed design plan from the get go, but even if you don’t, it’s good to have a general idea of what you’re looking for before you start getting quotes. Are there any appliances you want moved? Anything you want to add or remove (versus just replace)? Any existing fixtures you plan on keeping? Do you have any material preferences?
I’ve apparently reached an age* where I’m at the “I don’t want to fix this effing thing, let’s just buy a new one.”
Case in point: our dishwasher.
The dishwasher that came with the house died about a year and a half ago. We had both a new baby (bottles galore) and my mom staying with us (extra regular dishes) so we hurried out and bought a new one. Not gonna lie, I went mostly off of looks because how different could dishwashers really be? I mean, the one we had wasn’t anything special but it got the job done.
Spoiler alert: Don’t be like me and be sure to research any appliances before buying.
Needless to say, we’ve been not terribly thrilled with this dishwasher from day one. Recently, it’s started getting sitting water in the bottom which is a little ominous since the water’s supposed to get pumped out each time you run it. Matt talked to a repair guy who thought it sounded like an issue with the pump and would most likely be a couple hundred to fix.
My logic is, why would we pay money to fix something we don’t even like? Sure a new dishwasher will be more than a couple hundred, but it should hopefully cut down on some of our frustrations. We were even half-considering replacing the dishwasher as part of our coming-soon kitchen remodel.
Matt didn’t really argue with me since he never liked our current dishwasher either. This time though, instead of running out to the store to order a new dishwasher STAT, I spent the rest of the week deep in research and we went to actually order it over the weekend… our kitchen may or may not be a complete disaster at this point…
I had narrowed it down to either the Bosch 300 or 500 series. I know a couple people with Bosch dishwashers and they love them! Plus, the pricier dishwashers all had free install over the weekend so the final price was still about the same as a mid-range dishwasher. We ultimately went with the slightly-pricier 500 series…only because the 300 series version I wanted (with buttons on the instead vs the outside) was special order and we didn’t really want to wait an extra 2-3 weeks for a functioning dishwasher.
Warner Stellian has been our go-to appliance shop in the Twin Cities. Their prices and selection are competitive with national chains and we like supporting local business.** Plus, the issue with our last dishwasher install was handled reasonably promptly without me having to spend a week arguing on the phone with the store and finally resorting to a Facebook page complaint.*** I think to date we’ve gotten our washer and dryer, fridge (from the scratch and dent section!), microwave, and 2 dishwashers from them. The only slightly annoying thing is that you don’t know your delivery window until the day before (you know the day, just not the time frame which can be tricky depending on how flexible your work schedule is).
So now we’re set to be getting a new dishwasher sometime on Thursday. Wish us luck!
*And paycheck, let’s be honest, but these things often go hand-in-hand.
**Lucky for me, Target is also technically a local business.
When I started my closet makeover, I thought it was going to a weekend…maybe a week (factoring in a full-time job and toddler). Well, two and half weeks later, I’m finally able to put my clothes away (although there’s still a little bit of work I’d like to do)
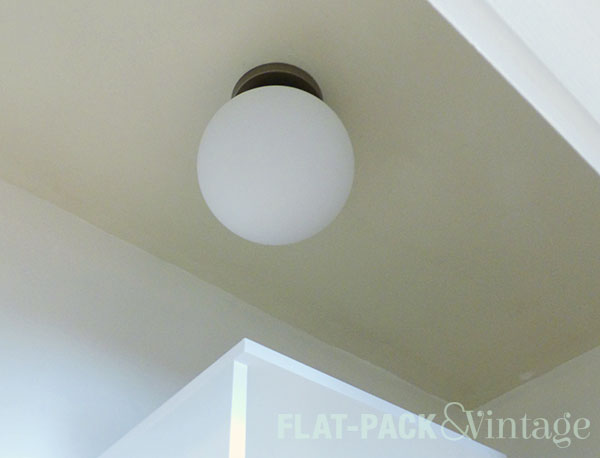
When we last left my closet, I had destroyed everything and finished repairing the walls. After that, I got everything painted and mostly-assembled the shelving unit of the organizer I bought (I’d need it for spacing and such). Then Matt installed a new ceiling light.
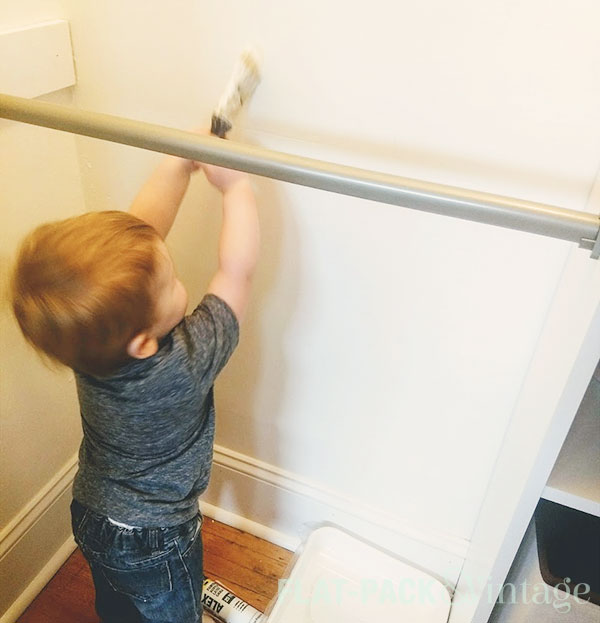
And I got some help with touch-up paint.
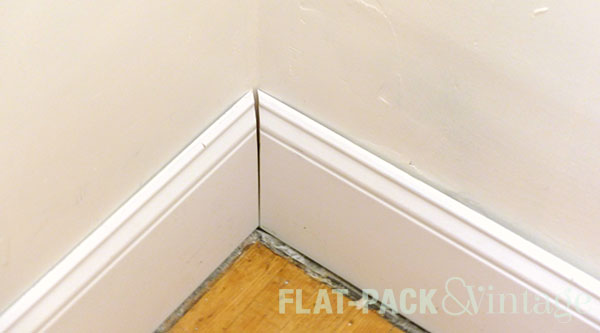
Next up was re-doing the baseboards. I had originally planned on just getting 1×8 pine boards…unfortunately the pre-primed 1×8’s at Menards looked suspiciously moldy. Ew. Pre-primed baseboard was only slightly more expensive so I decided to go that route rather than spend the time is priming.
You know Newton’s Third Law: for every action, there is an equal and opposite reaction? Well, it’s not just for physics anymore… While I saved time by not priming the baseboards, I lost time having to miter all the corners (yes, I had originally planned to take the lazy way out and use butt joints).
I also had to deal with the joy of old houses:
No matter how careful you may be with your cuts, if your walls aren’t square you’ll still end up with a mess (it’s harder to see, but the boards don’t sit completely flush against the wall either). If this was somewhere more visible than inside a closet, the options would be recalculating the angle, or using a coping saw. However, since this was inside a closet, I chose the super-unprofessional method of just filling the gap with caulk.
I also further half-assed things by using quarter round instead of shoe molding…but we had a bunch of (already painted!) quarter round from when I accidentally bought for our dining room so I figured the closet was decent place to use some of it up.*
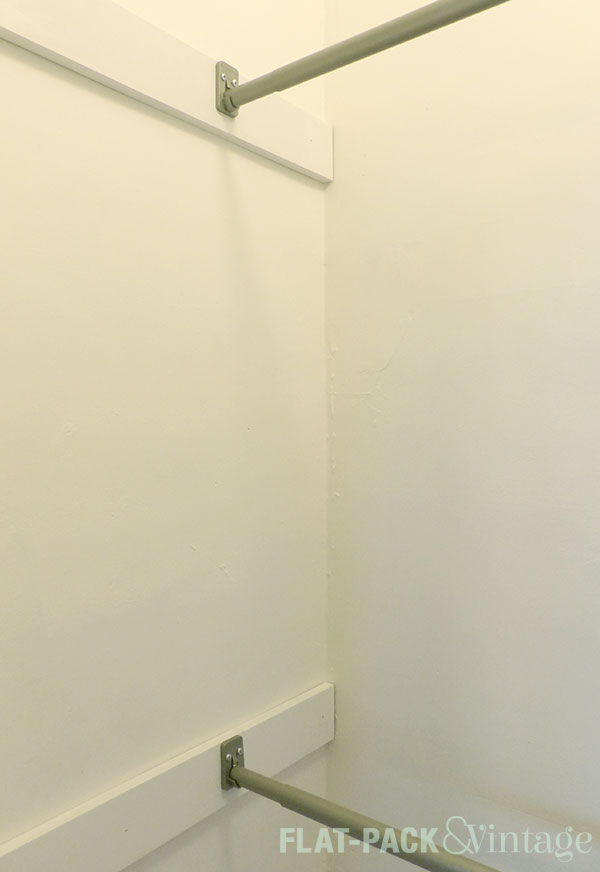
Along with re-installing baseboards, I also put up 1×4’s to support the curtain rod brackets. The previous closet system had the brackets attached to boards as well and I decided that was probably a good idea. In newer construction this probably unnecessary, but plaster doesn’t play especially nicely with anchors so I want to make sure I had the stability of studs to support the weight of my clothing.
Securing the shelving unit was one of the last things I did. I saved this for the end because I wanted to be able to move it out of the way while I crammed myself into an already tight corner to nail and caulk baseboards (sometime I make good decisions). Because the shelves were reasonably stable on their own and there wasn’t going to be anything pulling away from the wall, I was fine securing it with the anchors that came with the kit.
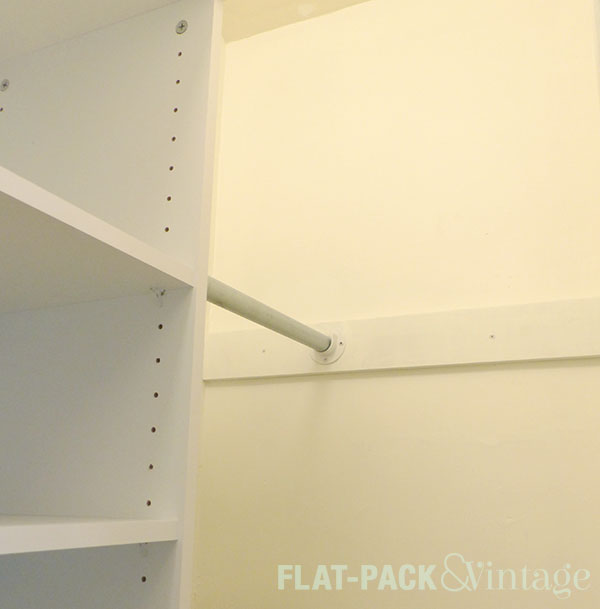
Once the tower was completely stable, I added the support brackets for the clothing rods. On the left side I used the rods and brackets that came with the kit. With careful measuring and a level…I still managed to eff up the first one. Matt, being the awesomely supportive husband that he is, walked in after I finished up, grabbed a level, and immediately pointed out that it wasn’t straight. Thanks dear…
The area to the right of the shelves was too small to use the rod that came with the kit. I could have cut it down with a hacksaw, but the rod is two pieces, each of which have a notch at one end to lock into the bracket…basically it would have been very annoying to cut everything. Instead I cut my old closet rod down to size** with a pipe cutter and re-used the old brackets.
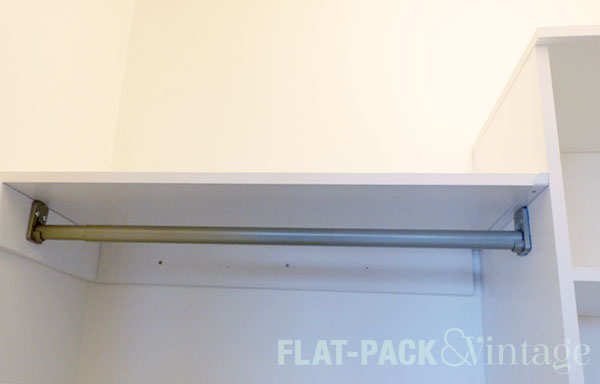
Once the main components were in place, I decided to add even more shelving over the rods. I bought the upper shelf support brackets designed to work with this system, a couple laminate shelves, and another 1×4. I only needed one package of the brackets since 1×4 the rods connected to on the walls would already be serving as some shelf support. I attached another 1×4 to the back wall to support the back of the shelf.
The laminate shelves only came in 48″ lengths so I had to cut them down to the right sizes (this left me a couple bonus shelves for the tower too!). Cutting laminate is a little intimidating since it’s prone to chipping so I did a a bit of a research first. The common method seems to be scoring the laminate with a utility knife first, then running it through a table saw with the blade height set to only cut through about half of the board, then flip the board over and cut the other side.
Well, I tried this and my board kept getting stuck so I decided to throw caution the wind and just run in through like a normal board…and this actually worked! If your board is going to be pretty visible I don’t know if I’d recommend this (I think I just got lucky), but if your cut edges aren’t really going to show, it might be worth the risk if you’re struggling with the “safe” way.
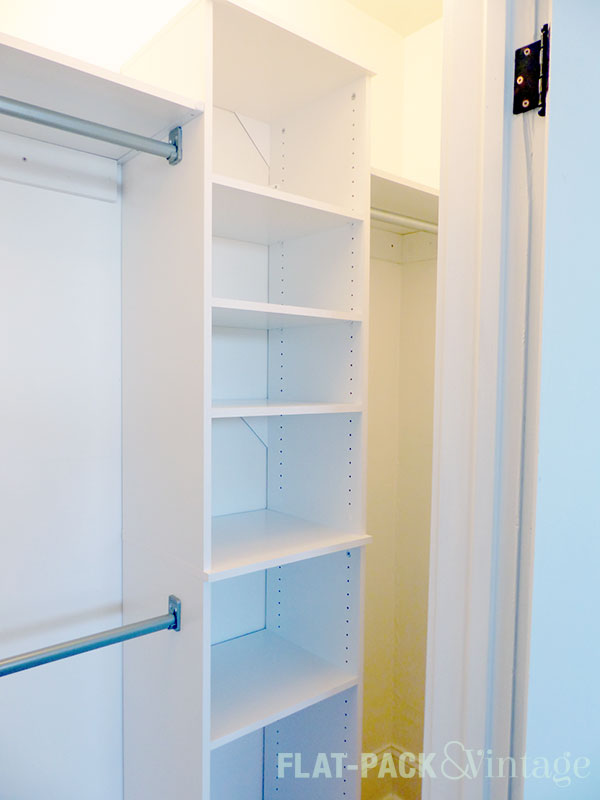
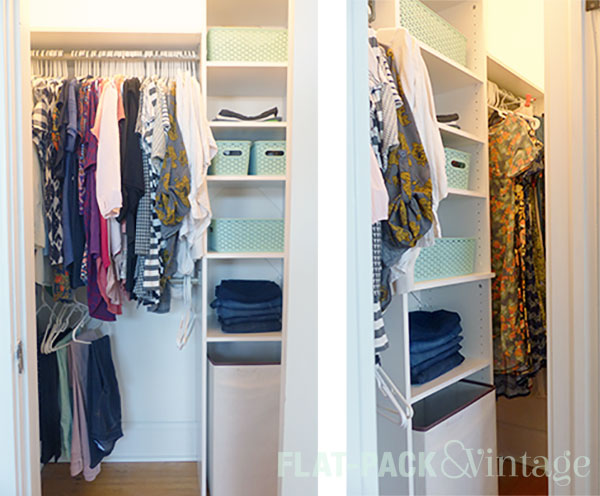
Now the light is up! The shelves are all up! The rods are up!
And I can put my clothes away at last!!!
I have some t-shirts and jeans folded on shelves and a handful of inexpensive baskets from Target for things like swimwear, belts, tights, and leggings. (I KonMari’ed my leggings BTW and it feels sooo good!)So a weekend project ended up taking around 3 weeks to complete, but I am incredibly happy with the result.
*More so than I had planned because I could not for the life of me get one of the cuts right and effed it at least three times.
**Technically Matt started this part, only first he cut the rod to exactly length between the shelf and the wall and didn’t account for the width of the brackets. Then he tried to re-cut a slightly smaller piece, but the pipe rebelled and he gave up after getting some blisters. I jumped in at this point and finished cutting it in about a minute…because he loosened it for me, right? To his credit, he cut the first piece without issue so it wasn’t like he didn’t know how to use a pipe cutter.


 So a weekend project ended up taking around 3 weeks to complete, but I am incredibly happy with the result.