DIY Channeled Headboard

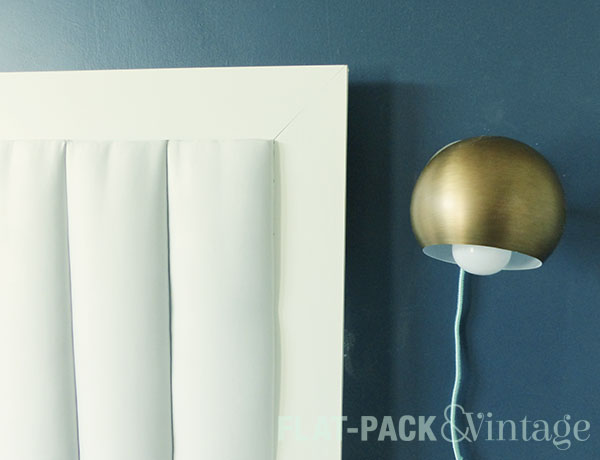
Hey hey hey!  We have a new headboard! Did you think you had lost me to baby posts? Yeah… hopefully those will be slowing down and I’ll be focusing more on the house again. If you are interested in some down-to-earth baby talk, I finally did something with my Twitter account. Yup, I’m officially a Twit.

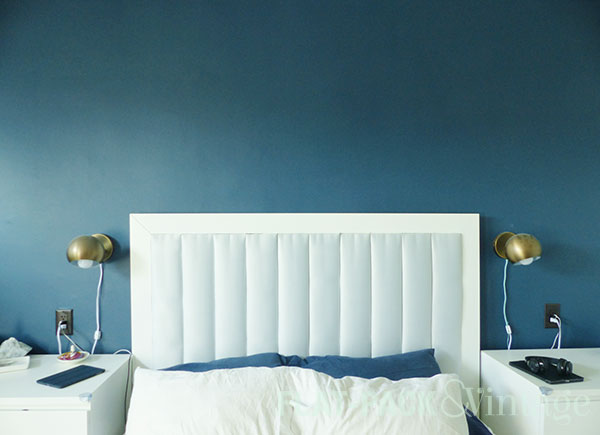
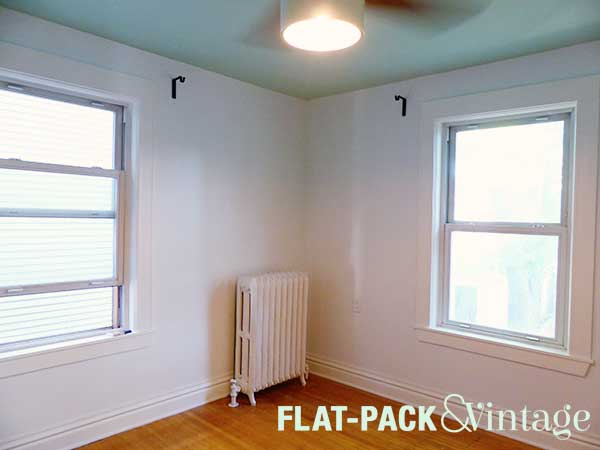
And our new sconces? How cute are they???

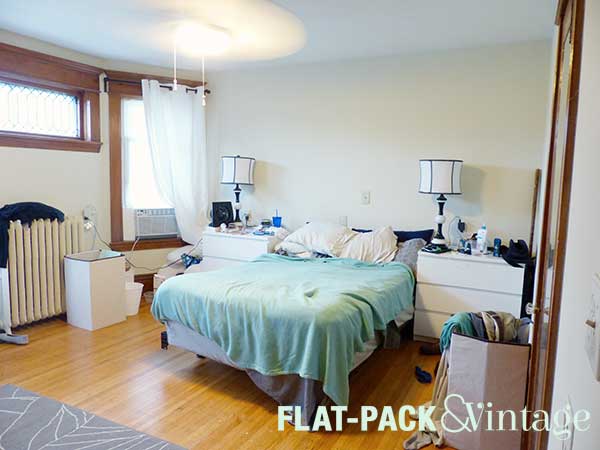
We seriously haven’t had a headboard since we moved into this house, so it’s been really nice to finally get this project out of the way. And yes, this was all custom-made and not terribly difficult. If you can use a miter saw and staple gun without losing a hand, this is for you!

I based this on the ah-maze-ing looking headboard from Fabric Paper Glue, but made a couple modifications to make it work better in our space.  Most notably:

  • I switched out the 1×8’s for 1×6’s (personal preference, plus 8-1×6’s + a 1×4 frame fit our bed frame perfectly)
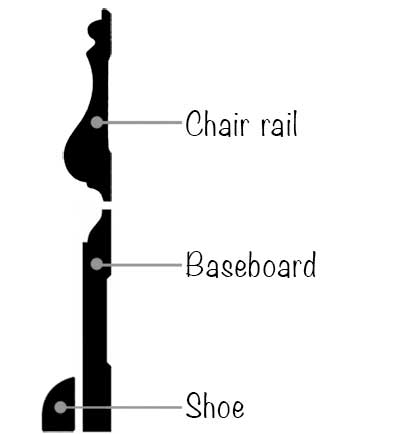
  • I opted for it not to run all the way to the floor (our chunky baseboards would get in the way)
  • I chose to mount it on the wall using a cleat, which is a great way to hang big, heavy things.

Here’s what you need (measurements/amounts based on a Queen-sized bed)

Supplies

  • 5-1″x6″x8′ boards (they just need to be straight, they don’t need to be pretty)
  • 2-1″x4″x8′ boards (paintable/stainable quality)
  • 2-2″x6″x6′ boards
  • 1 or 2-1″x2″x6′ boards
  • 2-L-shaped metal plates
  • 10-straight metal plates
  • Batting (1-90″x108″ roll of “classic loft” gave me 3 layers/board)
  • Fabric (about 3yds)
  • Spray adhesive (optional)

Tools

  • Scissors
  • Miter saw
  • Table saw
  • Staple gun (+ 1/4″ staples)–an electric staple gun is totally worth it!

Because we didn’t take our headboard all the way to the floor, we measured from the top of our bed frame (without the mattress) to our desired height. We cut 8 1x6s to this measurement.

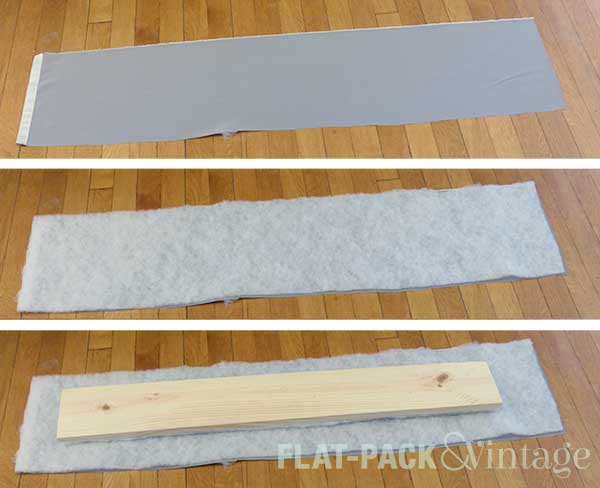
I used spray adhesive to adhere 2 layers of batting to each board. The adhesive will help prevent your base layers from shifting, but isn’t necessary. I rough-cut the batting first, then trimmed it to size after gluing it down.

Cut your third layer of batting a few inches longer on each side–you’ll need enough to wrap around the board and staple down.  Cut your fabric about the same size.

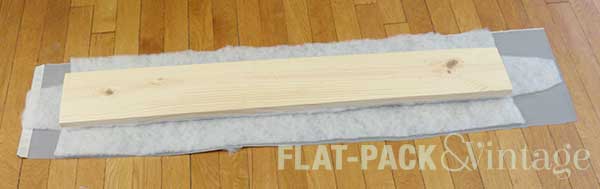
Lay your fabric on the ground right-side down. Layer your batting, and then your board (fabric side down).

Oh hey, look! I finally remembered to take some pictures! I blame mom-brain (it’s a convenient excuse for everything).

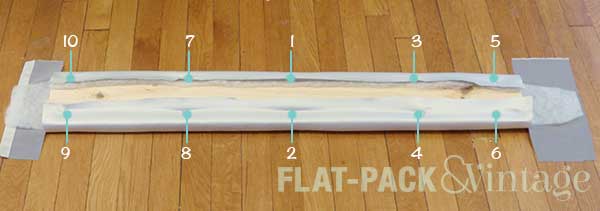
I also cut out the corners of the batting to de-bulk when I got to wrapping the ends.

Starting from the center, staple the batting and fabric to the back of the board.  You’ll want to pull the fabric snug, but not super-tight. Work your way around the board, alternating sides.

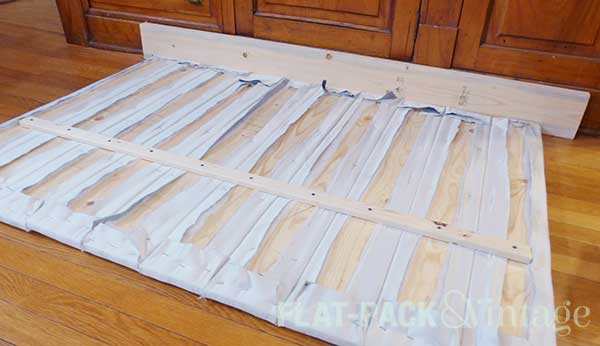
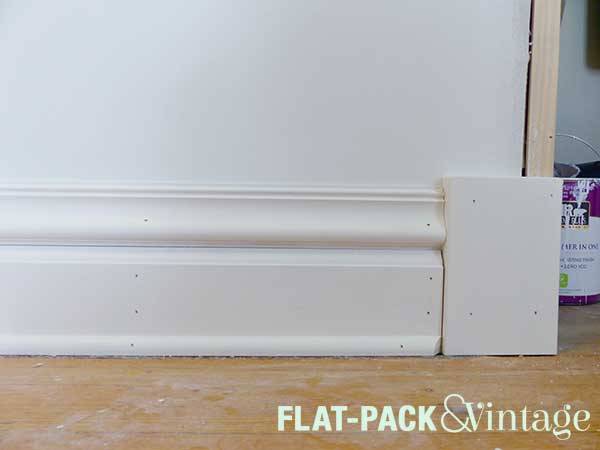
Once all your board are wrapped you’ll need to attach them all together.  Cut a 1×2 a few inches shorter than the entire width of the boards. Use a convenient stretch of baseboard to keep the top of your boards lined up evenly (because of our shoe molding, I put an extra board in front of our baseboards).  Recruit a helper to pull the boards tightly together as you screw the 1×2 into them. Depending on how you choose to mount the headboard, you may opt to do more rows of 1x2s, but we were attaching some additional boards.

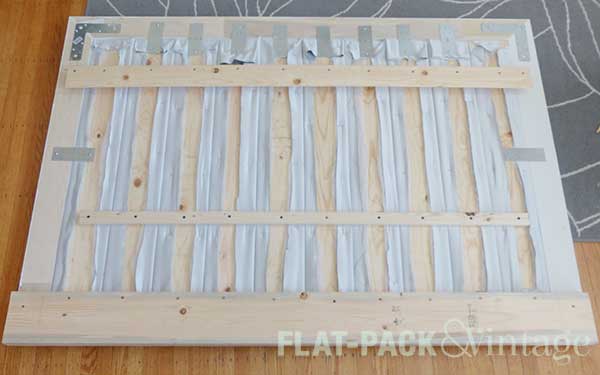
After the panels were secured together, we measured, cut, and attached the frame. First I dry-fit everything to check that everything was cut right. Then I attached the corners together with L-shaped plates. The frame then slipped around the panels and got attached to each board with straight plates.

We added a 2×6 along the bottom to give us an area to screw our bed frame directly into the head board. Our bed was constantly inching forward on our hardwood floors so we wanted to put a stop to that. Only about half of the 2×6 overlaps the headboard, the remaining overhang fills the gap between our bed frame and the wall. If you have less-chunky baseboards, you may not not need a 2″ board here.  Just measure the gap between your bed frame and the wall when your frame is pushed up as close as it will go.

At this point, some of you may be wondering why one of the boards of the frame appears to be painted on the back side.  This is because my husband–the math major–forgot how angles work.

Matt: I probably shouldn’t have bothered getting the pre-primed boards.  I still had to prime one of them again anyway.

Me: Why?

Matt: Because after cutting the first the side piece you need to flip it over to cut the angle for the opposite side.

Me: Or you could just reverse the saw.

Matt: No no, because see, this side needs to be angled this way so to get the opposite angle on the other side you need to flip the board over and…. oh… well I feel stupid now.

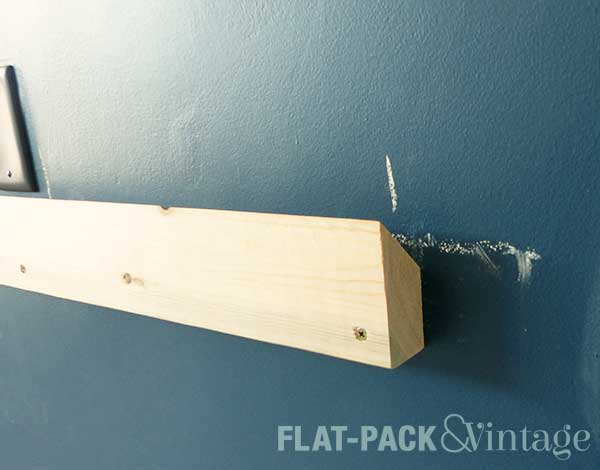
The picture above also show the cleat on the back of the baseboard.  Cleats are a great way to mount heavy objects on a wall–the length helps distribute weight while allowing you to hit multiple studs. If you have a table saw, they’re also super easy to make.

We chose to mount half of the cleat on the back of the headboard first and then measure for the correct height for the corresponding wall

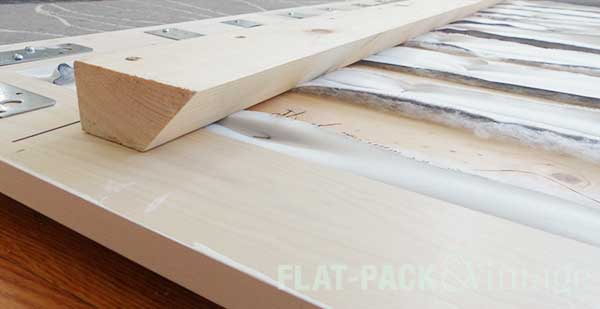
I don’t have a lot of specific guidance for lining up each half of the cleat other than measure.  Measure lots.  And make chalk mark for guides.  It probably easier if your headboard rests on the ground, but ours rests on the top of our bed frame (because we just like to be difficult here).

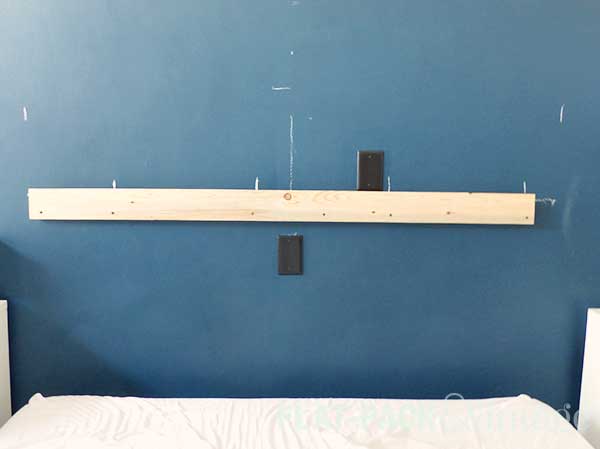
FYI: That’s not a phone resting on the cleat, it’s just one of the 50 million awkwardly placed outlets in the room.  Matt removed the outlets, capped the wires, and put a solid plate over the electrical boxes.

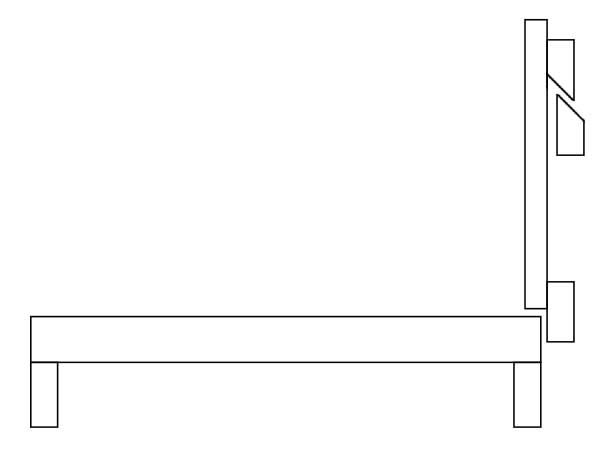
So to recap: The headboard is attached to both the wall and the bed frame. It’s secured to the wall with a French Cleat, and bolted to the frame using a spacer.

.

Awesome diagram, no? One of these days I’d like to install Windows XP on my old (Windows 7) laptop so I can install my copy of AutoCAD again…but that’s a lot of work. #lazygirl

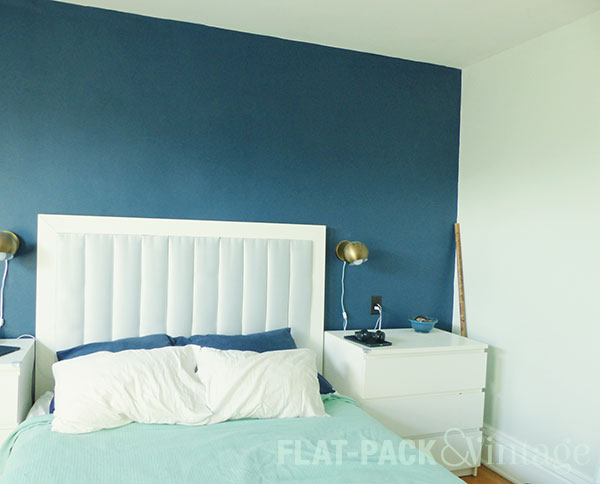
So yay! We have a headboard! And new sconces! Our bedroom is actually starting to come together! I have one wall left to paint (that I won’t be able to fully finish until we take out the window AC unit). I have an area rug ready to go (I just don’t want to put it down until I’m done painting). The biggest element I’m missing at the moment is a pair of nightstands.  The dressers aren’t really working there, especially with a lower bed frame…but hey, we’re getting close to done!


The Difference a Wall Makes

We’ve officially started work on our bedroom makeover!* It’s slow goings, because baby, but I got one whole wall painted the other weekend!  Whoohoo! A wall!

The bedroom plan was to have a dramatic, dark accent wall behind the bed, so I decided to start there.

Gorgeous, no? The color is Benjamin Moore Gentleman’s Gray… although don’t be fooled by the name because it is decidedly greenish-blue.

I painted the baseboard along that wall at the same time (yup, white trim EVERYWHERE) so we could shove our bed back into place. I’ll probably be tackling one wall at a time so it will look pretty hodge-podgey for a while.  I’m also going to wait until spring to paint the radiator because I really want to be able to open windows for that!

I had hoped to make some more progress by now, but cold and flu season took a pretty nasty toll on me, so it’s been sitting like this for a few weeks. We do have a headboard up now too, so those pictures (and tutorial) will be coming soon!


*Although, is it really a makeover if it wasn’t really “made” in the first place?

Brainstorming: Master Bedroom

This is probably super optimistic since we now have a demanding baby in our household, but our next project room is going to be the master bedroom.  This room is way overdue for some TLC since we’ve done nothing to it since we moved it.  Heck, Matt just fixed the closet door so it actually stays closed!

There are a couple reasons I chose to tackle the bedroom next.  Part if it is because we now have a kiddo (whose toys will gradually start taking over the house) it will be nice to have an adult retreat space.  I’ve also been spending more time in this room lately and it’s really hit me just how blah the space is.

masterBefore2

masterBefore1

Yaaaaawn. Also, please pardon the mess.  I didn’t even get a nap in today and had no motivation to style a Before shot.

So what’s the plan?

masterMoodBoard

Thankfully this room only needs cosmetic work so the bulk of the work will be painting. We also need to replace our mattress so we’ll be upgrading to a queen sized bed (and actual bed frame). I also want the headboard to really be a focal point of the room and the entire wall behind it will be painted a bold accent color. After that it’s a matter of replacing pretty much all our existing furniture and getting a rug that’s the proper size for the space.

Not gonna lie, but this makeover will probably take a while.  I’ll hoping we can at least make a start on the painting while Matt and I are still out on leave.  We’ll see since we’ve got a couple other (smaller) projects we’re trying to finish up too.

Save

Nursery Reveal (for Real!)

Sorry I psyched you out last time, but some things just happen on their own time.  I have a real nursery reveal for you now, although there are still some minor tweaks that still need doing.

Let’s start with a quick reminder of what we started with, shall we?

study1

Ugh.

Acoustical ceiling tiles, paneled walls (you can’t tell they’re paneling in the picture, but trust me), and trim belonging to basic modern construction instead of a Victorian beauty.  So we demoed All The Things, put up new drywall, routed some custom casings, got me sent to the ER, and cobbled together the rest of the trim pieces from stock moldings.

nurseryReveal_5

I opted for a colorful ceiling and muted walls partly because of the ceiling fan, and partly because I figured there would be more busy-ness happening on the walls and floor and didn’t want too much color competition.

Oh, and if you’re wondering if that is a TARDIS blanket on the chair, yes, yes it is!

nurseryReveal_2

I also wanted something fun and whimsical, without being overly baby-ish. The animal portraits are by Yago Partel and actually from a calendar I picked up a few years ago.  I fell in love with the mobile from Haba because it was bright and stimulating for baby, but still pretty artsy.

The chifferobe was apparently built by my great-grandfather and has actually managed to stay in use over the years. I re-painted it, but still feel like it’s missing a little something.

nurseryReveal_4

I didn’t want a specific changing table in the room, but I did want a changing station.  We picked up the cubby organizer from Target and added a bit more structure by screwing on an MDF backing.  I absolutely love the animal bins and they’re great for stashing towels, blankets, and small loose toys.  All the diapering supplies are on a rolling cart, perfect when mom’s a righty and dad’s a lefty.

nurseryReveal_1

Things that still need doing:

  • Install a real closet door
  • Refinish the main bedroom door
  • Hem the curtains
  • I’d really like to move the alphabet wall down a smidge (it’s a little too high and driving me bonkers) but that would be a significant undertaking (and Matt will probably kill me for even thinking about it)

There’s actually not too much left given that we unexpectedly lost about 3 weeks of work time thanks to this kiddo arriving early.  Now that we have a newborn around, it may be some time before the room is 100% done, but it’s mostly there and fully functional so it seemed like a good time to show it off!

Save

Save

Save

Save

Nostalgia

A while back my sister if I asked me I wanted some furniture for the nursery.  She had a changing table and chifferobe, both of which were ours when we were babies.  The changing table was a little big for the room (and not really my style) but the chifferobe was really cute and I remembered growing up with it.  I thought that was kind of cool too, to work in a piece of furniture that I had used as a baby/kid.

Later I was talking to my dad and he was mentioning how happy he was I was taking the chifferobe because his grandfather had made it for him. Whoa.  I seriously never knew that and always just assumed it was something my parents picked up when they started having kids.  I don’t know exactly why, but there is something kind of cool about being able to tell our son that he has furniture made by his great-great-grandfather.

The piece has obviously gone through several makeovers in its 60+ years.  When I had it the frame was white with yellow drawers/door and white numbers painted on the drawers (maybe letters on the door?  I don’t remember…).  My sister re-painted when she took it for her kids’ nurseries and added vinyl numbers and letters.

chifferobe1

Super cute, but the wrong colors for our space.  And the A was totally there when I got it, I was just curious to see how easily the vinyl peeled off.

I decided to keep the frame white and did a quick touch up coat with (of course!) Benjamin Moore Advance (satin) in Simply White.  Kids are tough on things and it just needed a little pick-me-up.  I was really torn on what to do about the drawers and door, but eventually decided on green.  I thought I had a good grasp on what shade I wanted, but, alas, it turned out a little too pastel-y

chifferobe2

Guys, don’t do what I did.  At $30 a quart, Advance is pretty pricey and I didn’t want to buy a new quart when I’m literally using about an 1/8th of it. I should have bought some cheap sample pots but was over-confident.  I ended up going back to the store and asking them if they were able to re-tint it at all.  If you ever need to do this, just be aware that there are limitations to how much they can do based on the pigments and the original base.  I already knew that and just asked them to do what they could.

chifferobe5

This was essentially the color progression as they experimented.

chifferobe3

It’s better, but I have a feeling I may have some sort of color breakdown once the room is more put together and try yet another shade of green.  I’m also debating if I want to add anything to the drawers or door.

Save

Save

Save

All the Trimmings

We have walls, we have a light fixture, and we now have mouldings!

NurseryTrim11

Oh my god it’s finally like a real room.

We started with the baseboards.  Once again I spent a while agonizing over trim pieces (since trying to duplicate 100 year old moulding with contemporary, mass-produced pieces is a bit of a pain).  We had a little more leeway in this room since the upstairs was already a bit mis-matched so I decided to simplify things from when I did the dining room baseboards.

This time I settled on a 3 part baseboard instead of the 4 part plan I used before.  We picked up a 4″ baseboard, chair rail, and shoe molding.

NurseryMouldingDiagram

We really should have started with the plinths, but I was still painting them.  You can buy fancier plinths at the hardware store, but the ones in the rest of our house are super-simple so I made them myself.  I measured the width of the door casings, added about a 1/4″ (seriously, I just eyeballed it) and ripped some down.  We had a scrap board of 10″ select pine so I used that since it would be plenty tall. Then I took my palm sander and rounded down all the edges and corners, primed and painted… and waited for them to dry.

While the plinths were being finished, we put up the 2 main parts of the base.  We started with the bottom layer, went around the entire room, then added the top layer rather than fully finishing a wall at a time.  My best advice for installing baseboards (or pretty much any trim) is to just tack it in place until you’re sure all the edges/corners line up well.  If there’s an oopsie down the road it’s way easier to pull off and fix.  Oh, and also start with your longest pieces first so if you cut them too short you can still re-use them elsewhere. We were able to leave the right amount of space for the plinths because I had extra one that was originally intended for backup but had a pretty nasty split in the wood.

NurseryTrim5

Once the baseboards were up we were able to add in the plinths, followed by the vertical door casings.  I was a little paranoid about installing them because my dad and I custom routed them and didn’t have any extra. Matt totally rocked it though!  We went with a simple header cut from a 1×6 since that’s what’s in the 3rd bedroom.

NurseryTrim13

SHAZAAM! We have door mouldings! (and a door that needs to be refinished, but that’s a project for another day)

After the doors, we moved onto the poor, naked windows.

NurseryTrim4

Here we started with the sills, which sound intimidating, but they were really easy. First we figured out the depth of the other sills in our house and ripped a couple boards down to that measurement.  Then we measured the depth of the window opening + the depth of the casing (A) and the width of the casing + 1/2″ (B).  This gave up the dimensions of the cutouts we needed to make. The length of your board will be the window width + (B x 2).

SillTemplate
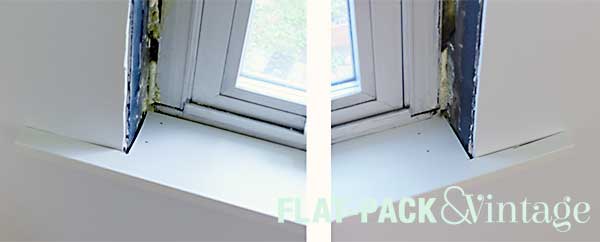
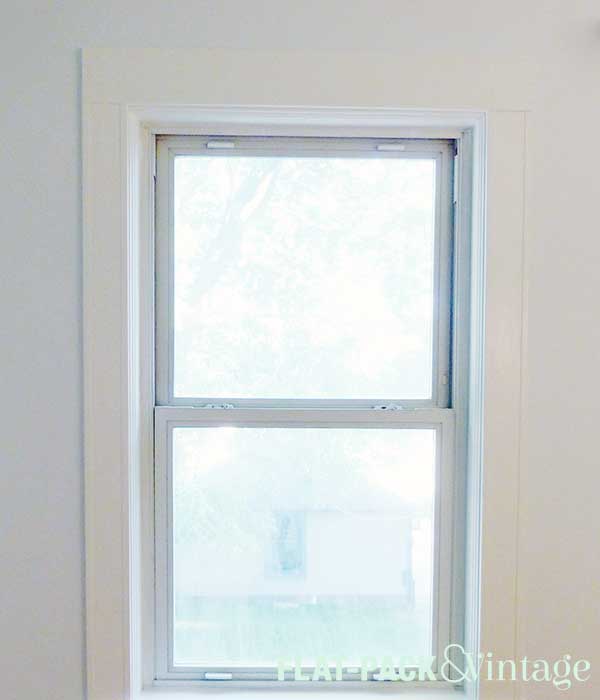
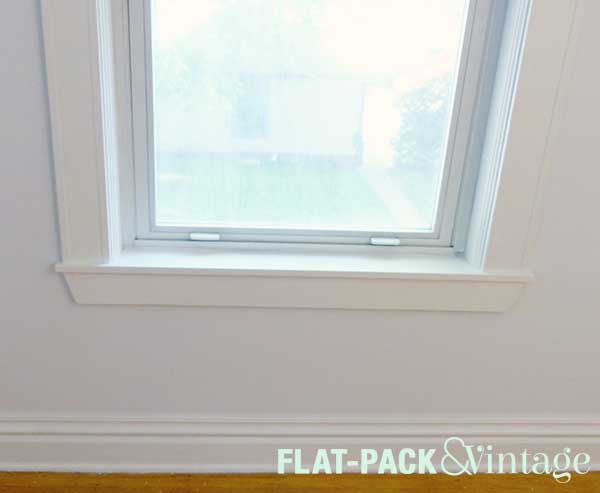
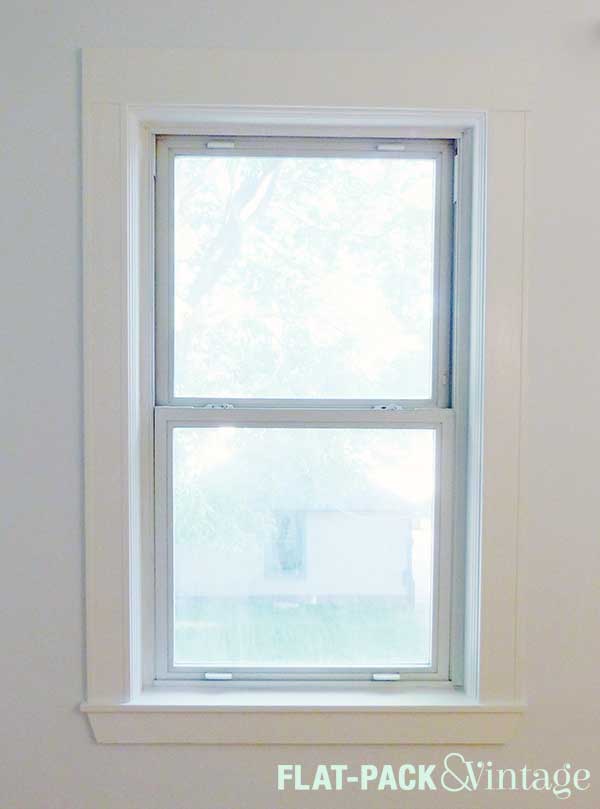
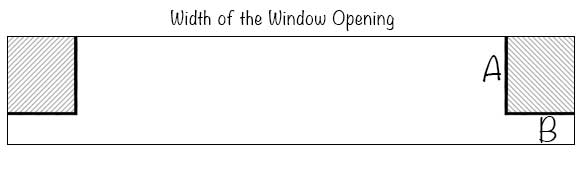
I actually added a little more than a 1/2″ to the ends and cut it down after we dry-fit the sill.  We used a jig saw to cut out the corners.  It’s a pretty crappy jigsaw and we probably didn’t have the right blade for this this so my cuts were a little wonky.  I also used my palm sander to slightly round off all the edges and corners.

NurseryTrim3

NurseryTrim6

All of this will get covered by the window trim pieces though so we’re ok!

After the sills were nailed down, we added the inside trim.  We found a 3 1/4″ baseboard which was shockingly perfect. Yes, ok, there’s a bit of a gap in the middle, but our house isn’t square/level/standard in anyway so we’re used to these things.

NurseryTrim7

I think it’s easiest to start from the top when you’re dealing with mitered cuts like these.  You’ll know the top piece fits snugly and then you only have 1 mitered edge on the side pieces and shave off extra length with just a straight cut until those fit snugly too.

NurseryTrim8

NurseryTrim9

Next we added the vertical casings and the header. Thanks to our old house and wonky walls, there’s quite a bit of gap between the header.  We’re going to add some wood filler and no one will ever be the wiser.

NurseryTrim15

Finally we added sill base (there may be a technical term here, but I don’t know it….).  Again, we just copied what was happening in the 3rd bedroom which was simpler than the trim in the rest of the house.  Here we used a 1×4 cut to an 18 degree angle on the ends… I don’t know how they came up with 18 degrees, but it’s consistent with the other small bedroom.

NurseryTrim12

And that’s the window!  Lots of parts, but mostly easy cuts.

nurseryTrim14

After all the trim was nailed up Matt went around and caulked everything.

CaulkAllTheThings
Original image via Hyperbole and a Half

I have to give a HUGE shout out to Matt for pretty much everything in this room.  I may write the blog, but he’s been working so hard on and picking up my slack when I need a nap break.  He’s really been the moulding (and painting, and ceiling fan) champ here and installed everything with pretty minimal help from me.


Save

Save

Save

Save

Save

Save

Save

Save

Save

It’s HERE…. Again

You know how we finally got the back-ordered ceiling fan a couple weeks ago?  We went to put it up the other weekend aaaaand it was missing a part.  Awesome.

Not gonna lie, my first thought was holy shit Matt just threw away part of my fan.  He had been cleaning up all the excess packaging that’s been taking over our living room between baby-related deliveries and home improvement crap and he already threw out the styrofoam packaging from the ceiling fan box.  He insisted he checked everything he threw out for stray parts beforehand and I have no reason not to believe him.  Buuuut I still may have went slightly catatonic and then decided I wanted ice cream (Izzy’s!) for dinner.

First I called Lowes, because that’s who we ordered it from.  They then contacted Hunter (the company who made the fan) who gave them a reference number which they passed on to me so I could call Hunter back.

The first person I talked to didn’t care about my reference number and seemed very confused as to why I was even calling in the first place.  She eventually said she was going to transfer me over to parts but instead I got trapped in the Automated Phone System From Hell.  If you keep pressing zero enough times you can usually get to a real person and thankfully that worked this time. I may handle automated phone systems rather badly. The second live person I talked to was actually helpful but apparently shipping just the missing part was impossible and then had to send a whole new fan.  Over-night shipping was also apparently impossible but she eventually caved and requested it be sent out as 2 day shipping (which translates to 2-5 days).  We did end up getting the new fan on Saturday though–score!

Matt handled the installation by himself (I may have possibly been napping….).  I went up to check on things as he was nearing the end and he had a laundry list of complaints.

Some of the screws provided did not actually fit, but he was able to scrounge spare screws from fan #1.

One of the screw holes for attaching the fan blades was miss-threaded making it damn near impossible to get the screw through.

The biggest issue though was installing the plate with the socket.  It attached with 3 small screws that were practically impossible to line up correctly.  It seriously took him a solid 1/2 hour to get that one piece in, it was also accompanied by a level of swearing straight out of the beginning of Four Weddings and a Funeral.

The lesson learned from this is pretty much whoever designed this fan only designed it to be pretty.  They also possibly designed it to give electricians more business because it is a giant PITA to install on your own.

But daaamn is it gorgeous!

ceilingFan

It came with an LED Edison bulb that’s pretty wussy so I’m going to try and swap it out for one of these pretty LED globe bulbs from IKEA.

Save

It’s HERE!

No, not the baby, that would be waaaay too early, but my ceiling fan for the nursery is finally here!

HunterCranbrook

I ordered it back in February, knowing it was back-ordered until the end of March.  Ok, I can wait.  At the end of March I get a call saying it won’t be available until the end of April.  Arghhhh.  We were ready to paint at this point, but I couldn’t pick out the paint until I had the fan.  At the end of April my already vivid pregnancy dreams started feeding off of my design neurosis and I had a nightmare in which I got shipped a broken and decrepit version of my fan and was told I couldn’t exchange it because it was the last one on the planet ever.  The next day I called up Lowes asking them to check on the status and they assured me it would be ready for pickup the next week.

Sure enough, I got a call last Thursday (also Star Wars Day, our 3rd Wedding Anniversary, and the official start of my third trimester) saying it was FINALLY ready for pickup.  The employee who called me was officially my BFF of the day.

Matt was hoping we could just pick up paint while we were already out.  Nope, sorry, hardware stores are possibly the worst place to choose a paint color.  That’s why they have all the swatches, so you can take them home and look at them in the same light you’ll be using the paint in.  Luckily for Matt, I already knew roughly what colors I wanted, I just needed to narrow down the exact shade so we were able to pick up paint first thing on Saturday and get to work.

Matt started on the ceiling while I started prepping the radiator.  My spray booth game is really improving.

nurseryPaint1

How awesome is that ceiling???? The color is Breaktime by Sherwin Williams (flat finish). I think it’s bright and fun without being too candy-colored like sooo much kid stuff.

The radiator was currently a flat beige-y color.  Once we get everything painted and the bright white trim installed it was going to look really dirty.  I went over it with 3 coats of white spray paint* (satin finish). Soooooo much better!

The ceiling and radiator took up all of Saturday, then Sunday we were able to start the walls! Painting goes MUCH faster when you don’t have trim to cut in around so we were able to finish the walls in one day.

nurseryPaint2

We have paint!  It looks pretty white, but it’s Palest Pistachio by Benjamin Moore (eggshell finish) and has a very faint gray/green tinge to it.  The next step is getting all the baseboards and casings primed, painted, cut, and installed.  Ooof! Our goal is to have the baby room looking like an actual room (instead of a construction zone) by my baby shower at the end of the month.  I think we can do it!


*Don’t worry, I had open windows and a full respirator.  I would have pawned it off on someone else, but spray paint is a technique and I have trust issues.

Save

Save

Save

Nursery Inspiration

Who’s excited???  It’s been a while since I put together a mood board and possibly the best part of pregnancy is brainstorming decor!  I had a few ideas floating around, but wanted to wait until we knew if we would be having a boy or girl.

Well, it’s officially a boy!

So here’s what I’m currently thinking:

Nursery Mood Board

I wanted something fun and child-appropriate without being overly cutesy.  Baby won’t have any opinions on decor for a while (if ever), so the nursery is really more for mom and dad.  I also wanted to keep the basics of the room pretty gender-neutral so if we have a girl sometime in the future we can reuse our baby gear easily.

As I mentioned before, my starting point was a set of Zoo Portraits–fun and whimsical without being sickeningly cutesy. The ceiling fan I fell in love with early on and nearly talked myself out of it! Everyone thinks I’m nuts when I start gushing over a ceiling fan, but isn’t this one just fabulous?

I didn’t want to fall into the muted, monochromatic trap that a lot of baby rooms fall into.  Bold colors and high contrast are easier for a baby to focus on, so I wanted pops of brights, especially in the mobile. Plus, it’s just more to my personal liking. The lime and redish-orange I plan to work into some more accessories and storage pieces.

My current thoughts on paint are to paint the ceiling the same minty-aqua as the light fixture and then go pretty neutral on the walls.  I think by the time I’m done there will be a lot going on around the floor and walls that will be better balanced by a bolder ceiling.

The Eames elephant probably won’t make it into the final room since it’s definitely splurgy, but a girl can dream, right?


Save

Save

Pantone Color of the Year 2017: Greenery

If you’re more on top of things than I am at the moment, Pantone’s 2017 Color of the Year is probably old news.  I’m super excited about this year’s choice though!  No offense Pantone, but last year’s colors were kind of bland… and essentially baby boy blue and baby girl pink.  This year though, they’ve given us Greenery.

Pantone Greenery 2017
Pantone 2017 Color of the Year

I happen to love green.  I loved the year of Emerald (2013) and now we have Emerald’s fresher younger cousin!

If you happen to hate green, that’s cool.  You’re not under any obligation to use or even like the Color of the Year (I pretty much ignored both of them last year…).  What it means for the green-lovers out there though is that we should be see a lot of bright, springy green popping up in stores.

Here’s a like green inspiration to help kick off your year.

pretty colors for your walls — MFAMB :: My Favorite And My Best:
Via MFAMB

There is, of course, slapping that sucker right up on your walls!  I love how they worked a gallery wall in with a bold color here.  You need to be aware of the colors in the the art you’re using for it to really look polished with a bold background, but if you have a lot of black-and-white art it’s pretty much guaranteed to look smashing.

Botanical love seat.:
Via Marks & Spencer

If you’re really gung-ho for green you can also just completely immerse yourself in it.  If you’re going for a monochromatic palette, just make sure to bring in plenty of texture to keep it from looking flat.

The 32 most beautiful kitchens in Vogue to inspire:
Via Vogue

Some people are afraid to bring color to their kitchen cabinets. I get it, it’s a lot of work to repaint it all and, let’s face it, color trends (and our own personal preferences) come and go.  If you don’t mind the elbow grease, adding a punch of color to kitchen can look pretty amazing.  Heck, if you have an island, just making that a bright focal point could really bump your kitchen to the next level!

Welsh House | Ben Pentreath Ltd.
Via Ben Pentreath

Another one not for the faint of heart… Not gonna lie, painting trim is beastly!  I can guarantee you I would never do this, but not because I don’t like the the look.  I’d probably just change my mind before I ever finished painting and have to start all over again.  I’m fickle like that.  If you don’t want to redo all (or even a single room’s worth) of your trim, maybe just a door update.  I happen to love me some bold front doors.

green bathtub
Via HomeTalk

If cabinets and trim are too much work, but you’re lucky enough to have a claw foot tub, this is another way to colorize a fixture.  Painting the exterior tub base is also super easy and can be done with just a little sample pot of paint!

15 Unique Places to Add a Pop of Color to Your Home
Via Brit + Co

You may have guessed by now that I’m kind of diggin’ the black-white-and-green combo.  I think it’s fun and lively without being too in your face.  Plus, green accents are easy to work in and switch out if you like to change up your decor periodically.

Green chairs
Via My Ideal Home

Green’s not just for stark black and white spaces.  A nice neutral palette with some natural wood plus pops of green will make for a cozier space.

Botanical inspired house in London
Via I Have This Thing for Interior

One of my favorite things about this year’s Color of the Year choice is that it’s even pretty awesome for color-phobes (don’t worry, I still love you).  Even if you aren’t super into colorful walls or furniture or accessories, you may still enjoy plants!  And like it’s name suggests, this is a color that really pulls from nature.  Plus plants pretty much go with everything!

Save

Save

Save

Save

Save

Save