D-Day

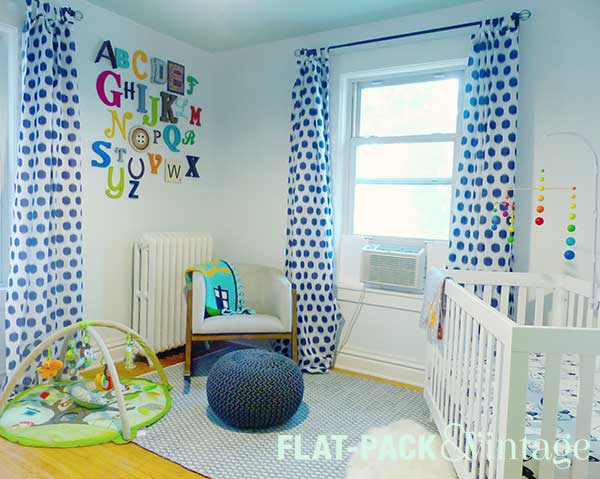
That’s Dishwasher Day.

A few weeks ago we decided to bite the bullet and replace our fridge and water heater.  Both were quite elderly* and we figured it was a much better idea to proactively replace them rather than deal with the consequences of them dying spontaneously. We figured all the other appliances could wait to be replaced until they actually died.

Well, about 2 weeks after replacing the fridge, our dishwasher started leaking. Awesome. I swear they’re going to start greeting us by name at Warner Stellian soon…

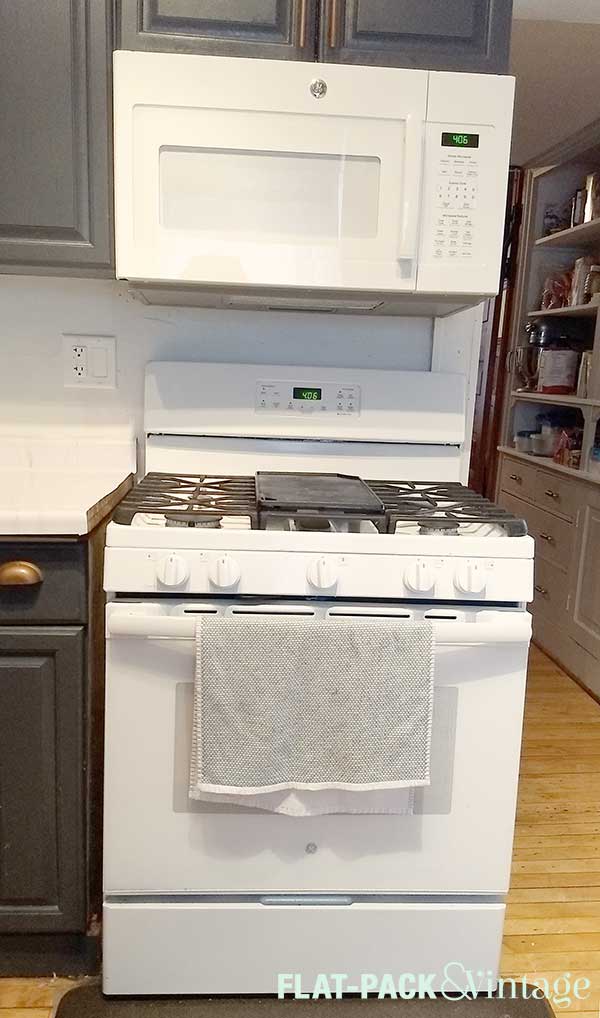
While we were dishwasher shopping we also decided fuckit, let’s just replace the microwave too.  Maybe if we replace the microwave and dishwasher with new (ie more efficient) models we’ll stop tripping the breaker when we run them at the same time.**

After much pondering, we picked out our latest batch of appliances and got delivery/install scheduled for last Tuesday. My mom is currently staying with us and watching Wesley during the day, so she got to be the one to field the delivery.

Being a weirdo, I get super excited about getting new appliances.  I’ve also gotten spoiled over the past 5+ years of living with a dishwasher so the week without one has been a bit of a bummer.  I seriously could not wait to get home and check out our new, shiny dishwasher.

Well, if you follow me on Facebook, you’ll know that this is what I actually came home to:
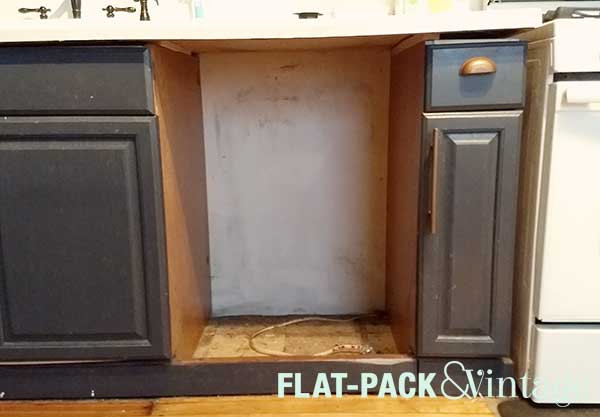
Whomp whomp.

The delivery people came, hauled out the old dishwasher, but when they went to haul in the new dishwasher they discovered it has been significantly damaged.  “Smashed in” is what I believe they told my mom.

Sigh.

So now we have a gaping hole where our dishwasher once was, which led to the following exchange with a friend:

Me: Do you like our new dishwasher?!

J: … Does Matt actually fit in there?

It’s a pity Mort doesn’t have opposable thumbs, because he hung out in this new “cave” quit a bit.

On the bright side though, our new microwave arrived that day and was installed just fine.

This gives us a 50% chance success rate with kitchen appliance delivery.  Now, I’ve been out of school for a little while now, but I’m pretty sure 50% is a solidly failing grade.

A week after our dishwasher disappointment, we attempted delivery round two.  Luckily, unlike with our stove fiasco, this was the end of it and we now have a brand-spankin’-new dishwasher.

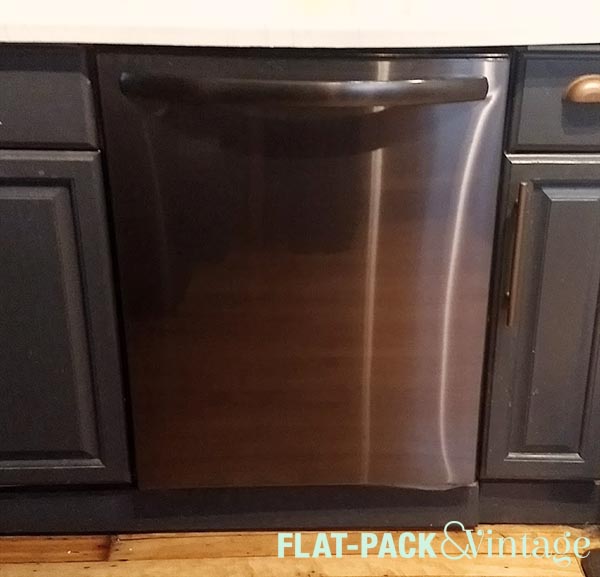
We debated back and forth about the color a bit.  All our other appliances are white, but I really wanted the dishwasher to blend into the cabinets.  I also plan on keeping dark base cabinets whenever we do our big kitchen makeover.  The color we ended up going with was “black stainless.” It’s not as industrial looking as true stainless and has more depth to it than plain black.  I’m totally diggin’ it.


*Our existing water heater was installed in 1982–our plumber was pretty impressed it was still running.

**We also can’t run our toaster and electric kettle at the same time.  Old houses are like a game of electrical Russian Roulette.


New Fence!

We’ve slowly been attempting to make our backyard look less like a junk heap.  We’ve already demo-ed the weird lean-to/shed thing, destroyed a decaying garden bed, and seeded new grass. After a fairly windy storm we had to stabilize our elderly fence before it collapsed and took out a pedestrian. Even with the extra support in place we still planned on completely replacing it ASAP.

We figured the perfect time to get it done was while we were out on leave. We had no intention of DIYing this one*, so it wouldn’t be added work on our end but we could still be on hand for the contractors if anything came up.  Last Thursday a team of two guys showed up, knocked the old fence down, and hauled the poor decrepit bits off to rot in piece.  They also set the new posts then left for the day so the cement could set.

We sort of assumed they’d be back the next day since they didn’t actually tell us when they left and when they’d be back.  By mid-day on Friday they hadn’t shown up so Matt called the company to see what the actual plan was.

Monday.  They would come back Monday.  This was perfectly fine, I just wish we were kept in the loop. We’ve had this same issue with other contractors too.  I realize some of the work we’ve had done is weather-dependent, but I’d still appreciate a ballpark estimate. We actually gave up on a mason because we had gone back and forth for a couple months and he refused to give us any idea of when he would actually be free to do the work.  For the fence it would have been really nice to know X was expected to be completed on day 1, but then the cement needed time to set so they’d be back 2-3 days later to do Y. I feel a little bad when we have to call to ask about a time frame because we aren’t actually trying to rush them, we just want to know what the plan is.

Anywho….

On Monday the men were back to install the the privacy part of the fence.  The battens went up, the support posts were cut to height, and the gate at side of the fence was installed.

YAY! We have a fence that actually looks nice! If we didn’t live on a busy-ish street we probably would have demoed the old one ages ago.  The privacy (and mild sound-blocking) the fence provided against the traffic was really nice though.  Having a kid put us on a timeline for a full replacement since having a sturdily-fenced backyard by the time Wesley was mobile was non-negotiable.

We also decided to keep the chunk of chain link fence that runs right through our giant lilacs (at the back of the yard).  The lilacs probably would have gotten damaged (at the very least, severely pruned) if we removed it and a new fence would have either smashed up against them on on side or hidden them from our view.  The chain link is pretty well camouflaged by the bush though so it’s not a big deal.

A cedar privacy fence was considerably more than we expected, but we suspect that due to the amount of lumber involved.  Our fence was 60′ long and 7′ high and cost just under $4k.  Ouch, but like I said, necessary. If you’re feeling ambitious, Vintage Revivals just DIY’ed a similar sized fence for around $800!


*Given the whole pregnancy/birth-recovery/adjusting-to-an-infant thing which was pretty much our entire summer plan.

Save

Save

Save

Laborious Labor Day

Ok, not all that laborious, but Matt did go on a small project rampage on Monday.  I think he was trying to get some stuff out of the way because he was going to be stuck on double babysitting duty on Tuesday.  I has a sedation dentist appointment and basically wasn’t allowed to function* for the entire day so not only did he need to solo-parent Wesley, he also needed to babysit me. Luckily I survived** despite a nasty fear of the dentist*** and we’re back to tag-teaming projects.

Now that I’m no longer pregnant (wheeee!) I’ve been able to get back to work refinishing the upstairs doors.  We tackled the nursery door first since it needed a little extra repair work. Matt stripped off the golden-oak stain and I re-stained and painted it.****  By Monday we were able to put it back up. Matt also replaced the mortise lock and switched out the black porcelain knobs with the glass knobs I ordered like, a year ago.

It’s also worth mentioning that the light switch cover in the hallway has seriously been off for at least a year. #safetyFirst

Our Winchester Door has also been sitting around with a gaping hole where the door knob should be.  Sure, the door can’t actually open, but I can’t remove it and drywall because I don’t have a good way to replace the baseboard.  Solution: embrace it’s complete and utter doorness. I wasn’t thinking about this door when ordered the knobs, so I didn’t have another glass one to use here.  We did, however, have this gorgeous embossed metal knob from the decaying cellar door in the basement.  Honestly, the embossed knobs are my favorite, but I thought the glass knobs would look better against the dark wood of the upstairs doors.

The final update seems really minor, but I smile every time I see it. The toilet handle in our downstairs bathroom has been acting wonky, so Matt decided to replace it.  Knowing me as well as he does, he chose the fancy porcelain handle option. It matches the faucet handles and as I said, it makes me kind of stupidly happy,

Even though I posted the Master Bedroom Plan, part of me wants to tackle our downstairs Micro-Bath before I head back to work.  It’s such a tiny room that it would actually be doable, but I know Matt wants to finish up the doors first. I may be a little ADD when it comes to projects so it’s probably a good thing he’s here to keep me in line.


*No driving, no attempting stairs, no being left unsupervised with small children, etc

**It actually went pretty well… although I remembered more than I expected too.  I also still panicked when confronted with needles which the dentist was apparently a little surprised by (although I did warn him that I can panic my way through nearly anything). Luckily I did not get belligerent with Matt, which is what I tend to do if someone is trying to coddle me.

***Step 1 in dealing with a dental phobia: find a dentist who’s not a condescending asshole.  This is surprisingly difficult.

****My original plan was to stain both sides, but Matt liked the doors better white on the inside and marriage is about compromise.

Save

Save

Brainstorming: Master Bedroom

This is probably super optimistic since we now have a demanding baby in our household, but our next project room is going to be the master bedroom.  This room is way overdue for some TLC since we’ve done nothing to it since we moved it.  Heck, Matt just fixed the closet door so it actually stays closed!

There are a couple reasons I chose to tackle the bedroom next.  Part if it is because we now have a kiddo (whose toys will gradually start taking over the house) it will be nice to have an adult retreat space.  I’ve also been spending more time in this room lately and it’s really hit me just how blah the space is.

masterBefore2

masterBefore1

Yaaaaawn. Also, please pardon the mess.  I didn’t even get a nap in today and had no motivation to style a Before shot.

So what’s the plan?

masterMoodBoard

Thankfully this room only needs cosmetic work so the bulk of the work will be painting. We also need to replace our mattress so we’ll be upgrading to a queen sized bed (and actual bed frame). I also want the headboard to really be a focal point of the room and the entire wall behind it will be painted a bold accent color. After that it’s a matter of replacing pretty much all our existing furniture and getting a rug that’s the proper size for the space.

Not gonna lie, but this makeover will probably take a while.  I’ll hoping we can at least make a start on the painting while Matt and I are still out on leave.  We’ll see since we’ve got a couple other (smaller) projects we’re trying to finish up too.

Save

Nursery Reveal (for Real!)

Sorry I psyched you out last time, but some things just happen on their own time.  I have a real nursery reveal for you now, although there are still some minor tweaks that still need doing.

Let’s start with a quick reminder of what we started with, shall we?

study1

Ugh.

Acoustical ceiling tiles, paneled walls (you can’t tell they’re paneling in the picture, but trust me), and trim belonging to basic modern construction instead of a Victorian beauty.  So we demoed All The Things, put up new drywall, routed some custom casings, got me sent to the ER, and cobbled together the rest of the trim pieces from stock moldings.

nurseryReveal_5

I opted for a colorful ceiling and muted walls partly because of the ceiling fan, and partly because I figured there would be more busy-ness happening on the walls and floor and didn’t want too much color competition.

Oh, and if you’re wondering if that is a TARDIS blanket on the chair, yes, yes it is!

nurseryReveal_2

I also wanted something fun and whimsical, without being overly baby-ish. The animal portraits are by Yago Partel and actually from a calendar I picked up a few years ago.  I fell in love with the mobile from Haba because it was bright and stimulating for baby, but still pretty artsy.

The chifferobe was apparently built by my great-grandfather and has actually managed to stay in use over the years. I re-painted it, but still feel like it’s missing a little something.

nurseryReveal_4

I didn’t want a specific changing table in the room, but I did want a changing station.  We picked up the cubby organizer from Target and added a bit more structure by screwing on an MDF backing.  I absolutely love the animal bins and they’re great for stashing towels, blankets, and small loose toys.  All the diapering supplies are on a rolling cart, perfect when mom’s a righty and dad’s a lefty.

nurseryReveal_1

Things that still need doing:

  • Install a real closet door
  • Refinish the main bedroom door
  • Hem the curtains
  • I’d really like to move the alphabet wall down a smidge (it’s a little too high and driving me bonkers) but that would be a significant undertaking (and Matt will probably kill me for even thinking about it)

There’s actually not too much left given that we unexpectedly lost about 3 weeks of work time thanks to this kiddo arriving early.  Now that we have a newborn around, it may be some time before the room is 100% done, but it’s mostly there and fully functional so it seemed like a good time to show it off!

Save

Save

Save

Save

Nostalgia

A while back my sister if I asked me I wanted some furniture for the nursery.  She had a changing table and chifferobe, both of which were ours when we were babies.  The changing table was a little big for the room (and not really my style) but the chifferobe was really cute and I remembered growing up with it.  I thought that was kind of cool too, to work in a piece of furniture that I had used as a baby/kid.

Later I was talking to my dad and he was mentioning how happy he was I was taking the chifferobe because his grandfather had made it for him. Whoa.  I seriously never knew that and always just assumed it was something my parents picked up when they started having kids.  I don’t know exactly why, but there is something kind of cool about being able to tell our son that he has furniture made by his great-great-grandfather.

The piece has obviously gone through several makeovers in its 60+ years.  When I had it the frame was white with yellow drawers/door and white numbers painted on the drawers (maybe letters on the door?  I don’t remember…).  My sister re-painted when she took it for her kids’ nurseries and added vinyl numbers and letters.

chifferobe1

Super cute, but the wrong colors for our space.  And the A was totally there when I got it, I was just curious to see how easily the vinyl peeled off.

I decided to keep the frame white and did a quick touch up coat with (of course!) Benjamin Moore Advance (satin) in Simply White.  Kids are tough on things and it just needed a little pick-me-up.  I was really torn on what to do about the drawers and door, but eventually decided on green.  I thought I had a good grasp on what shade I wanted, but, alas, it turned out a little too pastel-y

chifferobe2

Guys, don’t do what I did.  At $30 a quart, Advance is pretty pricey and I didn’t want to buy a new quart when I’m literally using about an 1/8th of it. I should have bought some cheap sample pots but was over-confident.  I ended up going back to the store and asking them if they were able to re-tint it at all.  If you ever need to do this, just be aware that there are limitations to how much they can do based on the pigments and the original base.  I already knew that and just asked them to do what they could.

chifferobe5

This was essentially the color progression as they experimented.

chifferobe3

It’s better, but I have a feeling I may have some sort of color breakdown once the room is more put together and try yet another shade of green.  I’m also debating if I want to add anything to the drawers or door.

Save

Save

Save

All the Trimmings

We have walls, we have a light fixture, and we now have mouldings!

NurseryTrim11

Oh my god it’s finally like a real room.

We started with the baseboards.  Once again I spent a while agonizing over trim pieces (since trying to duplicate 100 year old moulding with contemporary, mass-produced pieces is a bit of a pain).  We had a little more leeway in this room since the upstairs was already a bit mis-matched so I decided to simplify things from when I did the dining room baseboards.

This time I settled on a 3 part baseboard instead of the 4 part plan I used before.  We picked up a 4″ baseboard, chair rail, and shoe molding.

NurseryMouldingDiagram

We really should have started with the plinths, but I was still painting them.  You can buy fancier plinths at the hardware store, but the ones in the rest of our house are super-simple so I made them myself.  I measured the width of the door casings, added about a 1/4″ (seriously, I just eyeballed it) and ripped some down.  We had a scrap board of 10″ select pine so I used that since it would be plenty tall. Then I took my palm sander and rounded down all the edges and corners, primed and painted… and waited for them to dry.

While the plinths were being finished, we put up the 2 main parts of the base.  We started with the bottom layer, went around the entire room, then added the top layer rather than fully finishing a wall at a time.  My best advice for installing baseboards (or pretty much any trim) is to just tack it in place until you’re sure all the edges/corners line up well.  If there’s an oopsie down the road it’s way easier to pull off and fix.  Oh, and also start with your longest pieces first so if you cut them too short you can still re-use them elsewhere. We were able to leave the right amount of space for the plinths because I had extra one that was originally intended for backup but had a pretty nasty split in the wood.

NurseryTrim5

Once the baseboards were up we were able to add in the plinths, followed by the vertical door casings.  I was a little paranoid about installing them because my dad and I custom routed them and didn’t have any extra. Matt totally rocked it though!  We went with a simple header cut from a 1×6 since that’s what’s in the 3rd bedroom.

NurseryTrim13

SHAZAAM! We have door mouldings! (and a door that needs to be refinished, but that’s a project for another day)

After the doors, we moved onto the poor, naked windows.

NurseryTrim4

Here we started with the sills, which sound intimidating, but they were really easy. First we figured out the depth of the other sills in our house and ripped a couple boards down to that measurement.  Then we measured the depth of the window opening + the depth of the casing (A) and the width of the casing + 1/2″ (B).  This gave up the dimensions of the cutouts we needed to make. The length of your board will be the window width + (B x 2).

SillTemplate
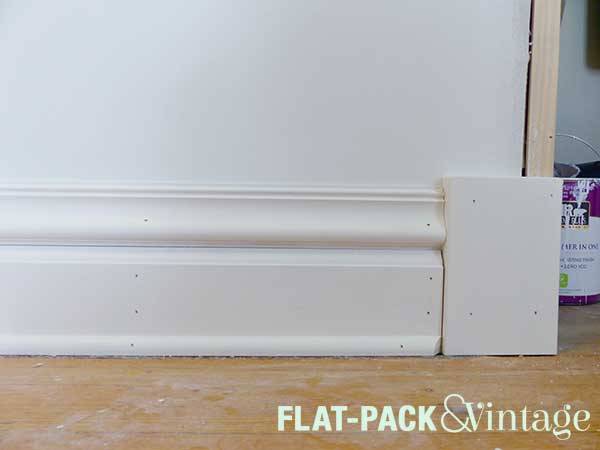
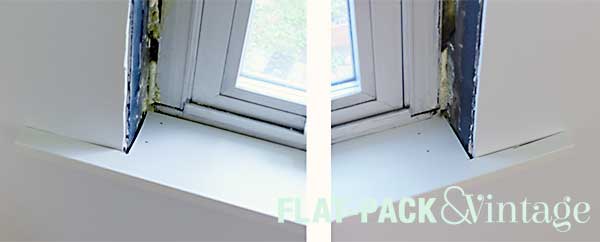
I actually added a little more than a 1/2″ to the ends and cut it down after we dry-fit the sill.  We used a jig saw to cut out the corners.  It’s a pretty crappy jigsaw and we probably didn’t have the right blade for this this so my cuts were a little wonky.  I also used my palm sander to slightly round off all the edges and corners.

NurseryTrim3

NurseryTrim6

All of this will get covered by the window trim pieces though so we’re ok!

After the sills were nailed down, we added the inside trim.  We found a 3 1/4″ baseboard which was shockingly perfect. Yes, ok, there’s a bit of a gap in the middle, but our house isn’t square/level/standard in anyway so we’re used to these things.

NurseryTrim7

I think it’s easiest to start from the top when you’re dealing with mitered cuts like these.  You’ll know the top piece fits snugly and then you only have 1 mitered edge on the side pieces and shave off extra length with just a straight cut until those fit snugly too.

NurseryTrim8

NurseryTrim9

Next we added the vertical casings and the header. Thanks to our old house and wonky walls, there’s quite a bit of gap between the header.  We’re going to add some wood filler and no one will ever be the wiser.

NurseryTrim15

Finally we added sill base (there may be a technical term here, but I don’t know it….).  Again, we just copied what was happening in the 3rd bedroom which was simpler than the trim in the rest of the house.  Here we used a 1×4 cut to an 18 degree angle on the ends… I don’t know how they came up with 18 degrees, but it’s consistent with the other small bedroom.

NurseryTrim12

And that’s the window!  Lots of parts, but mostly easy cuts.

nurseryTrim14

After all the trim was nailed up Matt went around and caulked everything.

CaulkAllTheThings
Original image via Hyperbole and a Half

I have to give a HUGE shout out to Matt for pretty much everything in this room.  I may write the blog, but he’s been working so hard on and picking up my slack when I need a nap break.  He’s really been the moulding (and painting, and ceiling fan) champ here and installed everything with pretty minimal help from me.


Save

Save

Save

Save

Save

Save

Save

Save

Save

It’s HERE…. Again

You know how we finally got the back-ordered ceiling fan a couple weeks ago?  We went to put it up the other weekend aaaaand it was missing a part.  Awesome.

Not gonna lie, my first thought was holy shit Matt just threw away part of my fan.  He had been cleaning up all the excess packaging that’s been taking over our living room between baby-related deliveries and home improvement crap and he already threw out the styrofoam packaging from the ceiling fan box.  He insisted he checked everything he threw out for stray parts beforehand and I have no reason not to believe him.  Buuuut I still may have went slightly catatonic and then decided I wanted ice cream (Izzy’s!) for dinner.

First I called Lowes, because that’s who we ordered it from.  They then contacted Hunter (the company who made the fan) who gave them a reference number which they passed on to me so I could call Hunter back.

The first person I talked to didn’t care about my reference number and seemed very confused as to why I was even calling in the first place.  She eventually said she was going to transfer me over to parts but instead I got trapped in the Automated Phone System From Hell.  If you keep pressing zero enough times you can usually get to a real person and thankfully that worked this time. I may handle automated phone systems rather badly. The second live person I talked to was actually helpful but apparently shipping just the missing part was impossible and then had to send a whole new fan.  Over-night shipping was also apparently impossible but she eventually caved and requested it be sent out as 2 day shipping (which translates to 2-5 days).  We did end up getting the new fan on Saturday though–score!

Matt handled the installation by himself (I may have possibly been napping….).  I went up to check on things as he was nearing the end and he had a laundry list of complaints.

Some of the screws provided did not actually fit, but he was able to scrounge spare screws from fan #1.

One of the screw holes for attaching the fan blades was miss-threaded making it damn near impossible to get the screw through.

The biggest issue though was installing the plate with the socket.  It attached with 3 small screws that were practically impossible to line up correctly.  It seriously took him a solid 1/2 hour to get that one piece in, it was also accompanied by a level of swearing straight out of the beginning of Four Weddings and a Funeral.

The lesson learned from this is pretty much whoever designed this fan only designed it to be pretty.  They also possibly designed it to give electricians more business because it is a giant PITA to install on your own.

But daaamn is it gorgeous!

ceilingFan

It came with an LED Edison bulb that’s pretty wussy so I’m going to try and swap it out for one of these pretty LED globe bulbs from IKEA.

Save

It’s HERE!

No, not the baby, that would be waaaay too early, but my ceiling fan for the nursery is finally here!

HunterCranbrook

I ordered it back in February, knowing it was back-ordered until the end of March.  Ok, I can wait.  At the end of March I get a call saying it won’t be available until the end of April.  Arghhhh.  We were ready to paint at this point, but I couldn’t pick out the paint until I had the fan.  At the end of April my already vivid pregnancy dreams started feeding off of my design neurosis and I had a nightmare in which I got shipped a broken and decrepit version of my fan and was told I couldn’t exchange it because it was the last one on the planet ever.  The next day I called up Lowes asking them to check on the status and they assured me it would be ready for pickup the next week.

Sure enough, I got a call last Thursday (also Star Wars Day, our 3rd Wedding Anniversary, and the official start of my third trimester) saying it was FINALLY ready for pickup.  The employee who called me was officially my BFF of the day.

Matt was hoping we could just pick up paint while we were already out.  Nope, sorry, hardware stores are possibly the worst place to choose a paint color.  That’s why they have all the swatches, so you can take them home and look at them in the same light you’ll be using the paint in.  Luckily for Matt, I already knew roughly what colors I wanted, I just needed to narrow down the exact shade so we were able to pick up paint first thing on Saturday and get to work.

Matt started on the ceiling while I started prepping the radiator.  My spray booth game is really improving.

nurseryPaint1

How awesome is that ceiling???? The color is Breaktime by Sherwin Williams (flat finish). I think it’s bright and fun without being too candy-colored like sooo much kid stuff.

The radiator was currently a flat beige-y color.  Once we get everything painted and the bright white trim installed it was going to look really dirty.  I went over it with 3 coats of white spray paint* (satin finish). Soooooo much better!

The ceiling and radiator took up all of Saturday, then Sunday we were able to start the walls! Painting goes MUCH faster when you don’t have trim to cut in around so we were able to finish the walls in one day.

nurseryPaint2

We have paint!  It looks pretty white, but it’s Palest Pistachio by Benjamin Moore (eggshell finish) and has a very faint gray/green tinge to it.  The next step is getting all the baseboards and casings primed, painted, cut, and installed.  Ooof! Our goal is to have the baby room looking like an actual room (instead of a construction zone) by my baby shower at the end of the month.  I think we can do it!


*Don’t worry, I had open windows and a full respirator.  I would have pawned it off on someone else, but spray paint is a technique and I have trust issues.

Save

Save

Save

We have WALLS!

And a CEILING!

It’s kind of amazing actually.

A few weeks back my dad and brother-in-law joined up for an Epic DIY weekend.  My dad and I kicked it off with some custom door and window casings.  Matt’s brother, Isaac, got in later, so he and Matt were going to tackle the ceiling on Saturday.

Matt and I had already gotten drywall up on the walls, and all the seams taped and mudded.  The ceiling was going to be a far more intensive job though and a little college boy labor goes a long way. The first step was to rent a drywall lift.  My dad was telling me that he and my mom drywalled a ceiling without a lift back in the 70’s…oof!  It cost us $15 to rent a lift for the most of the day (from Menards).  Totally worth it.

I may have mentioned before that my dad and I make up team Crazed Perfectionist.  We watched Matt and Isaac for a little bit to see if they would need extra hands.  They didn’t really, but we started getting a little twitchy about the lack of crazed perfectionism, so I suggested (firmly) for a division of labor.  Team Crazed Perfectionist would handle the measuring and cutting, and team Grunt Labor would handle the lifting and installing.  This actually worked out pretty well, especially since doing anything on the ceiling gets tiring pretty quickly so this gave team Grunt Labor a bunch of mini rest breaks.

We’re still pretty new to drywall so I’m not going to do a tutorial (I’m sure they are far more knowledgeable people out there who have already written them).  I do have a few useful takeaways we learned though.

  • Suck it up and rent a drywall lift!  We didn’t bother with it for the walls because we installed the sheets vertically, but it was MUST for the ceiling.  If you’re installing sheets on the wall horizontally, you’ll probably want it too.ceilingDrywall1
  • Align the factory edges of your drywall as much as possible.  The edges of a sheet of drywall have a very slight indent in them to help compensate for the thickness of the tape and mud.
  • Mark the ends of your joists on the walls, then use a chalk line to connect the marks to show you where to put your screws.  It’s MUCH harder to eyeball a straight line when you’re balanced and bent on top of a ladder.

ceilingDrywall2

  • THIN coats when mudding.  Seriously. Yes, if it goes on too thick you can sand it down, but drywall dust is horrendous. Thin coats should mean less sanding AND less dry time between layers so you can get more done in a day.
  • Once you’re at the sanding stage, try and tarp off the room as best as you can.  We hung plastic sheeting over the door and kept the door closed at all times.

ceilingDrywall3

  • We didn’t try this, but had multiple people suggest a drywall sanding sponge.  Wet sanding should help control the dust and joint compound is water soluble so it’s supposed to be faster.
  • We tried a sanding attachment for our shop-vac.  Awesome in concept, but according to Matt it was a little unwieldy.  The head would spin unpredictably making things a little difficult.  He did notice an improvement in the dust control though, so it probably depends on the person if they like it or not.
  • Get a bag filter for your shop-vac!  You for sure want one rated for drywall dust because you will be vacuuming up a LOT.
  • Wear a mask and full goggles when sanding.  I really can’t over-state how awful drywall dust is.
  • Make sure you keep a good moisturizer handy.  Drywall is incredibly drying on the skin.

ceilingDrywall4

You can see we ended up with a tiny little strip of drywall, which is usually frowned upon.  Based on where our joists were positioned, this made the most sense for us.  We were able to screw the edges of the second-to-last board directly into the joists and the last little strip was light enough adhere with construction adhesive (because we were drywalling over existing plaster instead of bare studs).  We screwed it in too, but there wasn’t a joist there which we would have needed to secure a larger piece.

ceilingDrywall5

After making it though the weekend without killing anyone, Matt kept working away on the mudding/sanding the seams.  It’s a process and, quite frankly, it sucks.  Actually, the mudding’s not so bad, but the sanding is possibly the worst home improvement task ever.  I was really happy to have solid excuse not to help.  Once Matt got things sanded, he would call me in to give the Crazed Perfectionist opinion and then I’d go around with a pencil and circle all the areas that needed more work.

Two weeks later we were ready to prime!  I’m specifically holding off on installing trim until the room is fully painted.  Painting goes SO much faster when you don’t have to worry about cutting in!  We knocked out all the walls in about an hour one evening after work. Unfortunately, it was starting to get a little dark at that point and the “fancy” bare drywall primer is nearly impossible to see until it dries so our first coat turned out super crappy.  Oops.  It also highlighted some spots that still needed a little extra smoothing (though not as many as I expected!).

The next evening we tackled the touch-up spots and the ceiling.  We’ll take another look at everything in full daylight, but it seems to be going well.  I’m planning another coat of regular primer just so we don’t get any surprises when we paint.  And when will we get to the actual paint?  Well, my ceiling fan is now back-ordered until the end of April and I need the fan to decide on the ceiling color and I need the ceiling color to decide on the wall color.  Matt just sort of shakes his head and asks why we can’t just get a white fan.  I tell him he because he married a crazy person which he really should have been aware years ago.

Until my beloved fan comes in I’ll be sanding (with a mask!), priming, and painting all the trim pieces.

Save

Save

Save

Save