Were you inspired by our faux tin ceiling? I hope you were! Ceilings are an all too often neglected part of the room. People spend their time picking out paint and wall coverings, choosing the perfect flooring and furniture…. and paint their ceilings the off-white color of the ceiling paint right out of the can…. why? You should think of your ceilings as a 5th wall, just as deserving of attention as all your other walls.
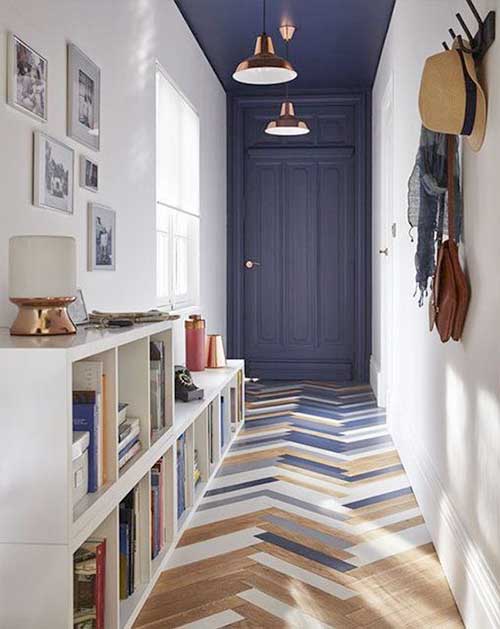
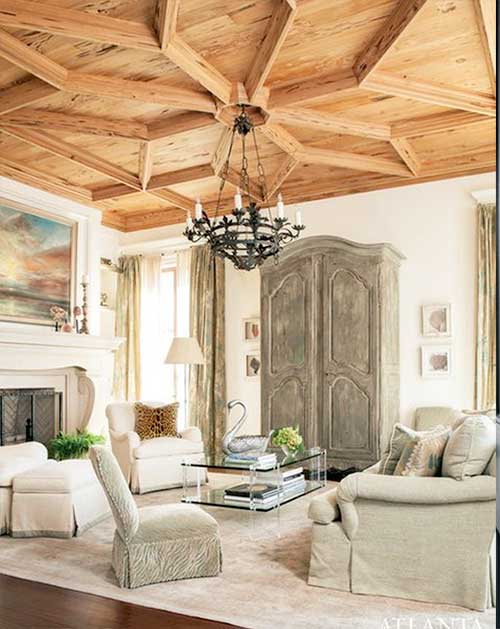
If you’re feeling like showing your ceilings a little love, here’s a roundup of inspiration.
Maybe you’re not feeling the paint, but wallpaper doesn’t have to be be just for the vertical walls. Julia Rothman’s Daydream is a pretty perfect pattern for a ceiling.
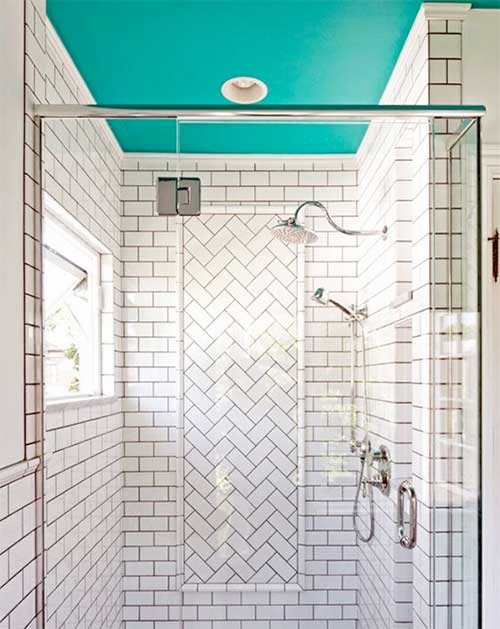
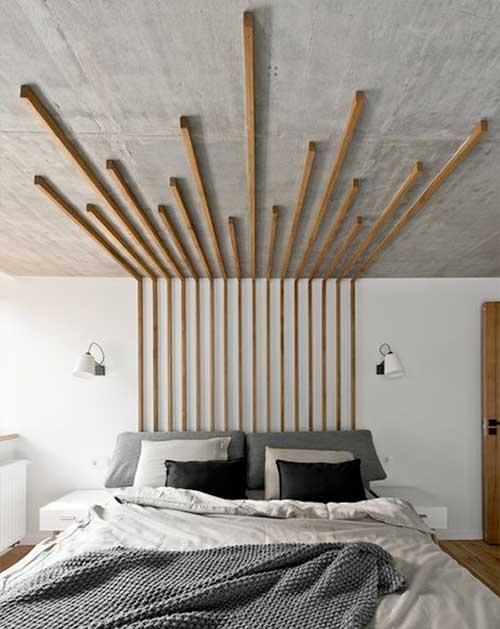
If you’re not up for covering the entire ceiling you always just add a focal point. This one has the added bonus of being an amazingly dramatic headboard too.
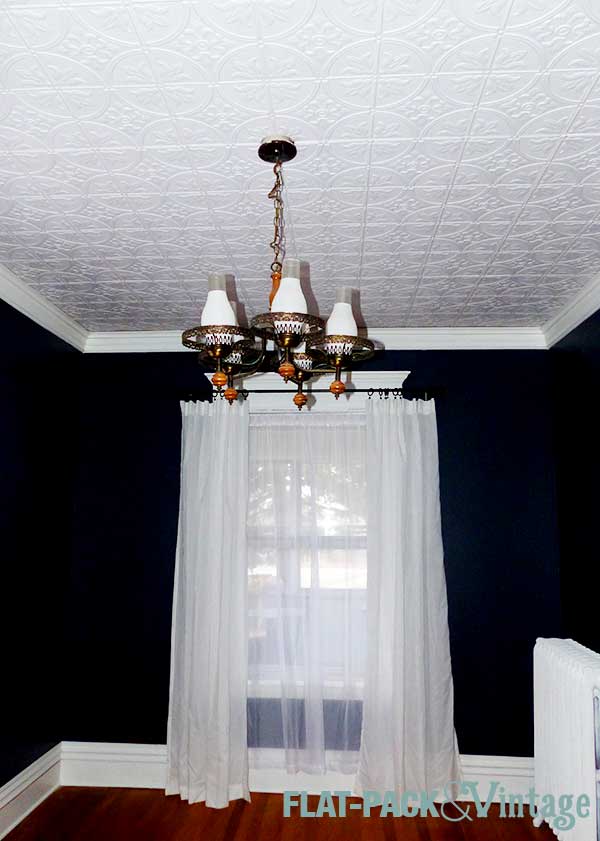
We have a ceiling!!!! I have been positively pumped for this moment ever since I decided to add faux tin panels to our dining room ceiling!
Why faux tin? Tin ceilings are fairly period-appropriate for the house but legit tin is super pricey and would need to be nailed up. Plus, the fake stuff is super easy to cut and manipulate–scissors and glue is all you need. I also wanted the ceiling to remain white, like someone had painted the tin (which is totally even a thing) and that seemed like a waste of good tin. If you’re feeling super hard core though, check your local salvage places for tin panels. If you’re local, The Mall of St Paul on has some and I would assume Architectural Antiques in Northeast Minneapolis has some too (I got distracted by doorknobs last time I was there…. omg that place is pure heaven).
If you’re going to jazz up a ceiling with faux tin, here’s what you need.
Tiles in your pattern of choice (there are loads of options!)
Locktite Power Grab (you need an adhesive that holds instantly because gravity)*
Caulk gun
Scissors and utility knife
Chalk line
Measuring tape
Straight edge
Another person
Yup, that’s about it.
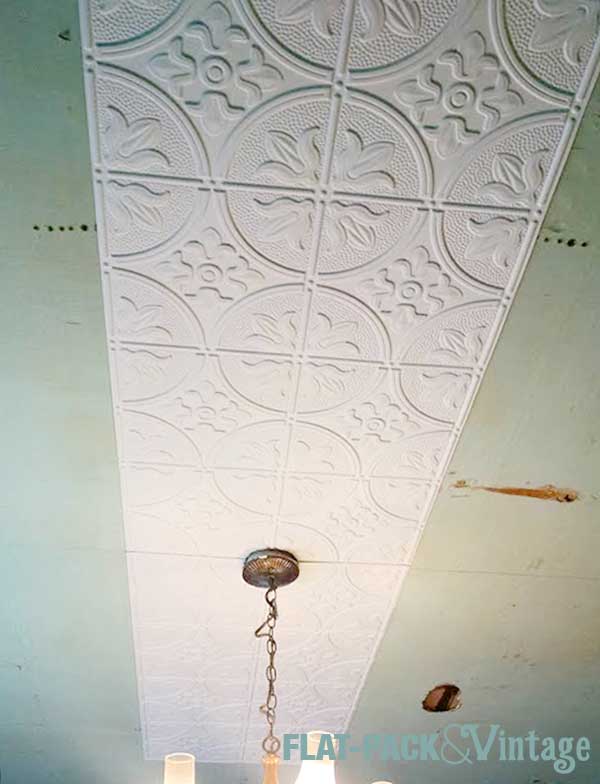
We had ordered 160sqft of tile and had 150sqft of ceiling, so we didn’t have a ton of wiggle-room in how the pattern fell. Thankfully the electrical box for the ceiling light was already nearly perfectly centered.
Then we chalk-lined the center lines on the ceiling….and then adjusted them ever-so-slightly to make sure the pattern was centered on the light.
We followed the directions that came with the tiles and ran a bead of adhesive around the perimeter, and then in 3 cross-shaped sections in the middle. (White-on-white isn’t so visible in photos, so I traced the glue lines in blue)
We started in the center, cutting out a semi-circle out of 2 panels to sandwich around the light fixture. Ideally you should cut the power and take out the fixture, but we’ll be replacing this one soon, we just don’t have the new one yet. #poorplanning
If you’re working with 2×4′ panels it’s really a two person job. Because the panels are very thin, they’re also very bendy so having an extra set of hands to both support the other end and help line up that end is incredibly useful.
Depending on the shape of your room and the placement of any fixtures, you could start in a corner. I just wanted to get our ceiling fixture centered on the pattern. You may want to sketch up a quick layout too so you can figure out where the panels will fall. Because our room was a simple shape and our light fixture was nearly perfectly centered, I was able to just visualize the layout and go.
From there we added all the panels that wouldn’t need to be trimmed down. Because the panels are designed to interlock, as long as you get the first one well-placed, the rest should follow suit.
And then filled everything else in.
(sorry for the ucky pictures… we were working on this mainly after work so natural light wasn’t on our side)
These panels are super easy to cut–scissors will work just fine. If you’re not putting up crown molding (although I would suggest it) you may want to use a utility knife and straight-edge for your cuts. It did take us several nights of work to get them all up, mainly because the caulk gun started to give me blisters, so we’d max out at around 5 panels per night.
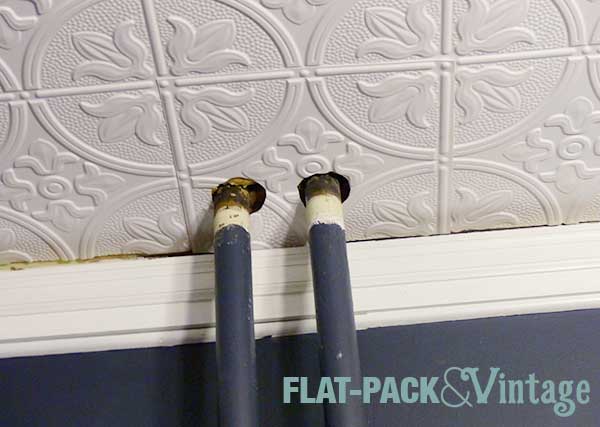
We saved the panel that would go over the radiator pipes for (second to) last because we figured it would be really annoying to get the cutouts just right. We cut out one of the squares from the pattern so we had a big gap around the pipes. Then I tested the cuts on some poster board and used that as a template. Using some of our scrap pieces, I used a straight edge to cut out a single square (I cut just to the outside of the pattern sections that overlap so it would fit into place) and traced my template onto there. Now it was much easier to manipulate a single square around the pipes. We wedged it into place and pulled down the edges to add the adhesive (it would have gotten everywhere if we had put the adhesive on first). Sorry I don’t have more pictures of this… I got sucked into the process and neglected my camera.
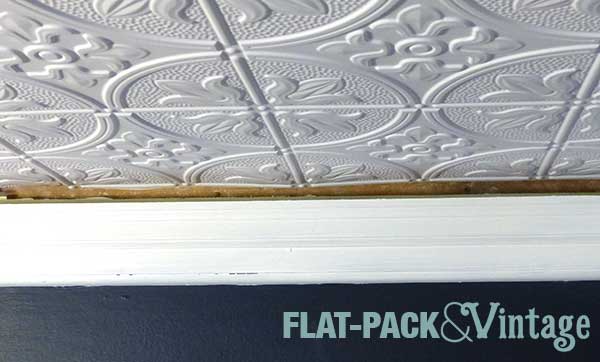
Because the previous tiles were stapled onto 1×2’s we were left with a small gap between the crown molding and the ceiling. No bueno.
We could have just moved the existing crown up, but I decided to add on to what was already there. I found some approximately 1.5″ cove molding at Menards (I can’t find it on their site, otherwise I would link) which was exactly what I was looking for! Now the crown molding sort of curves into the ceiling.
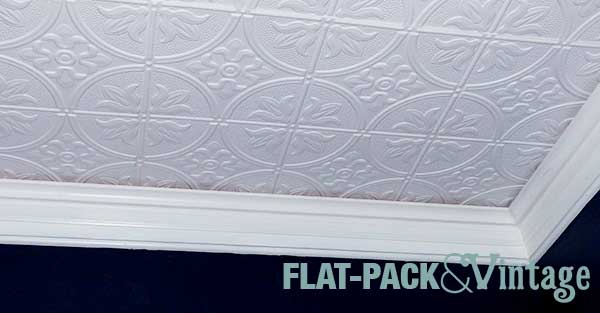
Crown molding is an absolute beast to put up by the way. It’s an exercise in geometry and I’m pretty sure luck plays into it as well. Uneven, not square walls make it especially beastly. Basically I’m saying I’m not even remotely qualified to give you a tutorial on installing crown molding because we’re not even entirely sure how we managed it at this point. There are tons of tutorials out there on youtube though. Good luck.
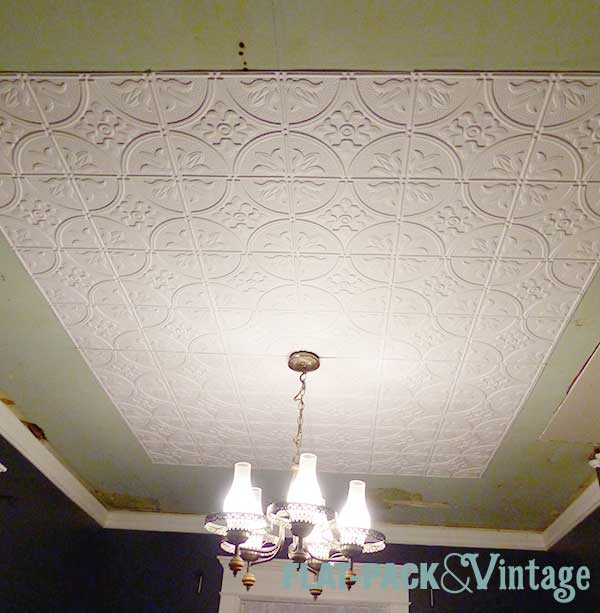
And now we have an actually nice looking ceiling! Pretty amazing right? I think it’s amazing a least, so please just humor me here….
The electrical box for the light sticks out a little bit because of the drop in the previous ceiling, but we should be able to find either a canopy or medallion that will hide that. Our new light fixture has been ordered and is on its way so the end of this makeover is in sight!
*You’ll need LOTS. I originally picked up 3 tubes, then went back for another 12… we ended up using 11 total for our 150sqft ceiling
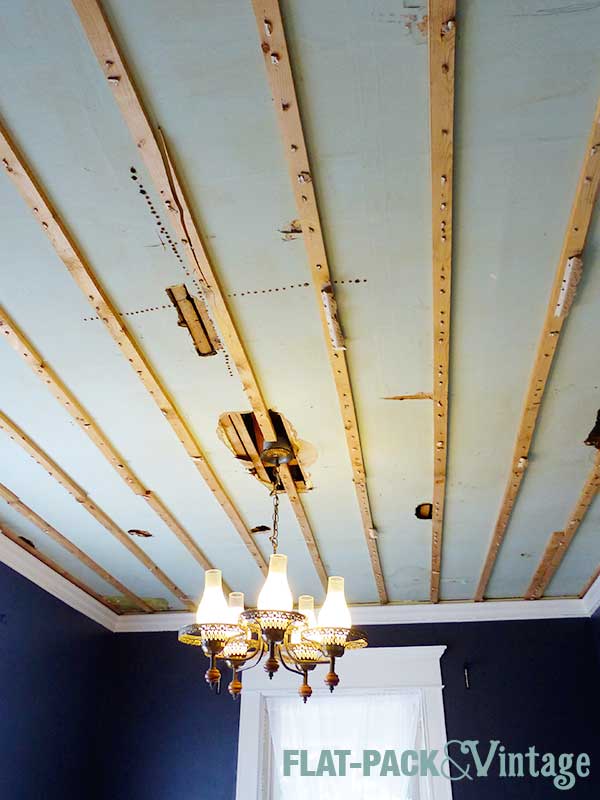
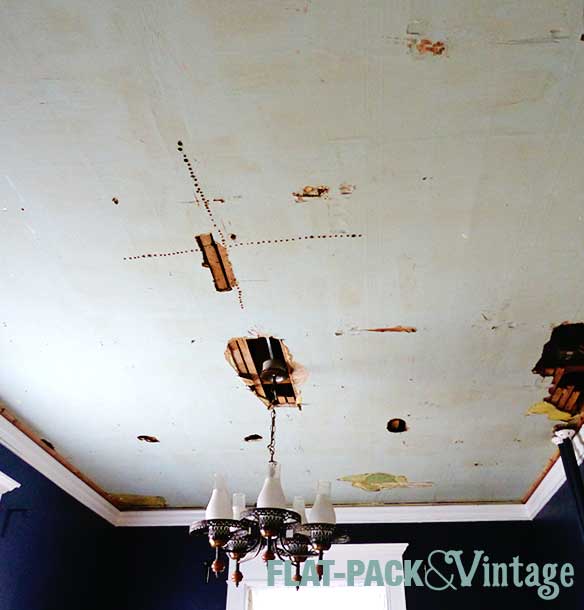
Our dining room ceiling was pretty sad when we moved in: fugly acoustical tiles and unfortunate saggy bits. Something needed to be done.
I pretty much assumed that there was some reason that there were acoustical tiles there instead of plaster, so I wasn’t terribly hopeful for the condition of the ceiling underneath. I figured the safest course of action would be to plan on covering the ceiling. Added bonus, a faux tin ceiling would be a pretty snazzy, and fairly period-accurate detail for the house and it would bump up the formality of our dining room a bit.
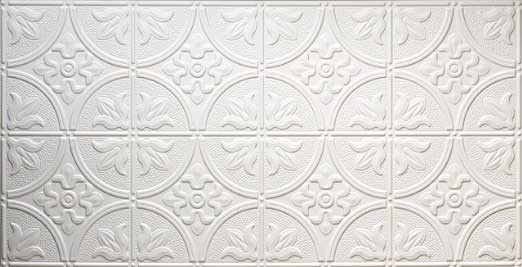
After doing some research and crowd-sourcing ideas from Facebook, I decided on this pattern:
It was one of the more affordable options (yay!) and after looking at a few companies who still used the same patterns they did back when they made actual tin ceilings, this one popped up a lot. You can find it in several different scales, but I opted for the 2-by-4 so each square on the panel would be roughly 1sqft. This was the same size as the existing titles so I already had a good reference for how it would look.
Immediately after moving into the house we had several things tested for asbestos, including the ceiling tiles. I knew we were planning on ripping them out and I wanted to be sure it was going to be safe to DIY. Thankfully the test results came back negative so we were good to go!
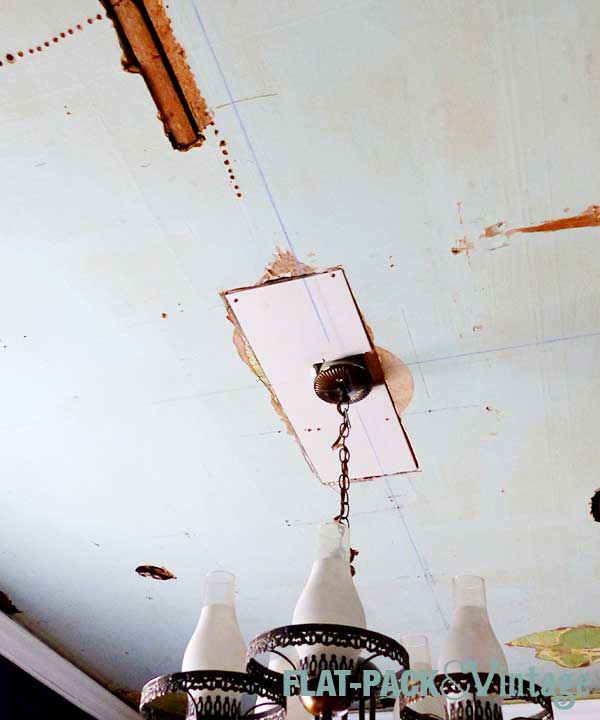
My back has been killing me for the past couple weeks so Matt removed the ceiling while I curled up with a heating pad and researched massage therapists. And yup, it was more-or-less what I expected to find underneath (except there was modern wiring!!!!)
We originally thought we were going to keep the 1x2s so we wouldn’t have to mess with the height of the crown molding. This did mean we had to pull out all the staples, which Matt did over the course of a couple evenings.
Then the tiles arrived and we re-assessed matters. After going back and forth a bit we decided that prying out the boards and semi-patching the holes would make putting up the tiles way easier in the long run…. so Matt went to work prying off the 1×2’s. It probably wouldn’t have been so bad except a former owner of this house was clearly a strong believer in overkill so a number of nails holding up the boards were HUGE.
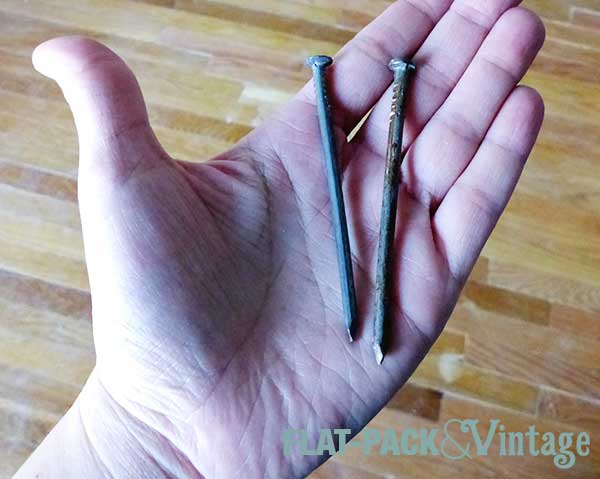
Matt pulled out most of the boards without incident, but there were two runs that were clearly put up before the crown molding was so there wasn’t enough space to pry the nails entirely out. We tried a metal hand saw, but it while it might have worked on a sheet of aluminum, it wasn’t going to get through a chunky steel nail. So we went shopping.
There are some good options out there, like reciprocating saws and the Dremel Multi Max, but we didn’t want to spend a lot. We eventually settled on a pair of 14″ bolt cutters which were just small enough to fit in the little gap we made after prying the boards as far away from the ceiling as we could.
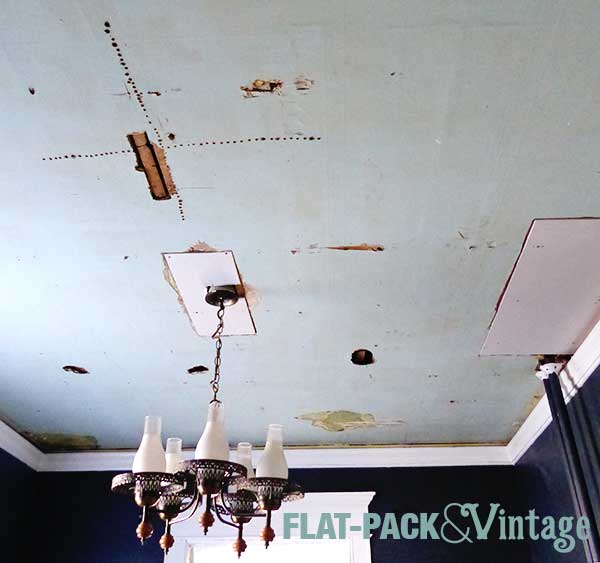
After prying off all the boards, we had to deal with the two biggest holes (we decided the smaller ones shouldn’t be a serious issue). Matt removed some extra plaster to make the holes squarer and then we cut and screwed up 3/8″ drywall. We didn’t bother taping and mudding because it’s not going to be visible, we just needed a solid surface to glue the tiles too.
As with any project, prep-work is half (or possibly even three quarters) of the battle, but all the extra work should make the tile install go much smoother.