And Then Our House Rebelled

Image via Giphy

Around 3:30am on Saturday our smoke detector decided to lose its shit.  It started beeping and loudly announcing “low battery!” Around 4am Matt decided to go an rip out the batteries.  That was when he discovered that the smoke detector in the hallway is hardwired. Yup,  our smoke alarm woke us up at 3:30am because the backup battery was bad.

Luckily we had extra batteries, so Matt grabbed a replacement…only to find that the previous battery was also rather corroded and the gunk left on the battery connectors was now impeding its ability to sense the new battery.

Now, I’m still in bed at this point so all I hear is Matt shuffling around the house like he’s playing some twisted game of Marco Polo with the smoke alarm. Then the alarm suddenly starts shrieking “Fire! Warning carbon monoxide! Fire! Warning carbon monoxide!” I start laughing like an idiot because now I’m convinced our smoke detector is just straight-up broken and of course that would happen at 4am.

Turns out Matt hit the test button to see if that would act like a reset and get the alarm to recognize the new battery. It didn’t work. Obviously.  So now it’s 4:10am and I start googling how to remove a corroded battery because it’s either that or flee to a hotel.

In case you’re wondering, vinegar will clean off battery corrosion. You should really use gloves/eye protection, and of course be very careful around the electrical workings of anything–especially when it’s still connected to power.

You’re welcome.

After Matt and I properly woke up for the day, we went on a walk to get breakfast since we’re having a January heat-wave at the moment.* When we got back, I went to haul in the baby gear and the baby, and Matt stayed out to salt the walkways. I left Wesley snoozing in his stroller next to the door while I dropped the diaper bag and pastries inside, then turned to go back out and grab the baby.

Only the backdoor wouldn’t open.

I checked the locks. It was unlocked. I fiddled with the locks (both the deadbolt and the simple lock for the latch we never use). Nothing. Was it stuck on something? Nope.

W.T.F.?

I finally went out the front door, walked around the back and tried to shove it open vs pull it open. No dice. So I tried and force it open with my shoulder TV cop style. Ouch. Finally I gave it a good swift kick (just to show it who’s boss), collected Wesley and schlepped around to the front door.

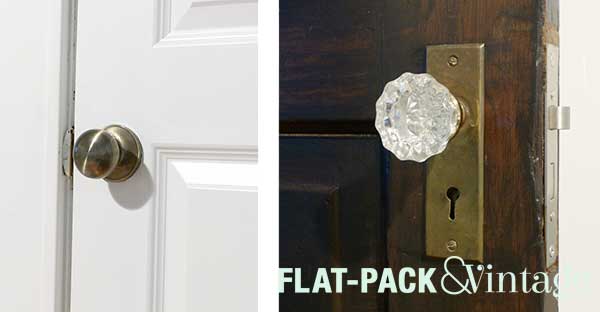
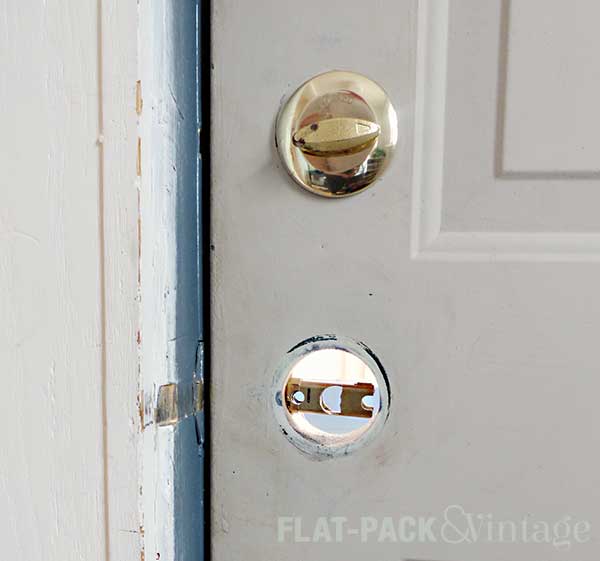
When Matt was done salting, he repeated everything I had just tried and nothing worked for him either.  It turns out that the bottom doorknob (which controls the latch) had inexplicably broken, so the knob could no longer retract the latch. This is a vital part of being able to open a door.

Step 1 was to run to the hardware store and buy a new latch set.  I also picked up a matching deadbolt because I really didn’t like the existing brass one we had so hey, excuse to update! We thought Step 2 would be as simple as taking off the door knob and wiggling the inner workings around. Nope. The inner workings were well and truly busted.

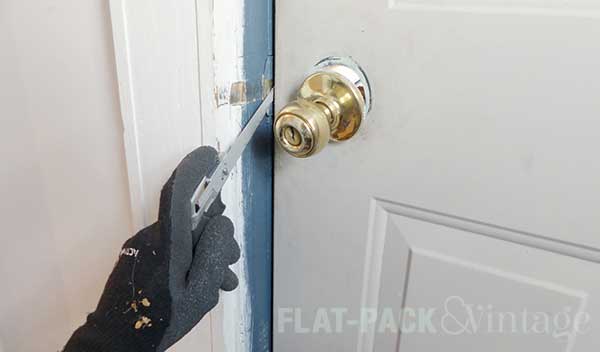
Matt went through our tool stash to try and find something he could shove between the frame and the door to push the latch back in,** but it still wouldn’t budge.  He asks me if I have any brilliant ideas, to which I reply “sure” and then immediately get to googling.***

It turns out this sort of thing is not unheard of and found a fairly lengthy thread in a DIY forum dedicated to it. Long story short, if your latch is properly busted (like in our case) there isn’t an easy fix. The general consensus is 1) don’t bother taking the door off the hinges because that often doesn’t help and 2) either bust out your hack saw or call a locksmith.

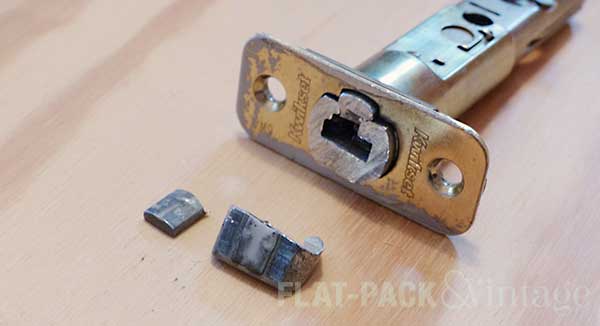
We chose the hacksaw option and it took Matt around an hour to cut through.

(We set the knob back in place to block some of the draft)

Thankfully installing our new latch and deadbolt was a piece of cake. Matt was very confused because I decided to try Kwikset Smartkey locks that let you re-key them yourself.  They were more expensive that the standard locks, but cheaper than bringing in a locksmith (and we really didn’t want 3 different keys for our house). They are SUPER simple to use to, so we were able to get our 2 back locks on the same key as our front lock in about a minute.

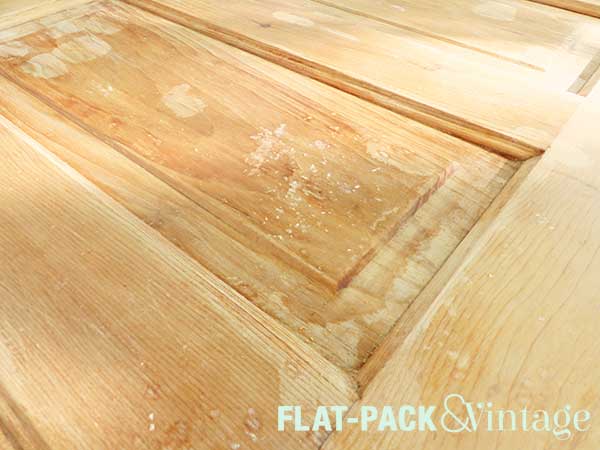
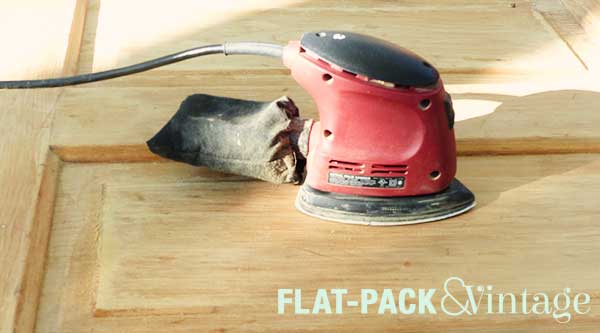
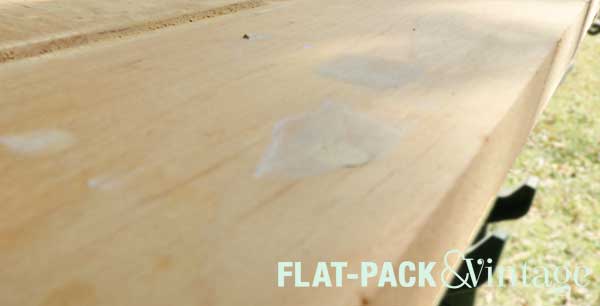
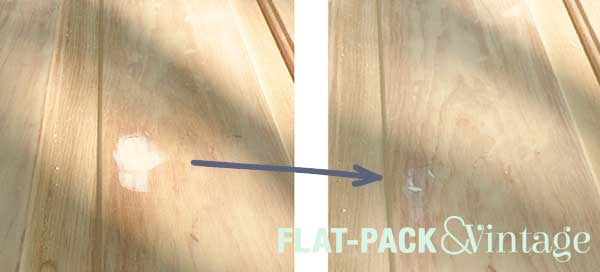
Once the weather legitimately warms up we’ll also paint the the rest of the door frame and repaint the door, since it looks a little sad at the moment.

Matt looked up the security of these locks and it sounds like they’re no better or worse than a lock that would require a professional to re-key. Plus, as one person put it: your house is only as secure as its weakest point and we all have windows.

So that was our Saturday.  We woke up to a demon smoke alarm and later I got locked inside the house. I have a feeling I’ve offended the DIY spirits in some way or else our house has spontaneously acquired a poltergeist. Maybe I should turn on our gas stove and shake some sage from our spice cabinet over it… If that doesn’t work, we are surrounded by churches so I could probably round up an old priest and a young priest.


*In Minnesota a winter heat-wave means anything over 30 degrees. Over the last 2 days I have seen 2 people outside in short sleeves, one guy in shorts, and several without jackets.

**During all of this we’re working from inside the house, so you have access to that tiny gap.  The outside of the door frame has trim pieces covering up this space.

***This is how I solve problems at work too. People think I’m smart, but really I just figure out good search terms.

A-Door-able

Sorry, couldn’t resist. Matt’s propensity for punning is apparently rubbing off on me.

One of the (many) random “features” of this house was the lack of a closet door in Wesley’s nursery. We originally put up a tension rod and curtain, but that just didn’t look terribly finished and we’ve been meaning to get a proper door up there for ages.

By some crazy stroke of luck, the door frame was actually a standard size.* By some other crazy stroke of luck, I was able to find a 5-panel door that was a reasonable match.  Not perfect, but for $50 it was pretty damn good! I’m pretty sure the only way I could have found a better match would have been to order a custom door which would have been super pricey. I’ve already mentioned that our house work is much more renovation than restoration, so the investment in a custom door just wouldn’t have been worth it in this case.

So door. $50. Good deal. Part of the reason it was so cheap is because we ordered a door slab vs a pre-hung door. The difference is just what it sounds like. A door slab is just a slab of wood–no hinges, no pre-drilled anything. A pre-hung door is both the door and door frame already connected by hinges. One of these is a little easier to deal with, but we didn’t choose that one.

Because we had an existing frame, we first needed to check the fit. The frame may have been a standard size, but unfortunately it wasn’t square.** In order to get the door to fit properly, we had to plane off a good chunk from every side. This would have been super easy, except for the way hollow-core doors are constructed.

Planing is meant to happen with the with the grain, but at the top and bottom of the door you hit the vertical supports of the frame, and it’s REALLY hard to go against the grain.  Matt ultimately took a hand saw to the edges–he figured out how much we needed to take off from the corner, sawed that off, and planed the rest down to that point.

After planing (lots and lots of planing), I took a palm sander to all the edges to smooth them out nicely. And yes, we were totally working on our upstairs landing since we had to keep checking the fit of the door and didn’t want to be constantly hauling it up and down the stairs.

To add the door knob, we bought a simple kit that came with a guide and hole saw bits for a drill. The guide clamps onto the door and then you just drill on through.  We managed to position our door knob right over one of the cross supports on the door so it was a little more difficult to drill through, but not a huge problem.


Mort likes to supervise things.

The hinges were a bit more problematic. The frame already had places for the hinges, and we even had some extra hinges that were original to the house… we just had to mount said hinges to the door itself. You can get hinge kits like the door knob kit, but they usually require a router, which we don’t have, so we decided to half-ass it. Typically you would route out only the exact size of the hinge, so you’d leave a little strip of wood along the edge.  Instead, Matt just planned out the entire depth of the frame to accommodate the depth of the hinge.*** It’s only noticeable from inside the closet though (and only if you know what to look for), so not a big deal.

Whoa! It’s a door! That opens and closes! Craziness!

Don’t mind the random futon.  We did some furniture shifting and need to figure out a permanent home for it.

My only real disappointment with this door is the knob. I assumed I’d be able to switch out the actual knob on a new latch set. Wrong. Current latch sets are designed to interlock and screw together in a way that makes switching out any one part of them impossible. House of Antique Hardware has vintage-looking knobs/latches designed to fit modern construction, but I can’t quite justify spending $140 on a closet door knob… although I am scoring an extra bonus this year at work…


* “Standard,” “square,” and “level,” are terms that don’t tend to exist when dealing with 100+ year old houses.

** See what I mean?

*** And only planed off a small amount of his thumbnail in the process.

Refinishing Wood Part 2: Prepping

Still have the old finish on your project? Make sure you check out Step 1: Stripping.

Supplies

  • Palm sander and/or sanding block
  • Coarse, Medium, and Fine sandpapers (roughly 80, 150, and 200 grit)
  • Wood filler
  • Putty knife

How To

Alrighty, by now you should have bare wood, but it’s still probably seen better days. If you have weird white residue in spots, don’t fret.

See? It happened to me too and it’s nothing to worry about–just dried up bits of stripper that didn’t get completely wiped off. It will come right off with some sanding. It can be washed off too, but you need to sand anyway, so why make extra work for yourself?

I started sanding with an 80 grit paper and my palm sander (I still used a sanding block and loose sand paper to get into the smaller and more detailed areas).  The coarser paper will even out any small scratches in the surface and also take off any tiny bits of varnish you may have missed with the stripper. When sanding, always sand with the grain of the wood as much as humanly possible.

After going over everything with 80 grit, dust everything down with a tack cloth (an ever-so-slightly damp rag works too). This is when I inspect for any significant gouges.  Since these doors are old I wasn’t aiming for a perfectly smooth surface. That just feels disingenuous. I did however want to patch the worst of the worst.  Some of the doors had dog scratches down the front. One had NO carved into it, probably by some angsty asshole teenager. Several had assorted old screw holes. These were all things that I didn’t really feel added to the character and would need to be filled in.

Using wood filler is easy, blob it over the hole/crack/gouge then use your putty knife to scrape off the excess. Set the edge of your putty knife flat against the surface and with a firm, even pressure pull it over the putty you laid down. It sands off very easily, so don’t panic if it looks a little lumpy. Also don’t panic if you didn’t completely fill in the hole–let the first layer dry and add another.

If you’re going to be staining, make sure to use stainable wood filler. I’ve tried a few different kinds and my favorite so far is Plastic Wood. Don’t bother buying a giant tub though.  It dries out fairly quickly and is difficult to work with if it gets too dry (I’ve had the same issue with other fillers I’ve tried too). Personally I also think a metal putty knife works better for wood filler, but you could definitely use a plastic one if that’s what you have.

Now that all your holes/dents/gouges/graffiti are all filled in, it’s time to sand with a medium grit paper.  I used 150-120 grit,* again with my palm sander.  This will smooth out your 80 grit sanded layer and smooth out any blips left from the wood filler.  If you find areas that need a filler touch up, dust them off, fill again, let dry, and sand.

When sanding over the filled spots you want to remove an filler that’s sitting on the surface and leave only the filler left in the divet. Pretty much just keep sanding until you see the original shape of the hole you filled.

Finally, I went over everything with a fine grit sandpaper (I used 200 grit).  I chose to used just a sanding block instead of a palm sander since all the real work should have been done on the coarse and medium sands.

At this point you’ll want to clean everything off really well. Vacuum, tack cloth, canned air–whatever it takes. If you find dust congregating in any crevices you can dig it out with a tooth pick.  Basically you want your surface to be completely dust free before finishing it.

Up Next: Staining (or Painting)


* I had a mix on hand… have I mentioned I am SO not a professional?

Save

Save

Refinishing Wood Part 1: Stripping

Sexy music is optional, but I highly recommend it.

Anytime you want to refinish a piece of wood furniture with a different stain, the first step is to strip off the old finish. Even if you plan on painting you may still want to strip off the old finish if it’s lumpy. If you’ve been looking into re-staining a piece you may have discovered gel stain and its claims of little-to-no prep work.  I’ll get into more detail on stain later on, but if you’re interested in preserving the wood grain you’ll want to skip the gel stain and read on.  Like a lot of DIY projects it’s time consuming, but not technically difficult. Actually, it’s really hard to screw this up too badly at all.

Supplies

How To Do It

In the past I’ve used Smart Strip but this time around I decided to give Citri-Strip a go.  It’s still low odor and biodegradable, but it more readily available at pretty much every big box hardware store.  The process is the same with both, just make sure to work in a well ventilated area with appropriate skin protection.

Paint the stripper on your surface in a fairly thick coat.  If you’re using Citri-Strip do NOT use a foam brush, the stripper will start eating through the foam. Yes, I learned this lesson the hard way and inexpensive chip brushes are definitely the way to go.  Do your best to cover the entire surface, but the Citri-Strip can be hard to see so you may end up missing something (but don’t worry!).   For my particular project I found that waiting about 15-20 minutes after applying the stripper was perfect.

Once your stripper has kicked in (it will change color a bit and show some bubbling) it’s time to scrape it all off.  I was working over a plastic (disposable) drop cloth, but I also lined a metal bowl with a plastic bag to catch most of the gunk.  Use a plastic (less likely to scratch) putty knife to scrape off all the stripper and all the finish it’s taken off.  Not gonna lie, it’s pretty gross. If you have any intricate corners or trim, you can scrape them out with a stiff scrub brush.

Side note: did you know it’s near impossible to find a putty knife narrower than 1.5″?  If you have a raised panel door like I do the indents around the panels may be less than 1.5″…. argh!  I eventually picked up 1.5″ plastic putty knife and used a hack saw to shave just a little bit off the edge–perfection for under $1 and about 2 extra minutes of work.

There will probably be some little bits of gunk that get left behind.  If you let them dry out a bit  you can brush the off with a clean scrub brush or vacuum them up with a shop vac.  Then I looked for any areas that were still shiny with varnish and, if needed, dabbed on some more stripper.

Any areas that were proving especially stubborn I would scrub with a wire brush instead of scraping with a putty knife.  This was especially helpful in the more detailed areas. I only used the wire brush on the toughest spots because it can scratch up the wood.  Use it sparingly and only scrub (medium firmness, no need to put your back into it) with the grain and you should be fine. If you plan on re-staining you’ll want to make sure you have every bit of varnish off otherwise the stain won’t absorb into those areas and you’ll get an uneven finish.  No bueno.

Next time: how to prep your piece for finishing.

Save

Save

Save

Save

Save

Save

Save

Save

Laborious Labor Day

Ok, not all that laborious, but Matt did go on a small project rampage on Monday.  I think he was trying to get some stuff out of the way because he was going to be stuck on double babysitting duty on Tuesday.  I has a sedation dentist appointment and basically wasn’t allowed to function* for the entire day so not only did he need to solo-parent Wesley, he also needed to babysit me. Luckily I survived** despite a nasty fear of the dentist*** and we’re back to tag-teaming projects.

Now that I’m no longer pregnant (wheeee!) I’ve been able to get back to work refinishing the upstairs doors.  We tackled the nursery door first since it needed a little extra repair work. Matt stripped off the golden-oak stain and I re-stained and painted it.****  By Monday we were able to put it back up. Matt also replaced the mortise lock and switched out the black porcelain knobs with the glass knobs I ordered like, a year ago.

It’s also worth mentioning that the light switch cover in the hallway has seriously been off for at least a year. #safetyFirst

Our Winchester Door has also been sitting around with a gaping hole where the door knob should be.  Sure, the door can’t actually open, but I can’t remove it and drywall because I don’t have a good way to replace the baseboard.  Solution: embrace it’s complete and utter doorness. I wasn’t thinking about this door when ordered the knobs, so I didn’t have another glass one to use here.  We did, however, have this gorgeous embossed metal knob from the decaying cellar door in the basement.  Honestly, the embossed knobs are my favorite, but I thought the glass knobs would look better against the dark wood of the upstairs doors.

The final update seems really minor, but I smile every time I see it. The toilet handle in our downstairs bathroom has been acting wonky, so Matt decided to replace it.  Knowing me as well as he does, he chose the fancy porcelain handle option. It matches the faucet handles and as I said, it makes me kind of stupidly happy,

Even though I posted the Master Bedroom Plan, part of me wants to tackle our downstairs Micro-Bath before I head back to work.  It’s such a tiny room that it would actually be doable, but I know Matt wants to finish up the doors first. I may be a little ADD when it comes to projects so it’s probably a good thing he’s here to keep me in line.


*No driving, no attempting stairs, no being left unsupervised with small children, etc

**It actually went pretty well… although I remembered more than I expected too.  I also still panicked when confronted with needles which the dentist was apparently a little surprised by (although I did warn him that I can panic my way through nearly anything). Luckily I did not get belligerent with Matt, which is what I tend to do if someone is trying to coddle me.

***Step 1 in dealing with a dental phobia: find a dentist who’s not a condescending asshole.  This is surprisingly difficult.

****My original plan was to stain both sides, but Matt liked the doors better white on the inside and marriage is about compromise.

Save

Save

Checking in on the Hallway

I had visions of being completely done with the hallway by now!  Unfortunately life and a pissy thyroid ate up a lot the time I had planned for this so I’ve very much not done yet. I thought I’d share my progress anyway though.

If you need a refresher on what I started with, check out this post.

The Staircase

One of the first projects I had planned was replacing all the busted newel caps on our staircase.  I had a good start on it but petered out.  So right now I have replaced…. one.  Yes. One.  But that one looks good!

hallcheckin_3

The chunky post at the base of the stairs in all original, but the second post has a brand-spankin-new newel cap.  Is a it a perfect match?  No.  But is pretty darn good?  I think so!

hallcheckin_4

Even in old houses I think it makes sense to weigh every investment.  Is it 100% historically accurate?  No.  Is the cost of a 100% historically accurate reproduction worth it for this particular house?  Sorry, but no.  It’s a pretty basic, standard old house for St Paul (heck, there’s even a near-perfect doppelganger house a couple blocks away!).  It’s sort of like trying to make an average 1950’s ranch a high-end MCM masterpiece. We’re also not restoring this house, we’re renovating it.  We’re just renovating it while still trying to be mindful of it’s origins.

Ahem.

Anyways… one newel cap down, 5 more to go!

The Doors

Oh the doors!  I had such high hopes that they would have been done weeks ago!  Unfortunately barely being able to get off the couch for nearly a month set me back a bit.  We’re 1/2 way there though!

hallcheckin_2

I posted about my love of black doors a while back, but Matt was adamantly against it.  He also didn’t want to paint them white (so picky!) so we compromised with a darkdark stain.  It’s a shit-ton of work, but I think it looks pretty fab.  Please ignore the orange-y railing, I’m working on it.  Slowly.

hallcheckin_1

I also ordered glass knobs to replace the black ceramic ones.  Yeah, the ceramic ones were probably original, but they just disappeared into the dark stain (the brass back-plates are more noticeable in real life, but I’m still thinking of cleaning them up a bit).  Half the upstairs door knobs were already glass anyway and I wanted continuity.  I ordered these beauties from House of Antique Hardware.  It might be my new favorite place on the internet.  I could make a shopping list a mile long from this place if I had the budget for it, but alas. I still may get the dust corners at some point because they’re super cute and cat fur clogging up the stairs is a legit problem in this household.

The Cat Tree

Why is pet furniture so often really ugly?  I mean, where are the homes where the standard fleshy-beige cat upholstery fits in?  My best guess is that it’s designed to hide most fur colors.  These are the sorts of things I tell myself to make sense of this crazy world.*

Regardless of the reason, the fleshy-beige had to go! The scratching posts sections had also gotten pretty beat up over the few years we’ve  had it.  It’s seen a lot of love from the cats and needed  a makeover.

hallcheckin_5

I dissembled the whole thing, wrapped the flat pieces with a faux sherpa fabric, and wrapped the polls top-to-bottom with jute.  I did a bit of reconfiguration of the pieces too to make it visually lighter and provides the cats with a taller section they so they stretch out and scratch. They usually only hang out on the top section anyway, so it really didn’t need the extra bulk. I still am not sure what to do about the top basket yet (helloooo weird blank space and lonely screw), but I’m working on it.

Still Working on:
  • Newel caps
  • Staining the railing
  • Refinishing the doors
  • Planning a gallery wall
  • Lighting
  • Building a new cabinet for the entryway


So that’s the current State of House address.  I’m planning on doing a check-in with the kitchen too to let you know how my temporary fixes are holding up. I just need to clean it first…


*At least I’m not alone in my “Why does pet furniture have to be ugly” thoughts.  There is a shop in St Paul called–I shit you not–Custom Cat Purrinture.   Yes, Purr-niture.  Believe it or not Matt and I haven’t checked it out yet.

Save

Save

Save

Save

Save

Save

The Great Door Compromise of 2016

It’s been a little quiet around here lately.  My actual, money-making job has been insanely busy–we’re operating at about 1/2 staff between vacations/medical leave/maternity leave so stress levels have been through the roof and my energy level once I get home hits the floor (or rather, the couch).  We’re still working away, just slowly, so I thought I’d give you a little sneak peak at my current project.

A while back I mentioned that I was sort of swooning over the white trim + black door combo.  Matt, however, was Not a Fan…. but he didn’t want me to paint the upstairs doors white either and I certainly wasn’t leaving them honey oak.

Ok, I can stain them super dark, it will be almost like my beloved black doors, right?  Only re-staining is rather a giant pain in the ass.  But wait, there’s this magical gel stain that is all over the Pinterest!  I bet it’s a miracle worker.  I bet its secret ingredient is unicorn snot.*  I bet it…. doesn’t do a damn thing to these doors.

Yup.  I tried the General Finishes Gel Stain with minimal prep (mineral spirits and an abrasive scrubbie) and it did absolutely jack.  Sure, some of the inside corners got a little darker but otherwise it was very underwhelming. Sorry, no pictures, I was too distraught.  Just imagine a door that toddler wiped a brown ink pad over.

And Matt still didn’t want me to paint the doors.  Matt, I’m continuing to try because I love you.

Now it was time to try what I had wanted to avoid in the first place–stripping and refinishing.  Ugh.  It’s not that it’s a difficult process, it’s just time consuming–strip, sand, wash, stain, poly, with waiting or dry time between nearly every step.

I had already taken 2 of the hallway doors down while I was painting the trim, so I used one of them as my guinea pig.

DoorCompromise

I’m on the fence if I think it’s really worth the effort (that’s about a week’s worth of work right there!) but Matt really likes it and marriage is about compromise or some such crap.

Actual conversation we had as I was pondering the door (which by the way, is currently just leaning in place and missing all hardware, just FYI):

Matt: We should really try to get together with some people this weekend.

Me: Sounds good, go ahead and email people.

Matt: Why me?

Me: Because I’m busy stripping and refinishing your damn doors!

I’m going to try and start door #2 tonight and try a slightly different technique once I get to the stain.  I like the final color on the one I have done, but the finish is a little splotchy.  It’s also worth noting that the staircase railing is going to get darkened up (and de-oranged) too, and we have dreams of refinishing the floors to be much darker (although the latter may not happen for quite a while…).


*Because unicorn tears would make it too runny to be a gel stain.  Duh.

Save