How to Create a Design Plan

Now that we’ve wrapped up the master bedroom, it’s time to move onto the living room/TV room.  This is more-or-less how I approach a room design, but remember that there are no set rules when it comes to your own space.  The ultimate goal is that YOU are happy (your home = your rules).

Fix on a Focal Point

This could be a piece of artwork, a rug, a piece of furniture, an architecture detail….pretty much anything. Hell, it could be your TV, I won’t judge. What’s going to be the “star” of the room?  Where do you want the eye to be drawn?

You may also have an inspiration piece for you room that’s not going to be your focal point. Heck, it could be a magazine clipping that’s not exactly about to framed and hung in the room at all. Some sort of inspirational image is incredibly useful at this point.

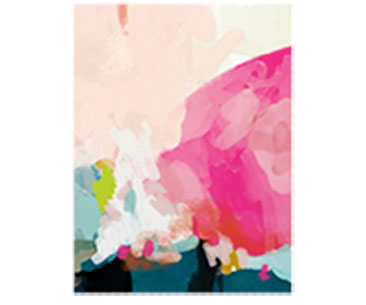
Technically this print is planned for the living room and I’m going to be only focusing on the TV room here. Because my 2 rooms flow into each other, they really need to relate to each other so this piece serves as a great inspiration for both spaces.

Pick Your Palette

Using your focal point or inspiration piece, determine your color scheme. If you’re feeling minimal, you could opt for a monochromatic (different values of the same color) color scheme.  This can end up a little flat so I’m always a fan a making sure there’s some good contrast going on. You can always use the internet for inspiration and search for “blue rooms” and see how other people have handled it.

Personally, I like a variety of color.  The absolute easiest way to accomplish this is to start with a focal piece that already has multiple colors in it. Not to worry if the star of your room is your solid pink chair though! Internet to the rescue again! If you search google or Pinterest for “pink color schemes” you’ll get a ton of results and you can pick one that resonates with you.

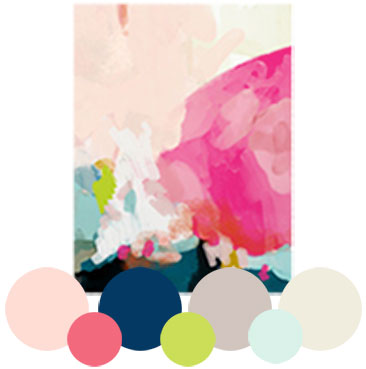
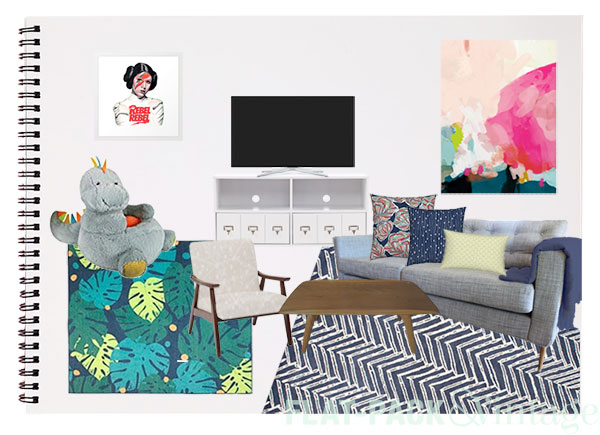
See what I mean by finding something with multiple colors? This print provides a variety of options! Navy and blush make for a more formal base (along with some gray and creamy neutrals) and accents of aqua, bright coral-pink, and bright green funk it up a bit.

Now, don’t go buying your wall paint just yet.  This is just a rough color idea at these point.  The exact shades may change, plus, you’ll want to have your main pieces already in your home so you can match paint swatches in the most accurate lighting. Pro Tip: never bank on accurate color representation from an online image–monitors and color settings are way too varied.

Bring in the Big Stuff

So you have a focal point, you have a rough idea of a color scheme, now you want to look for the main items that will fill in the room. This is going to be pretty much furniture, rugs, and dominant light fixtures. They may not all be physically large items either, but they’ll probably be your spendier items. They may also be pieces you already have an definitely want to keep in the room.

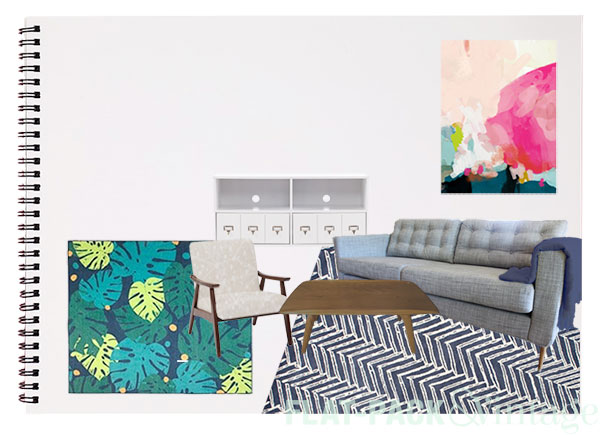
Why the two rugs you may be asking? A corner of the TV is going to be a play space for Wesley and the rug helps define the space.

Add in Accessories

To really make a space feel like you, and not a staged show-house, shop your house for accessories.  Things you’ve naturally acquired overtime will have more personality than something you’ve bought just because it looked good in the room.  This isn’t to say you can’t by new things, just see what you already have first and pick items that truly resonate with you even if they’re not “magazine perfect.” You’ll be happier and that’s the most important thing for you to feel about your home.

Accessories don’t necessarily mean knickknacks. Plants, accent lighting, throw pillows, wall art…all of these are options for accessories. I don’t bother adding every little thing in when I’m creating a mood board either–I usually stick to pillows and wall art.
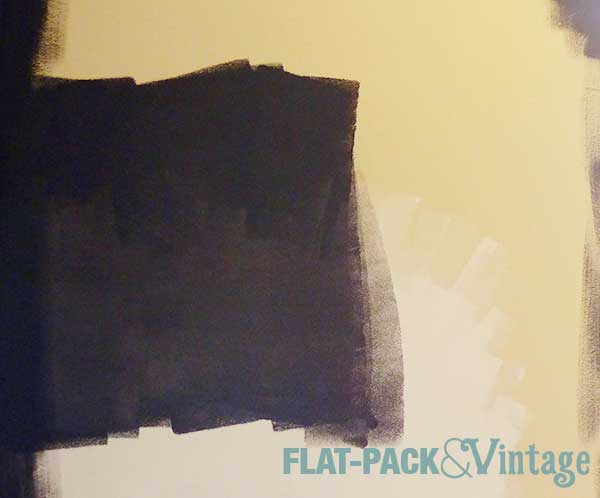
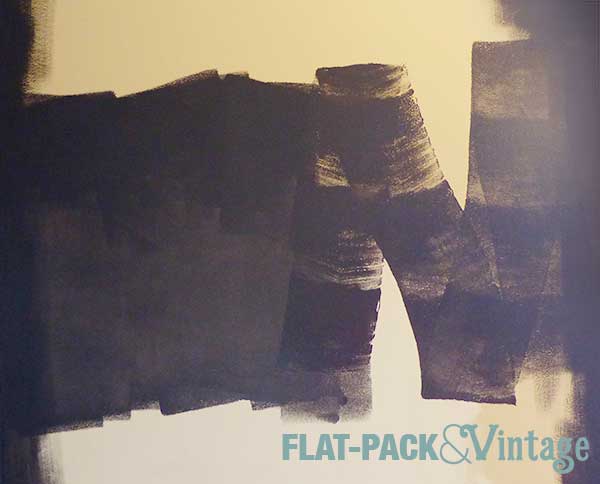
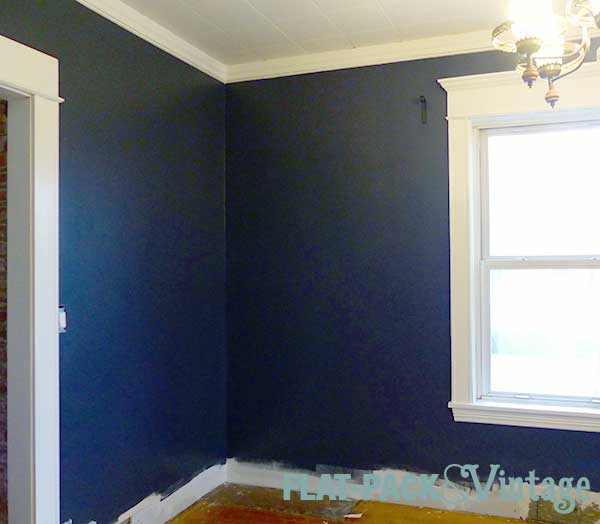
Wake up your Walls

You may already have an idea of what color you want your walls to be.  Now’s the time to pick your exact paint color.  Why wait until the very end of the design process? There are practically unlimited paint color choices so it’s much easier to find a paint that will complement your rug/upholstery/throw pillows/art than vice versa.


Now, for the record, it’s not as easy as pick this, pick that, bam you’re done. There will be changes and frustrations, and maybe your entire plan will morph into something completely unexpected. Just go with your gut and don’t try and force things. Maybe the rug you picked as your focal point isn’t meshing with the other items that caught your eye. It’s ok to completely rethink your rug choice. That’s why it’s a good idea put together a mood board before you start shopping.

Don’t feel like you have to make decisions on every single thing in the room either. Your mood board isn’t set in stone, but it’s a good idea to get the overall feel for your room before you start spending money.


And Then Our House Rebelled

Image via Giphy

Around 3:30am on Saturday our smoke detector decided to lose its shit.  It started beeping and loudly announcing “low battery!” Around 4am Matt decided to go an rip out the batteries.  That was when he discovered that the smoke detector in the hallway is hardwired. Yup,  our smoke alarm woke us up at 3:30am because the backup battery was bad.

Luckily we had extra batteries, so Matt grabbed a replacement…only to find that the previous battery was also rather corroded and the gunk left on the battery connectors was now impeding its ability to sense the new battery.

Now, I’m still in bed at this point so all I hear is Matt shuffling around the house like he’s playing some twisted game of Marco Polo with the smoke alarm. Then the alarm suddenly starts shrieking “Fire! Warning carbon monoxide! Fire! Warning carbon monoxide!” I start laughing like an idiot because now I’m convinced our smoke detector is just straight-up broken and of course that would happen at 4am.

Turns out Matt hit the test button to see if that would act like a reset and get the alarm to recognize the new battery. It didn’t work. Obviously.  So now it’s 4:10am and I start googling how to remove a corroded battery because it’s either that or flee to a hotel.

In case you’re wondering, vinegar will clean off battery corrosion. You should really use gloves/eye protection, and of course be very careful around the electrical workings of anything–especially when it’s still connected to power.

You’re welcome.

After Matt and I properly woke up for the day, we went on a walk to get breakfast since we’re having a January heat-wave at the moment.* When we got back, I went to haul in the baby gear and the baby, and Matt stayed out to salt the walkways. I left Wesley snoozing in his stroller next to the door while I dropped the diaper bag and pastries inside, then turned to go back out and grab the baby.

Only the backdoor wouldn’t open.

I checked the locks. It was unlocked. I fiddled with the locks (both the deadbolt and the simple lock for the latch we never use). Nothing. Was it stuck on something? Nope.

W.T.F.?

I finally went out the front door, walked around the back and tried to shove it open vs pull it open. No dice. So I tried and force it open with my shoulder TV cop style. Ouch. Finally I gave it a good swift kick (just to show it who’s boss), collected Wesley and schlepped around to the front door.

When Matt was done salting, he repeated everything I had just tried and nothing worked for him either.  It turns out that the bottom doorknob (which controls the latch) had inexplicably broken, so the knob could no longer retract the latch. This is a vital part of being able to open a door.

Step 1 was to run to the hardware store and buy a new latch set.  I also picked up a matching deadbolt because I really didn’t like the existing brass one we had so hey, excuse to update! We thought Step 2 would be as simple as taking off the door knob and wiggling the inner workings around. Nope. The inner workings were well and truly busted.

Matt went through our tool stash to try and find something he could shove between the frame and the door to push the latch back in,** but it still wouldn’t budge.  He asks me if I have any brilliant ideas, to which I reply “sure” and then immediately get to googling.***

It turns out this sort of thing is not unheard of and found a fairly lengthy thread in a DIY forum dedicated to it. Long story short, if your latch is properly busted (like in our case) there isn’t an easy fix. The general consensus is 1) don’t bother taking the door off the hinges because that often doesn’t help and 2) either bust out your hack saw or call a locksmith.

We chose the hacksaw option and it took Matt around an hour to cut through.

(We set the knob back in place to block some of the draft)

Thankfully installing our new latch and deadbolt was a piece of cake. Matt was very confused because I decided to try Kwikset Smartkey locks that let you re-key them yourself.  They were more expensive that the standard locks, but cheaper than bringing in a locksmith (and we really didn’t want 3 different keys for our house). They are SUPER simple to use to, so we were able to get our 2 back locks on the same key as our front lock in about a minute.

Once the weather legitimately warms up we’ll also paint the the rest of the door frame and repaint the door, since it looks a little sad at the moment.

Matt looked up the security of these locks and it sounds like they’re no better or worse than a lock that would require a professional to re-key. Plus, as one person put it: your house is only as secure as its weakest point and we all have windows.

So that was our Saturday.  We woke up to a demon smoke alarm and later I got locked inside the house. I have a feeling I’ve offended the DIY spirits in some way or else our house has spontaneously acquired a poltergeist. Maybe I should turn on our gas stove and shake some sage from our spice cabinet over it… If that doesn’t work, we are surrounded by churches so I could probably round up an old priest and a young priest.


*In Minnesota a winter heat-wave means anything over 30 degrees. Over the last 2 days I have seen 2 people outside in short sleeves, one guy in shorts, and several without jackets.

**During all of this we’re working from inside the house, so you have access to that tiny gap.  The outside of the door frame has trim pieces covering up this space.

***This is how I solve problems at work too. People think I’m smart, but really I just figure out good search terms.

Sofa Table DIY

The room we use as our TV room is slightly awkward for furniture placement since it would have originally been used as the dining room. We happen to like it as the TV room since the built-in buffet acts as a killer bar and we really like the openness between this room and living room for entertaining purposes.

The layout in the TV room has the couch in front of the radiator, which means…

…the couch has a tendency to angle back  since there’s nothing to stop the other side from shifting.

Luckily, there was super easy fix. Full disclosure: As easy as it was, I totally half-assed this project.  I had no plan and had to redo it once. But it the end it all worked out. I also failed at taking progress shots since I was just trying to get this done in the evenings while Matt was on baby duty.

First I picked up a couple 1×10 pine boards, along with a couple 1×2’s. I cut the 1×10’s into 1 board the length of my finished table, and 2 boards the height of my finished table (if your goal is a really exact finished size, technically it’s the height minus 3/4″).

You could move on to construction at this point, but I wanted a little extra detail, so I cut the 1×2’s down to 4 pieces the height of the table, then glued and clamped them down onto edges of the table legs. (You can also glue, then cut everything down to size at the same time)

Once the legs were dry, I glued the tops of them onto the bottom of the table top, making sure to line up the edges as smoothly as possible.  After that dried, I reinforced the joint with a couple of small L brackets and assorted tiny screws we had left over from random projects.

The table was still a little wibbly-wobbly, so I cut down a scrap 2×2 with 45 degree angles at each end to use as a brace on each side. This also got simply wood-glued into place.

Once everything was nice and solid, the whole piece got a light sanding, a couple coats of stain (Minwax: dark walnut), and 2 coats of polyacrylic. I didn’t bother staining the inside faces of the table since it will be completely hidden behind the couch. #lazygirl

Et Voila! No more shifting couch + a great place to stash drinks and a basket of baby items since this couch is my go-to nursing spot (and a great spot to stash a cuppa).

Refinishing Wood Part 2: Prepping

Still have the old finish on your project? Make sure you check out Step 1: Stripping.

Supplies

  • Palm sander and/or sanding block
  • Coarse, Medium, and Fine sandpapers (roughly 80, 150, and 200 grit)
  • Wood filler
  • Putty knife

How To

Alrighty, by now you should have bare wood, but it’s still probably seen better days. If you have weird white residue in spots, don’t fret.

See? It happened to me too and it’s nothing to worry about–just dried up bits of stripper that didn’t get completely wiped off. It will come right off with some sanding. It can be washed off too, but you need to sand anyway, so why make extra work for yourself?

I started sanding with an 80 grit paper and my palm sander (I still used a sanding block and loose sand paper to get into the smaller and more detailed areas).  The coarser paper will even out any small scratches in the surface and also take off any tiny bits of varnish you may have missed with the stripper. When sanding, always sand with the grain of the wood as much as humanly possible.

After going over everything with 80 grit, dust everything down with a tack cloth (an ever-so-slightly damp rag works too). This is when I inspect for any significant gouges.  Since these doors are old I wasn’t aiming for a perfectly smooth surface. That just feels disingenuous. I did however want to patch the worst of the worst.  Some of the doors had dog scratches down the front. One had NO carved into it, probably by some angsty asshole teenager. Several had assorted old screw holes. These were all things that I didn’t really feel added to the character and would need to be filled in.

Using wood filler is easy, blob it over the hole/crack/gouge then use your putty knife to scrape off the excess. Set the edge of your putty knife flat against the surface and with a firm, even pressure pull it over the putty you laid down. It sands off very easily, so don’t panic if it looks a little lumpy. Also don’t panic if you didn’t completely fill in the hole–let the first layer dry and add another.

If you’re going to be staining, make sure to use stainable wood filler. I’ve tried a few different kinds and my favorite so far is Plastic Wood. Don’t bother buying a giant tub though.  It dries out fairly quickly and is difficult to work with if it gets too dry (I’ve had the same issue with other fillers I’ve tried too). Personally I also think a metal putty knife works better for wood filler, but you could definitely use a plastic one if that’s what you have.

Now that all your holes/dents/gouges/graffiti are all filled in, it’s time to sand with a medium grit paper.  I used 150-120 grit,* again with my palm sander.  This will smooth out your 80 grit sanded layer and smooth out any blips left from the wood filler.  If you find areas that need a filler touch up, dust them off, fill again, let dry, and sand.

When sanding over the filled spots you want to remove an filler that’s sitting on the surface and leave only the filler left in the divet. Pretty much just keep sanding until you see the original shape of the hole you filled.

Finally, I went over everything with a fine grit sandpaper (I used 200 grit).  I chose to used just a sanding block instead of a palm sander since all the real work should have been done on the coarse and medium sands.

At this point you’ll want to clean everything off really well. Vacuum, tack cloth, canned air–whatever it takes. If you find dust congregating in any crevices you can dig it out with a tooth pick.  Basically you want your surface to be completely dust free before finishing it.

Up Next: Staining (or Painting)


* I had a mix on hand… have I mentioned I am SO not a professional?

Save

Save

Refinishing Wood Part 1: Stripping

Sexy music is optional, but I highly recommend it.

Anytime you want to refinish a piece of wood furniture with a different stain, the first step is to strip off the old finish. Even if you plan on painting you may still want to strip off the old finish if it’s lumpy. If you’ve been looking into re-staining a piece you may have discovered gel stain and its claims of little-to-no prep work.  I’ll get into more detail on stain later on, but if you’re interested in preserving the wood grain you’ll want to skip the gel stain and read on.  Like a lot of DIY projects it’s time consuming, but not technically difficult. Actually, it’s really hard to screw this up too badly at all.

Supplies

How To Do It

In the past I’ve used Smart Strip but this time around I decided to give Citri-Strip a go.  It’s still low odor and biodegradable, but it more readily available at pretty much every big box hardware store.  The process is the same with both, just make sure to work in a well ventilated area with appropriate skin protection.

Paint the stripper on your surface in a fairly thick coat.  If you’re using Citri-Strip do NOT use a foam brush, the stripper will start eating through the foam. Yes, I learned this lesson the hard way and inexpensive chip brushes are definitely the way to go.  Do your best to cover the entire surface, but the Citri-Strip can be hard to see so you may end up missing something (but don’t worry!).   For my particular project I found that waiting about 15-20 minutes after applying the stripper was perfect.

Once your stripper has kicked in (it will change color a bit and show some bubbling) it’s time to scrape it all off.  I was working over a plastic (disposable) drop cloth, but I also lined a metal bowl with a plastic bag to catch most of the gunk.  Use a plastic (less likely to scratch) putty knife to scrape off all the stripper and all the finish it’s taken off.  Not gonna lie, it’s pretty gross. If you have any intricate corners or trim, you can scrape them out with a stiff scrub brush.

Side note: did you know it’s near impossible to find a putty knife narrower than 1.5″?  If you have a raised panel door like I do the indents around the panels may be less than 1.5″…. argh!  I eventually picked up 1.5″ plastic putty knife and used a hack saw to shave just a little bit off the edge–perfection for under $1 and about 2 extra minutes of work.

There will probably be some little bits of gunk that get left behind.  If you let them dry out a bit  you can brush the off with a clean scrub brush or vacuum them up with a shop vac.  Then I looked for any areas that were still shiny with varnish and, if needed, dabbed on some more stripper.

Any areas that were proving especially stubborn I would scrub with a wire brush instead of scraping with a putty knife.  This was especially helpful in the more detailed areas. I only used the wire brush on the toughest spots because it can scratch up the wood.  Use it sparingly and only scrub (medium firmness, no need to put your back into it) with the grain and you should be fine. If you plan on re-staining you’ll want to make sure you have every bit of varnish off otherwise the stain won’t absorb into those areas and you’ll get an uneven finish.  No bueno.

Next time: how to prep your piece for finishing.

Save

Save

Save

Save

Save

Save

Save

Save

Let’s Talk About Paint: How to Paint Walls

Last week I went over my favorite tools and products for painting.  Today I’m going to cover my process for painting walls.  Painting walls really isn’t difficult so if you have the time and aren’t afraid of getting a little messy it’s probably not worth hiring out,* especially if you’re working on a budget.

paint_part_2

There are multiple different techniques for painting, but this is what works well for me. If you’ve got your own awesome tips, tricks, and techniques feel free to chime in in the comments!

If you have carpeting, you’re going to want to drop cloth the bejeezus out of it (unless you’re planning on replacing it, then make sure you paint first and voila! Built-in drop cloth).  I’ve had hardwood floors for years and, um, don’t actually do much of anything to protect them.  If you drip a little paint you can wipe it right off while it’s still wet and even if you don’t catch it before it dries you can scrape it off or use some Goof Off.   I really just use a big scrap of cardboard to pile my roller tray and paint can on and just shove it around the room with me as I go. Carpet is not as forgiving, so you’re going to want to be careful about protecting it.

Cutting In

I start by cutting in.  In a perfect world you’d keep a wet edge everywhere you go, but if you’re working solo that’s not always practical. I cut in using a 2″ angled brush (I hardly ever tape anymore) and make sure I cover at least 4″ or so away from the edge so I don’t have to worry about my roller bumping the ceiling or trim.  When cutting in you also want to feather out your wet edge so you don’t end up with a line as it dries.  Basically, once you have most of the paint off your brush (or edger) come back over inner edge of your paint and smooth it out any excess paint.

To get a nice clean line (without tape!) I start by dipping just the tip of my brush into the paint.

***It’s important to have a good brush if you’re going to do this. I used a crappy one once and it was a gigantic mess!  I’ve been super happy with the Wooster Shortcut for cutting in and I think the short handle makes it very easy to control.***

Set the brush down on the wall a little bit away from the edge,

paint_process_1

Then smoosh the bristles down a bit so they fan out slightly.

paint_process_2

Then slowly sweep the brush towards the edge.

paint_process_3

And finally, drag the brush downward (or across for horizontal edges) keeping only the very tip the bristles against the edge. You can see I also still keep the brush at a slight angle so only a small section of it is coming into direct contact with the trim.

paint_process_4

Work slowly and don’t load too much paint onto your brush.  If you’re worried about your cutting-in skills, you can still tape your edges and practice to see how much paint really ends up on the tape.

Walls

The open areas of walls are the easy parts.  Load your roller up with paint and then use the textured part of your paint try to roll off excess.

I work in a N pattern on the walls (most people say W, but I tend to actually make an N or  M)–roll your paint on in a 2-3 foot N….

paint_walls_1

….and then roll right back to fill it in.  This distributes the bulk of the paint from your roller and then spreads and evens it out as you come back over it. I set my roller down to get the picture so I starting rolling again on the same side I started with.  If I’m not pausing in between I’d naturally roll my N then double back the way I came, just slightly off-set… whatever works.

paint_walls_2Your may have to go back and forth a couple times to fill it in nicely, but don’t add more paint to your roller, just work with what’s already up on the wall.

paint_walls_3

Once you’ve filled in your N then you can go back for more paint.  Start a new N (or M or W) shape, slightly overlapping your previous section and repeat.

paint_walls_4

When working with a roller make sure you don’t have too much paint on it (it should be saturated but not dripping) and roll slowly.  This will minimize both paint drips and spray from the roller.  You also want to slightly overlap your previous section each time.  This keeps a wet edge and helps each section of paint better blend into the other.  You also don’t need to put a lot of the pressure on the roller–remember, you’re rolling, not scrubbing.  If you find yourself scrubbing with the roller it’s probably a sign you need a new cover.

If you need to stop partway through (waiting a couples hours until the next coat, ran out of time for day, etc) you don’t have to wash out your brush and roller.  Wrap them in plastic wrap, and if you’re not picking back up until the next day, stick them in a cool place like the fridge (we were out of room in our fridge, but our basement’s pretty cold so I stuck mine there).

No too scary, right?

Also, how absolutely amazeballs does this color look????

paint_walls_5

Let’s Talk About Paint

Part 1: Supplies


*Super tall walls and stairwells are TOTALLY worth hiring out in my opinion, but I’m not so good with ladders. Also ceilings. Painting ceilings is a bitch.

Let’s Talk About Paint: Supplies

I started painting the dining room today.  I got about 1/2 done but now have to shove the furniture into the other corner so I can paint the other 2 walls.  I’ve done quite a bit of painting over the years–walls, trim, furniture.*  I know not everyone has painting experience though so I’m going go over the supplies I use, and then run through my process.

paint_talk_1

At the time of writing this I have no sponsors, no advertisers, no one slipping me convenient wads of cash behind the scenes.  This is what I use and my honest, unbiased opinions.

Priming:

Almost all paints I see these days are a paint + primer, but a separate primer is still definitely worth on some things.  If you’re painting over bare wood or drywall, you should probably prime.  If you’re painting over a finish that may be a little grimy (kitchens, homes previously owned by heavy smokers…. that sort of thing) you’ll probably want to prime.  I’ve been using the water-based Bullseye 1-2-3 primer and have been pretty happy with it.  An oil-based primer will give you even better adhesion, but will also need more ventilation and special cleanup.  Also, you can use latex paint over oil-based but shouldn’t oil-based over latex.

Walls:

I always use an Eggshell finish on walls in all rooms.  Sure there are lists that specify certain finishes for certain rooms based on durability, but my go-to is always eggshell.  It’s cleanable, but not shiny (quick n’ dirty breakdown: the shinier the finish the more scrub-able it will be, but shinier will also highlight any imperfections or texture changes on the walls). If you have kids who are prone to drawing on walls, you might want to bump up the sheen in problem areas.

My paint brands of choice for walls are Behr  (Home Depot) and Clark + Kensington (Ace). They’re pretty inexpensive as far as paints go, but have pretty respectable coverage.

Trim, Cabinets, and Furniture:

I used to always use a high gloss on furniture, and then I discovered satin. To me the satin is more in the range of a “factory finish” level of shine for most things and the high gloss can leave things looking obviously painted. Painting my kitchen cabinets turned me into a Benjamin Moore Advance convert (fangirl!).  I’d read good things about it so decided to give it a shot.  It’s a little pricey, but the coverage is excellent and the finish is beautiful. I was raving to my sister about it and when she saw our cabinets her comment was “I can see why you liked this some much.”

We also used Advance (satin finish) on our trim… after the kitchen.  I went to buy Advance but the Ace near us didn’t carry Benjamin Moore since they’re too close to another BM dealer and the guy there highly recommended Clark + Kensington. I’d used it on walls and been really impressed for the price point and at half the price of Advance I thought sure, why the hell not.  3 coats plus primer (and could probably use another) is why the hell not. And painting trim is a beast so I think it’s better to splurge on better coverage here (but I’ve personally never found the pricier paints worth it for walls). After the kitchen we switched over to my original plan of Advance. It still needed 2 coats + primer, but was definitely looking good at that point (and if you’re only using about 1/2 the amount of paint, it’s not really even a splurge anymore)!

Tools:

paint_supplies_1The basics: paint tray, roller, roller covers (don’t be afraid to splurge on roller covers, or at the very least, don’t reuse your covers to death –>guilty) drop clothes, 2″ angled brush. I really like the Wooster Shortcut, but there is a little bit of personal preference involved.  This is another area where you don’t want to choose the absolute cheapest option and take good care of your brushes.


paint_supplies_2Very useful extras: pole/extender for your roller (I really wish I had an adjustable one!), painters pyramids (if you need to prop up something flat to paint the edges), paint pail (sure, you could use any old plastic container, but the handle and magnetic brush holder are pretty sweet), paint tray liners (they make clean up waaay easier, I dump as much extra paint back into the can, let the rest dry, and then peel it off and reuse the liner**), and a flexible pour spout (they conform to both gallon and quart cans, make the paint easier to pour, and prevent paint from clogging up the rim of the can).


paint_supplies_3Marginally useful extras: Edger (I have had various levels of luck with these, they work well in some situations but not others, and some of them constantly fall apart or get paint where they shouldn’t), paint guide (like the edger it works well in some areas and less so in others, if you use one keep a damp rag around and wipe it down constantly).

To Tape or Not to Tape?

I used to be a taper because I was told that was just a normal part of prep work… then I read an article over at Apartment Therapy and it changed my life. They claimed that taping was actually more time consuming and even a little more risky than just cutting in by hand. So I tried cutting in the old fashioned way…and it was wonderful!  You need a good quality angled brush and a steady hand, but if you go slow it’s not that hard.

The “risky” part of taping is that it can lead to overconfidence because if your tape is not perfectly sealed or you’re a little too globby with your paint it can ooze underneath.  Also, there’s a risk of peeling off some of your new paint if you don’t time your tape removal right.

Ultimately it comes down to personal preference.  If you’re new to the painting game you may still want to tape everything, but maybe still try your hand at cutting in carefully and see how much paint you really get on the tape.


*Ceilings are hands down the worst.  If I ever want to repaint our ceilings I may just hire it out.  Really.

**Cheap, green, whatever you want to call it