Shit My Husband Broke This Weekend

Matt decided to get his DIY on this weekend, which is general is awesome!  This time though… he was a little off his game.

Project 1: Fix the leaky radiator

The radiator in our dining room had a small leak.  Nothing super noticeable, but it was causing some rust on the pipe and, because radiator systems rely on pressure, was also causing some issues with the radiators on the upper floors.  So Matt did some research and decided to try a fix with epoxy putty and fiberglass tape.  “I don’t know if it will work, but it can’t possibly make it worse” was basically his mantra.

Except it made things worse.

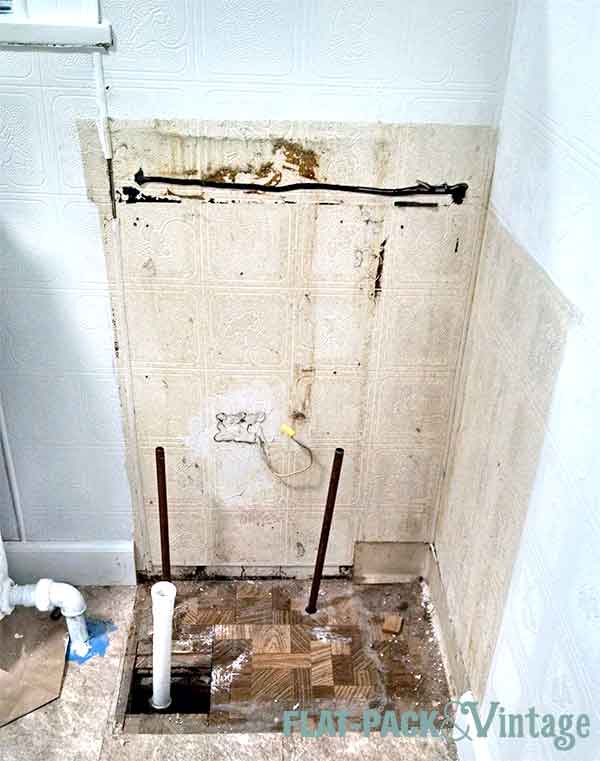
I wasn’t supervising watching his progress, but he had to chip off some paint to get the putty to adhere.  Paint that had been partially sealing the leak.  And then the epoxy and fiberglass didn’t really do anything (except look awful) so we just ended up with a slightly larger leak.

broken1

I don’t have a before picture because I wasn’t expecting this to be a big deal, but this is the aftermath.  I told him he wasn’t allowed to “fix” anything else this weekend.

Project 2: Study Demo + Outlet Replacement

We’ve been steadily ripping out the paneling in the study and were down to the last wall this weekend!  The only annoying thing so far is that the outlets in the room were installed over the paneling, so they needed to be removed in order to take the paneling off. Which means once the panels were off we had to put the outlets back in, but properly this time.

Matt picked up new electrical boxes that could be secured to studs (so they wouldn’t be wibbly-wobbly).  To reach the studs he had to cut through some of the old plaster and lath.  He was pretty excited because he got to bust out the reciprocating saw we got for Christmas.

The first outlet went smoothly… but the second.  Well, I was downstairs and heard a crash.  I shouted up that I didn’t want to know about it, but I found out anyway.  He was cutting a new opening for the outlet on the wall that runs along the stairs.  The wall where we had recently hung a gallery wall.  A gallery wall I was planning on photographing that same day.  If you’re unfamiliar with reciprocating saws, they create a lot of vibration.  Vibration doesn’t mix well with wall art and one of the pictures came crashing down off the wall.

broken2

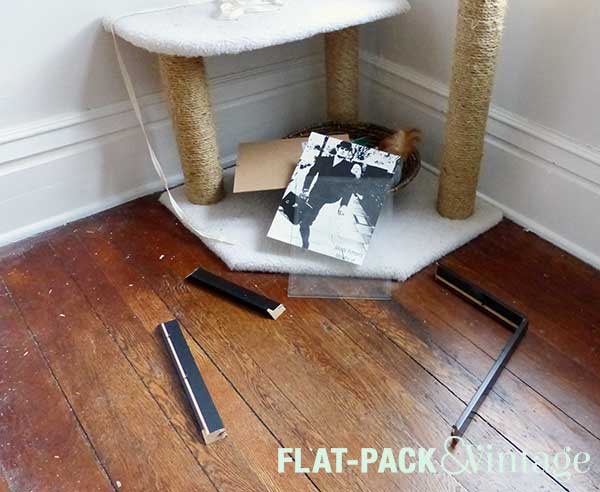
Yeah. There goes my project for the weekend.  I made him take down the rest of the art before continuing and he made it through the rest of the project without destroying the house.

Save

Out With the Old

In a perfect world I’d love to reconfigure the bathroom.  It’s a pretty good size bathroom, but the layout doesn’t make the best use of the space.  Sure it would be fabulous if I could rotate the tub so the plumbing connections are against the wall, and swap the toilet and vanity around so I could fit in a sink with actual counter space… but rerouting plumbing is pricey and probably not going to happen.  This means I have to work with what I have, which happens to be enough room for a 24″ vanity. Sigh.

It gets even better though. The plumbing for our sink comes up through the floor instead of through the wall so anything raised on legs is out as well.  I also had to wave goodbye to a practically perfect option because the drawers were a 1/4″ too wide to accommodate our existing plumbing. That was devastation right there. I found another practically perfect option, but not only was it raised (I could work around that if I had too) but it was nearly all sink and no counter.  No bueno.

There was only one option left at this point.  Custom.  Not 100% from scratch kind of custom, but a custom mod to a mediocre cabinet.

newBathCabinet

I ended up with this as my base for several reasons. 1) I liked the counter top on it.  Too many had goofy recesses (mini soap dish? really?) and backsplashes that were unnecessary.  I wanted a white, streamlined sink and didn’t want to shell out another several hundred bucks to replace it in the future.  2) I liked the overall shape–simple and reasonably classic.  3) Price point was good.  I almost picked out a boring-as-hell builder-grade yawn-fest that was cheaper and the only reason I paid more was to get the counter/sink I liked more.

bathFaucet

We also picked up this lovely little faucet.  I am absolutely crazy about the ceramic X shaped knobs.  I really wanted a wide-spread faucet with 3 separate pieces instead of everything mounted on a base, but that was over 3x the price so I had to pass on absolute perfection. This one is pretty near perfect though and so I think I can live with that.

Next up we ripped out the old vanity/sink.  In the process we discovered the shut-off valves were not completely shutting off the water so we had to turn off the water to the house, cut the pipes, install new compression fittings and shut-offs, turn the water back on, and pray we go it right.  We did.

newVanity1

The line of black on the wall is some rubbery adhesive I had to scrap off with a putty knife and razor blade.  And that wood pattern on the floor? Vinyl. Thank god they covered that up is all I can say! Then we measured where all the pipes were and cut holes into the base of our new vanity cabinet.

Luckily the sink did not come attached to the cabinet (which would have been good to know before we hauled the whole box up the stairs) so it was easy for one person to lift and the other to make sure everything was lining up right.  We also discovered this cabinet was  deeper than our old one (measure people!) and had to rip off the baseboard on the side wall (it will be going back once we trim it down).

The sink itself just attached with some silicone caulk so that was pretty simple.

Getting the faucet in was another story… Actually the faucet was easy, the pop-up assembly was the hard part.  If you’re just switching out a faucet you may not even need to deal with the pop-up assembly (drain stopper) but if you’ve added a brand new sink you’ll definitely have to.  The instructions that came with ours were AWFUL.  Part of the reason we were confused was that the part that came with our faucet was designed for a sink with an overflow, but our sink didn’t have that. We got it all sorted out eventually though.

So we’ve got the vanity cabinet in place.  We’ve got the sink installed.  We’ve got the faucet installed.  Go us!  Me being me, this wasn’t good enough, so then I painted the vanity.  The existing color wasn’t bad, but there were going to be some additions made and I didn’t want to stress over getting an exact finish match.

bathVanity

I wish I could tell you the color I used, but I can’t.  I started out with Benjamin Moore Temptation (Advance, satin) and thought it was too light, so I brought it back to get it re-tinted.  The next shade darker was French Beret and the awesome paint people couldn’t quite get that because of the amount of white in the previous mix so the color is somewhere in between the too, but still probably closest to Temptation (you can see the difference where I tried the dark version on the doors, although you can barely tell in real life).

Looking pretty good, right?  Not even the vanity is done yet though…

DIY Fail

You may have noticed I’ve mentioned our tub faucet a couple times without any actual closure.  Our existing faucet is leaky as hell so we decided to replace it. Also the shower curtain rod was was too small for the tub (a little narrow and about a foot too short). We even got all fancy and splurgey and found this complete set (faucet/shower/curtain surround) at Vintage Tub and Bath because I figured if we were going to do it, let’s do it right.

showerBefore1

The new faucet arrived the day before we left for Europe.  We somehow got it into our crazy heads to try and install it that night so the faucet wouldn’t be dripping the whole time we were gone. Two hardware store runs later we discovered we couldn’t actually turn the water off.  There’s no shut of at the tub and the main house shutoff wouldn’t budge and we were afraid of breaking it.  So we called a plumber to replace the shutoff valves.

showerBefore2

All right!  Let’s do this thing!

We tackled the kitchen faucet last weekend and were going to do the bathroom at the same time… only when we went to start disconnecting everything we discovered that there are no actually hex nuts connecting the pipes to the faucet so our wrench was rather useless.  We had to give in at this point since it seems like the only way to disconnect everything was to cut the pipes and redo the connections.  We’re at least smart enough to know that is probably beyond our skill level at the moment so we had to call a plumber again, this time to replace a faucet.  Argh…. this should have been a pretty simple DIY job but our quirky house has conspired against us.

This morning the plumber came and nearly didn’t do the work.  Our old faucet was not up to code (faucet below the spill the line) and our new faucet didn’t fix this issue (since this is hard to on a clawfoot where the faucet is mounted to the tub wall).  Plus, St Paul is trying to change their codes to get rid of 2 handled shower faucets because apparently there’s a risk of scalding (????). We’re not worried about either of these issues since A) the spill line issue is only an issue if you have sewage backing up into the faucet (and contaminating your drinking water) which we’re not terribly concerned about on the second floor (and we haven’t found a record of this ever actually happening) and B) scalding could only be a possible issue if your water heater is set hot enough which ours is most certainly not. Ultimately we had to sign a waiver but we now have a non-leaky (and gorgeous!) faucet and shower head! … and a stupid-expensive plumber bill.  Nrghhh.

showerAfter1

Expensive, but oh-so pretty!  And much more authentic to the house! Granted, nothing else in the bathroom besides the tub are terribly authentic to the house (more like authentic to the 70’s-80’s), but I’m working on it!

showerAfter2

The new shower head sits significantly higher than the old one and can definitely comfortably fit even the tallest people I know (and I know some crazy tall people).

showerAfter3

We also ended up with this….er… beauty. If we had anticipated this we could have ordered nice looking connections.  But then, if we had anticipated all of this we might have just asked the plumber to repair the existing faucet. The good thing here is that the shower curtain hides it pretty well.


Unrelated: I’ve been home sick all day, pumping myself full of pain killers/fever reducers and vitamin C and really just trying to sleep it off. Apparently I get some trippy dreams while sick.  This time my house was invaded by a squirrel that both my stupid boy cat and my cousin’s six year old son tried to befriend.  The Bloggess was my neighbor and was giving me gardening advice, like growing carrots in bathroom vanity drawers and trying to keep renegade kale from taking over the yard. Then my Dad and step-mom came over and we went to the Gay 90’s (not exactly NSFW, but possibly mildly questionable for work) to watch the drag show but ended up playing a bizarre Clue-like game (involving the Waco, TX siege) instead. The really sad thing is I can see exactly how my sub-conscious arrived at about 99% of this.

Kitchen Progress

Last week we attempted a temporary counter top fix because the butcher block patterned laminate is just a little gross. We’ll get new counter tops at some point, but not until we replace the sink and possibly the cabinets as well.  In the meantime I ordered a roll of Instant Granite  (in a marble pattern) for $60.  It’s basically a heavy vinyl sticker you can put over your counters.  It actually seems pretty awesome for a temporary solution and it’s renter friendly since it peels off without damaging the existing counters… we’ll see how it holds up over time.

As a refresher, here’s what we started with:

counterBeforeKitch

We actually flubbed the first installation attempt and had some issues with the sink corners and gaps that needed patching… it wasn’t pretty.  Then I watched a shit ton more videos on people installing this and then tried again. It worked WAY better the second time. Here’s the quick rundown:

Step 1: Clean the counters.  I used a general surface cleaner and then wiped everything down with rubbing alcohol and remove any trace nastiness. (Vodka works too if you say, lose the cap to the rubbing alcohol and then your husband dumps it out so  no one accidentally spills it).

counterSuppliesKitch

Step 2: Cut the vinyl roughly to size.  Since we screwed up the first time we didn’t have *quite* enough the second time so I actually had to do a little piecing.  In a perfect world I would have done the back splash as a single piece and then the entire flat surface as a single piece (we ended up using 4 pieces and one very tiny patch stuck in the sink corner). Maker sure you give yourself generous borders since you can always cut it down later, but adding on patches looks weird.

counter1kitch

counter2Kitch

Step 3: Mist the counter top with water and start adhering the vinyl working in about 10″ sections at a time.  Peel off the backing and have your buddy hold the non-working section of vinyl up while you smooth out bubbles with you hands and a make-do squeegee (like a credit card… we had a hard plastic kitchen scraper that worked great).  Smooth everything out the best you can then expose a little more adhesive and slowly press that onto the counter.

counter3Kitch

Step 4: To fit the vinyl around corners (like if you have a over mount sink) a heat gun or hair dryer helps soften the the vinyl to make it a little more pliable.  Corners are tricky though so my absolute best advice is to take some vinyl you know will be extra and experiment a little bit.  Like wall decals, this stuff just peels right off.  It can take a little muscle, but doesn’t seem to leave an residue or gunk behind.

We put on the back splash first (the above pictures are from attempt #1) and trimmed it so there was about a 1/4″ overlap on the horizontal counter surface since it can be a little difficult to line up a giant sticker perfectly.  If you’re feeling bold you can try and do everything in one piece, but be warned, it is a little unwieldy. We also caulked around our sink after putting on the vinyl since any caulk had long since disappeared. Any remaining bubbles in the vinyl you can poke a pin hole in and then re-smooth.

We also made things easier by taking out our faucet. Our existing one was nasty and had the wussiest water flow ever.  We had a plumber look at it before and he thought the problem was in the faucet and not the pipes.  As we removed the old faucet this started to look increasingly probable.

faucetEwKitch

The hardest part of replacing the faucet was getting the old one out. There are lock nuts that hold the fixture in place, but are not any sort of watertight barrier whatsoever.  Whoever put this faucet in though had puttied these into place.  We finally had to break one to get it off (thankfully they were plastic). Everything else went about as smoothly as you would expect.

Now we have some much better looking counters and a beautiful and fully functioning faucet (We chose Premier’s Charlestown faucet)! Replacing that thing actually completely solved our  water flow problem!

counterAfter1Kitch

counterAfter2Kitch

faucetAfterKitch

And now doesn’t our sink just look especially awful?