A useful clamp setup begins before you open a glue bottle. You need to know how the parts meet, where the pressure belongs, and whether you can hold the assembly without marking or distorting the furniture.
This guide helps you plan a simple setup after an appropriate repair method has been established. It does not turn an unidentified loose joint into a ready-to-glue project, especially on an antique or a connection with damaged material.
Decide whether the joint is ready for a setup
Look at the connection and describe what is loose, which parts are moving, and whether any material is missing. A gap caused by an obstruction is different from a clean joint that has separated.
If you cannot identify the construction or an earlier repair, stop before applying pressure. Old adhesive, split fibers, hidden fasteners, or a distorted part may prevent the joint from closing correctly.
For a valuable or sentimental piece, have a repairer or conservator establish the treatment approach. Once the repair requirements are clear, the clamp plan can support them instead of dictating the repair simply because those clamps are available.
Keep the furniture supported in a stable working position. You should be able to observe the joint without holding the whole object upright with one hand while trying to operate a clamp with the other.
Sketch the direction the parts need to meet
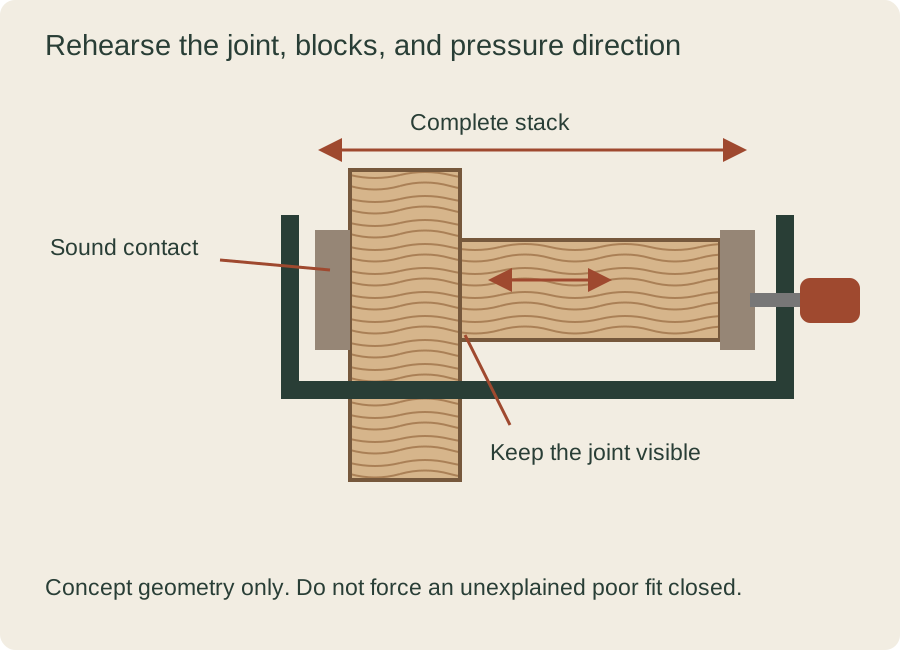
Draw the two components and the joint between them. Mark the direction that would bring the mating surfaces together, then identify sound surfaces where a clamp or protective block could make contact.
A clamp pushes between its two contact points; it does not automatically correct every alignment error nearby. Pressure applied at an awkward angle can encourage a part to slide or twist away from the position you wanted.
Look for a route that keeps the clamp close to the intended line of action while leaving the joint visible. If a handle, rail, or curved leg blocks that route, reconsider the arrangement before choosing a larger clamp.
A small sketch can reveal when your proposed contact points belong to fragile ornament rather than the structural parts. Do not ask a decorative molding or lifted veneer edge to carry the clamp pressure.
Measure the complete stack
Measure everything that must fit between the jaws, including the furniture, protective blocks, and any fixture required by the chosen method. The clamp’s nominal opening must accommodate that complete stack.
Then measure the distance from the accessible edge to the intended pressure point. This reach is different from the opening, so a long bar does not necessarily let the jaw reach farther into a panel.
Check clearance for the handle and release mechanism as well. A clamp that can be installed but cannot be released once another part is in position creates a problem you should discover during rehearsal.
Record these measurements with your sketch instead of buying by a familiar clamp size. They explain why the setup needs a particular geometry and let you compare tools on something more useful than the biggest force claim.
Choose contact protection deliberately
Use clean, sound protective blocks or suitable pads where the repair method calls for them. Their role is to provide stable contact and protect the surface, not to conceal an irregular assembly that will not align.
Check each block for grit, glue residue, sharp corners, and movement under light contact. A soft pad on the clamp does not guarantee that an old finish will tolerate the pressure or contact material.
For a shaped surface, a flat block may sit only on a small edge and want to move. Consider whether a suitable shaped support or professional setup is needed rather than tightening harder to keep a poor contact in place.
Do not improvise by wrapping loose fabric around a contact point without considering whether it can slip or bunch. You need a predictable interface that still lets you see what the furniture is doing.
Rehearse without adhesive
Place the components, blocks, and clamps in their intended positions without glue. Bring them into gentle contact and watch the joint, surrounding surfaces, and supports as the setup takes shape.
The parts should meet in the intended alignment without force being used to overcome an unexplained obstruction. If they do not, release the setup and find the reason rather than using the rehearsal to train the wood to obey.
Practice the order in which you will place and release each clamp. The first clamp should not block access for the next one or pull a previously aligned part out of position.
Keep necessary tools and cleanup materials within easy reach without putting them under the furniture. Your rehearsal should include the movements you actually expect to make, not just a photograph of the finished arrangement.


Check alignment from more than one view
Look at the joint from the front, side, and any accessible reference surface that matters. One face can look flush while the assembly is twisted in another direction.
Use appropriate reference measurements for the repair rather than assuming that matching outside edges establishes the whole geometry. If the piece has moved out of square or the required alignment is unclear, get the construction assessed first.
Photograph the dry setup from a useful angle and note the block locations. This gives you a reference for the planned sequence without marking a finished surface or relying on memory once adhesive is involved.
If a clamp or block shifts during gentle rehearsal, treat that as a demonstrated setup problem. Correct the contact or support before proceeding; added pressure is not a dependable way to make a poorly arranged clamp stay put.
Keep adhesive instructions separate from clamp specifications
The appropriate preparation, application, working time, clamp time, and full cure depend on the adhesive and repair method. Read the exact product instructions instead of borrowing a timing figure from a different glue or joint.
A manufacturer’s maximum clamp-force claim does not tell you the pressure your particular repair should receive. Contact area, wood condition, joint geometry, and treatment requirements all matter to that decision.
Do not interpret visible squeeze-out as proof that a damaged joint is repaired. A surface symptom cannot establish that the mating surfaces were prepared appropriately or that the internal fit is sound.
If the instructions and your available setup do not fit together, pause and resolve the mismatch. Choosing a glue because it seems to forgive an uncertain joint is not the same as establishing an appropriate repair.
Know what would make you stop
Stop if the wood cracks, the surface dents, a pad skates, the joint begins to open elsewhere, or a support shifts. Release pressure in a controlled way while maintaining the object’s support.
Also stop if you lose access to the release mechanism or can no longer observe an important part of the joint. A setup that depends on guessing what is happening behind a clamp needs to be reconsidered.
After an appropriate repair, follow the specified timing before removing support or returning the furniture to use. A joint that appears closed is not permission to shorten cure time or skip the required assessment.
A successful plan leaves you able to explain the force direction, contact protection, alignment checks, and release sequence. That understanding is what makes a small clamp setup useful, rather than simply surrounding a loose joint with the tools you own.
Consider a small rail that sits correctly during the dry fit but slides sideways when a clamp touches a curved leg. The useful response is to revisit the contact arrangement, not to interpret that sideways motion as a need for greater force.
Sources & editorial notes
Research checked October 22, 2026. Practical examples are editorial explanations; no personal restoration experience or product testing is claimed.
Your next useful step
01 / How to Diagnose a Wobbly Table Before Reaching for Glue →02 / Best Small Clamps for Furniture Repairs: Jaw Reach, Pads, and Control →03 / How to Set Up a Small Furniture-Repair Workspace →