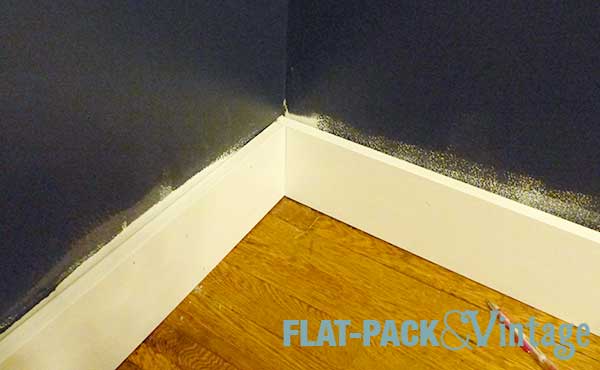
After fighting with them for a week, the dining room baseboards are now installed and they look FABULOUS! Trying to mimic Victorian baseboards with trim you can find at an accessible hardware store can be a bit of a pain in the ass, but guess what? It’s doable! It’s not exactly cheap (it cost us around $200 for a 150sqft room), but it is still reasonably affordable.
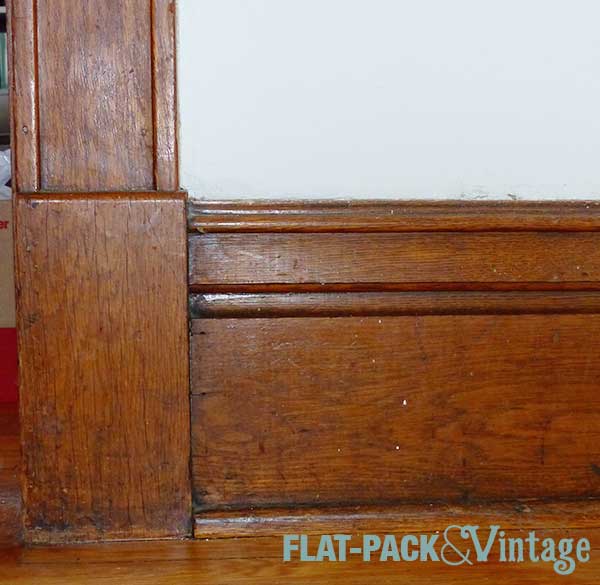
To recap: This is what the rest of the house has that I was trying to at least somewhat match.
And I ended up being my neurotic self and choosing a 4 part baseboard option.
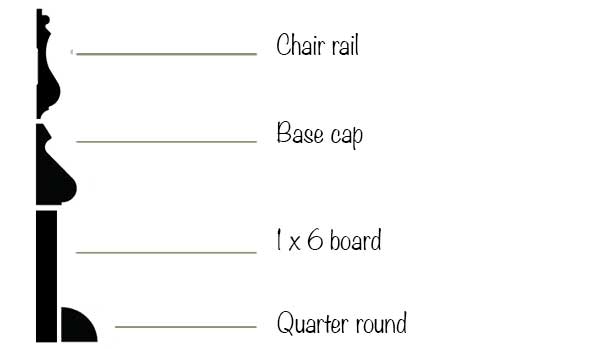
(This image isn’t exactly too scale since, so the base cap really isn’t that chunky)
If I hadn’t had a specific plinth height to work around at all the doorways, I probably would have gone with a 5 1/4″ baseboard, the chair rail, and quarter round since the look would be very similar, but about an inch or so shorter than what I needed.
I’m pretty sure I saw all the same pieces at Home Depot, Menards, and Lowes (I’m positive of everything except the base cap), but I ended up buying the Chair Rail and Base Cap from Lowes and the 1×6 (select pine) and quarter round from Home Depot, just because I happened to be at Lowes when I had my trim meltdown.
When buying your trim pieces, not only do you need to measure your total length of trim, but you should also calculate how many pieces you’ll need to avoid as may same-wall joints as possible. Example: our longest wall was 15′, we could only fit 8′ boards into our car so after cutting pieces to fit that wall we’d have 1′ of board that would effectively be dead to us since we don’t have either a 1′ long run or a 9′ long run anywhere and piecing in a 1′ long piece unnecessarily would look a little awkward (you want to try and limit as many seams as possible). Basically just be aware that you may have to overestimate more than you might think.
I decided to paint everything before installing it (although you will still need to fill and touch up your nail holes later on). I used 2 coats of primer (the bare wood absorbed quite a bit of the first coat so I decided to play and it safe) and then one coat of Benjamin Moore Advance.
After everything was dry, I moved on to the install. Matt and I decided to buy a brad nailer for this very purpose since, let’s be honest, while you can definitely hammer everything in by hand it will be a beast. We also have other trim we’ll be replacing in the house later on so buying seemed like the best option. Most hardware stores have tool rental options you could look into as well.
We started off with the easiest section of wall–single length of board, no miters. You want to measure as precisely as possible because if you cut your pieces too short they’ll be gappy, too long and they won’t fit.
I dry-fit after each cut: cut my 1×6, dry fit; cut my base cap, dry fit; cut my chair rail, dry fit. This way I could figure out after one cut if I screwed up my measurement somewhere before possibly ruining any of the other pieces.
I felt like a champ after doing this bit! It fit together like a dream and looked perfect! I was on top of the world! I was going to conquer this dining room in less time than I thought!
And then I moved on to a corner.
Oh sweetzombiejesus kill me now.
A pretty well known fact about old houses is that nothing is square. As a teenager I once watched my dad, my aunt, and my uncle work to install a hardwood floor into a 150 year old farm house… you think I would have learned something from that. Apparently not, but here’s my best advice for tackling a baseboard install.
1- Dry-fit ALL your pieces before nailing anything in.
I started by working wall-by-wall (luckily only with the 1×6) and at my very first corner I hit a snag (see above re: walls not square). So I had to rip off the first board and yank all the nails out of it. Ugh. THEN I did the same damn thing while trying to join the boards on the long wall. *headdesk*
Also, pick a start point and work consecutively from there. If you have sections of walls that don’t have corners you can do those independently. Otherwise though you want to go in order rather than trying to make something meet in the middle. We had a couple spots where we had to shim up the 1×6 to make it level with the previous board and other places where we had to grind off a bit of the floor to make a piece sit level (what we took off from the floor was entirely under the previous baseboard and was a combination of some sort of adhesive and a height change from years of refinishing the exposed floor).
2- Keep your saw close by
We keep our miter saw in the basement so I had maneuver 8′ boards up the stairs and around a couple corners and sometimes the cuts require a bit of tweaking so I’d to haul them BACK downstairs and back up again. This virtually destroys my motivation. After 2 days of not much progress we shoved the dining room table into the living room and I moved the saw into the same room I was working in.
3- Saw blades have width
I actually knew this before starting, but if you’re new to power tools this is worth noting. Basically, when you’re going for very precise cuts where you line your saw blade up with your cut mark matters. It’s also why if you’re cutting multiple lengths out of one board you don’t mark off all the measurements an then cut–you’ll get progressively more off the more cuts you make.
4- Know your joints
There are 3 main types of joints you’ll deal with for trim: butt, miter, and scarf.
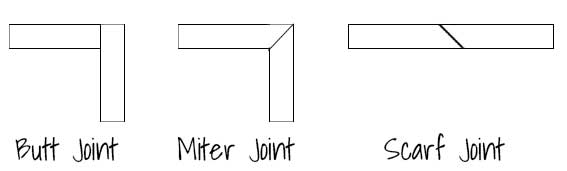
You can use a butt joint for corners when you have straight pieces (I used it for the 1×6’s). You can also do a version of a butt joint with fancier trim pieces; this would be a coped corner.
The other option for corners is a mitered joint, but this can get finicky when your walls are not square. If you’re painting the trim and it’s just a little off, it’s not a big deal because you can caulk the gap unless it’s ginormous.
The scarf joint is for joining two straight pieces of trim because most trim you find will be 8-10′ long and many walls are longer than that.
5- Cut your longest pieces first
This way if you screw up you can just keep cutting them down and use them in a shorter space. I managed to do this without even thinking about it–go me!
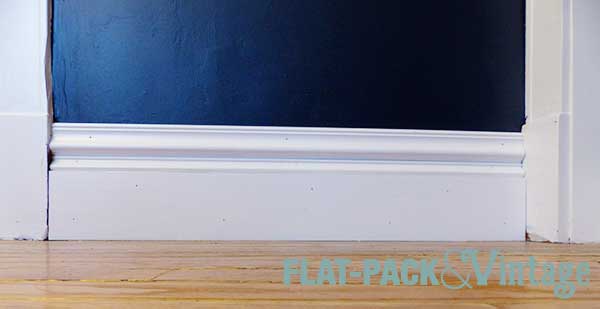
So after a couple of false starts and a few headaches we got all the baseboard molding up!
The 1×6 was the worst to deal with–it’s not flexible and has the most area to line up well for corners. I opted for butt joints with this because the mitered corners were not lining up well at all. It also didn’t help matters that the miter saw would slide a little on our hardwood floor, making some of my cuts off because the board I was cutting would no longer be square against the blade. ARGH!!!! This took a couple evenings of work, but getting the first layer installed well would make everything else a lot easier.
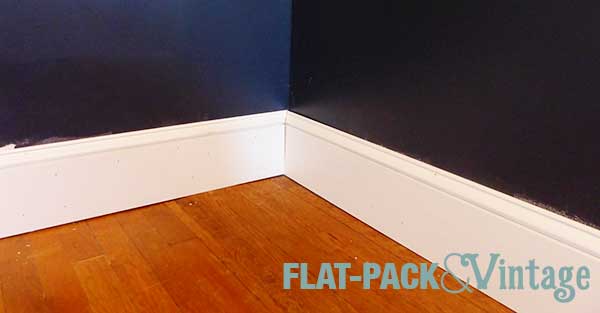
Next up I added the base cap. SO much easier. I was able to knock out this layer in about an hour and my scarf joint were much, much cleaner.
And finally, the chair rail.
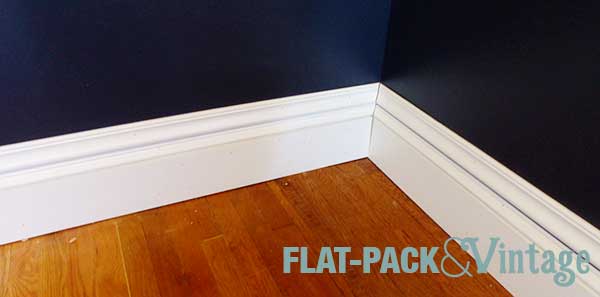
I still have to add the quarter round, fill the holes, caulk any gaps, and touch up with paint. The worst is over though and it’s looking good!
*I don’t think any reasonable person could truthfully admit that they wouldn’t have even considered that title.