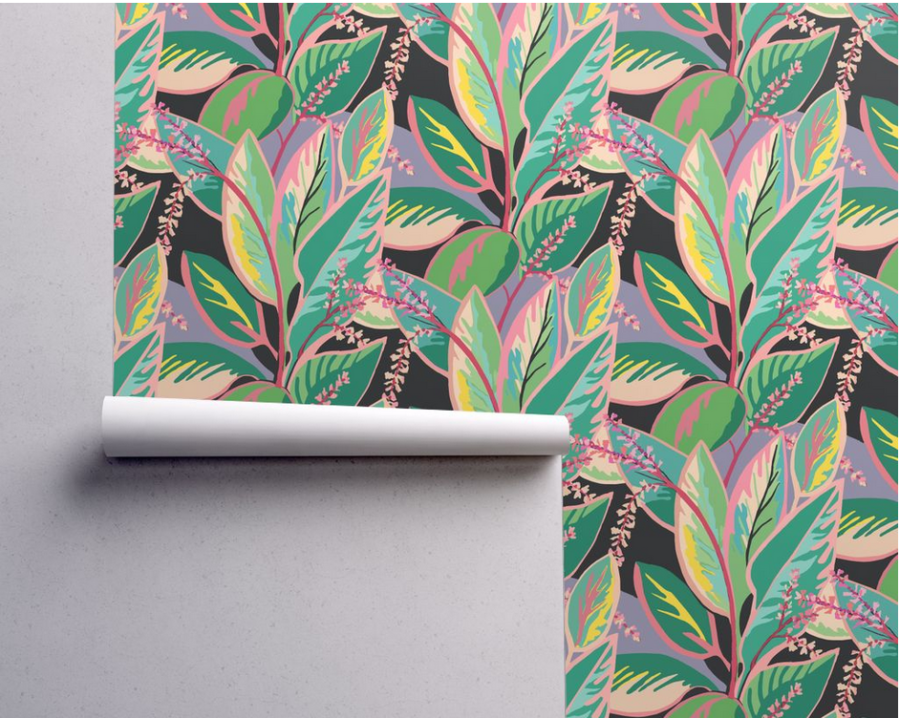
A couple weekends ago we hung the wallpaper in the micro-bath! It looked so good I even had to share a teaser on Facebook before it was trimmed.
When I’ve told people I was planning on wallpapering the bathroom I’ve mostly been met with polite skepticism. I get it. Most people probably associate wallpaper with their grandma’s house and think of dated florals that are impossible to remove.* Wallpaper has come a very long way though! There are a huge selection of prints to choose from and it’s a great way to add a fun accent. Plus, it’s much easier to remove than it used to be.
I ordered this water-activated wallpaper from Spoonflower. The instructions it came with were pretty straight-forward, and you can find video instructions too. Unfortunately, we had to deviate slightly from the directions because they assume your walls are reasonable square and ours very much are not.
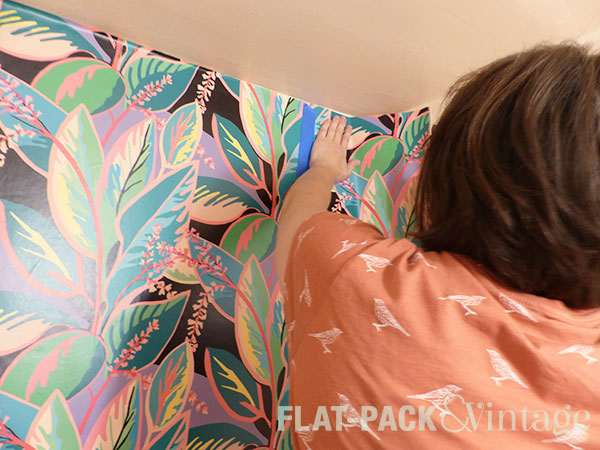
Instead of lining up the wallpaper in the upper left corner, I drew a level line down the wall (about an inch narrow than the paper) and lined up the right edge of the paper with that, leaving some overhang along the left corner. This was slightly more finicky, but really not too bad. The pattern had a noticeable vertical to it so I wanted to make sure it hung a square as possible.
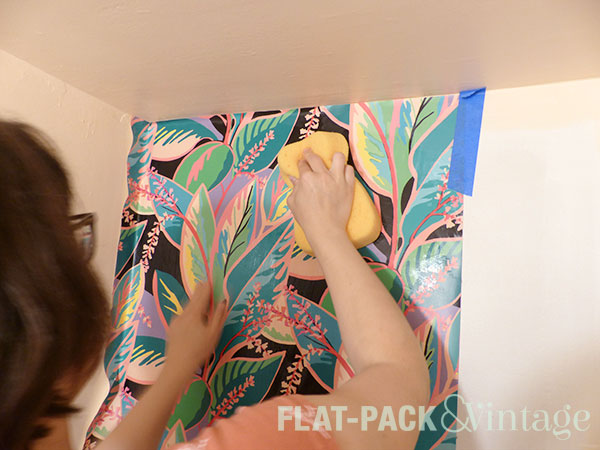
I used painter’s tape for a little bit of extra support while lining everything up. It won’t support a lot of weight, but it’s helpful for keeping a section in place while you’re wrangling the rest of the roll.
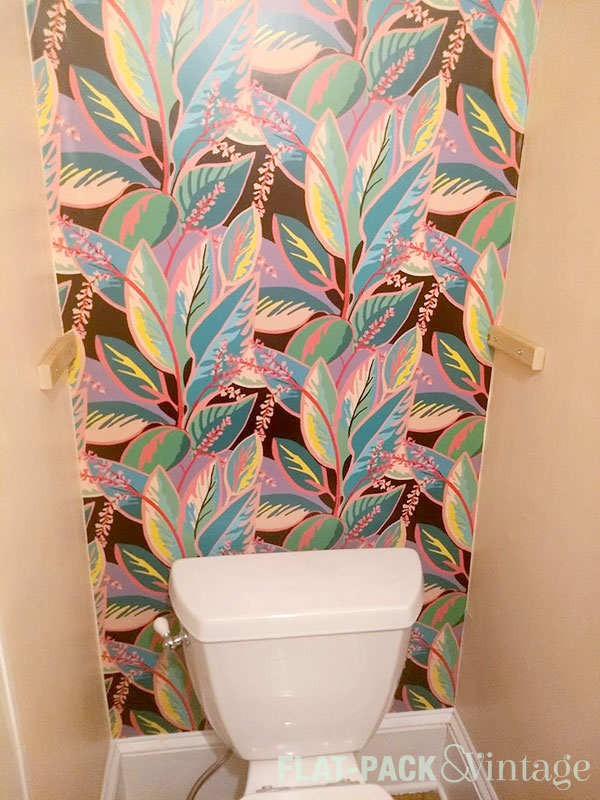
Since out bathroom is only about 30″ across, I only need about a width and a half of wallpaper. Instead of dealing with over a foot of overhang, I cut the second roll in half (while it was still rolled–it’s not a super-clean cut, but the extra wasn’t getting used for anything). I still had a couple inches of overhang, but it was much easier to wrangle in a tiny space.**
To smooth it down behind the toilet (without having to remove the toilet), I used this handy-dandy super-skinny roller. Now, I’m positive this area has some lumpy bits, but they’re also impossible to see so I’m fine with that.
Once everything had dried, I trimmed all the overhang with a utility knife and a straight edge. Even though the excess had adhesive on it, it peeled off without a problem and didn’t leave any gunk behind. You can totally tell how not-square our corners are, but I anticipated that and carried the wall paint past the corners a bit… I could have painted the back wall completely, but it wasn’t necessary. After trimming, I noticed some loose bits along the edges/corners which was a little worrying. Thankfully I just re-wet the adhesive on the paper and stuck down just fine.
(ignore the bits of wood on the walls…they’re part of the last project for the room that’s not done yet)
SO GOOD!
At this point Matt probably thinks I’m a lunatic since I keep wandering into the bathroom to stare at it.
*One house I lived in growing up had wallpaper EVERYWHERE and it left the most disgusting residue when you tried to take it off.
**Matt’s brilliant suggestion was to just hand a single width of wallpaper down the center of the wall. Um, yeah, no.
Damn…Netflix makes some really good series. The main reason I’ve been keeping it around after getting Amazon Prime is for Stranger Things. But I’m also a sucker for the 72 Dangerous Animals series. Now I’m also keeping it around for The Umbrella Academy.
To be fair, The Umbrella Academy isn’t 100% original Netflix–it’s based off a comic book. A comic book I really want to read now.
Me: I’m watching The Umbrella Academy and really getting sucked in. I want to read the comic it’s based off of now too.
Matt: Is it sort of like X-Men?
Me: Sort of… it’s like a jacked-up, highly dysfunctional X-Men
It’s fairly predictable if you’ve seen/read a lot of this sort of thing, but it’s still very good. The soundtrack is also awesome, in a bizarre sort of way. Like a fight scene to They Might be Giants: Istanbul (Not Constantinople). I think it has a similar musical feel to Kill Bill (which was the first movie I saw where I was really wowed by the soundtrack).
The actors are awesome, especially the guy who plays Five. I assumed he was an older (and by “older” I still mean fairly young, like 20’s) actor who just looked very young. Nope, dude’s 15 and just wildly talented.
So basically, if you like shows/movies based off of comic books, or generally like Sci-Fi/Fantasy, I definitely recommend it.
Matt took last week off of work to get some things done around the house. His big project? Re-doing the front steps.
Our existing steps were ugly, wonky, and starting to decay. Matt already replaced one of the boards that was starting to fall apart, but the steps really needed to be completely replaced. Apart from lacking in structural integrity, the steps were also ugly and badly proportioned.
Day 1
Matt texts me a photo of the demo work…an giant gaping hole in the front of our house. Awesome. He also called me just before I left work asking me to pick up 80lbs of sand on my way home. He was apparently too dirty to go to Menards, but me picking up a couple bags of sand, covered in dirty rain water, in my work clothes was no problem. #bitter
Day 2
Matt finished digging out the base and leveling the existing pavers. Once he had a level base, he was able to build new (and level!) supports.
Day 3
We have stringers! And a tread! Woot Woot!
Day 4
Apparently lattice is a bitch to cut if you’re not cutting on a 45 degree angle, but I think he did a pretty good job!
Day 5
Matt waited for me to have free time to do the risers. They needed to be ripped down to the correct height and it’s much easier to have two people when running long pieces of wood through our table saw.
We still need to add railings, but I think it’s looking pretty good so far! My dream plan is to extend it width-wise as well (the sides of the top step line up with the edges of the windows), but we would need to pour a new concrete pad to really make that worth it. You can also see our walkway isn’t as wide as the steps, which we’re dealing with for now. Someday down the the road it would be nice to redo the walkway and make a better base for the steps. Unfortunately we have more pressing spendy updates before we get around to that. Very few people have money to do All the Things, and that’s ok, just figure out what your priorities are and work from there.
Wesley the Crusher is now 11 months old! He’s 24lbs, has 2 teeth (and is working on 2 more), and has almost discovered his knees. He still mostly drags himself around like a walrus, but occasionally we see him move a few feet on all fours. He’s pulling himself up on everything, whether it’s stable or not, and super curious. Luckily for the cats he’s also (gradually) getting more gentle with them.
Poor little guy also just got his first significant illness. He’s had a few colds, and a mild case of croup, but this time he has something that’s really taken a tole on him. It’s pretty scary for the parents when your baby’s temperature climbs to 105, but our pediatrician said that babies tend to run a little hotter, so while it’s definitely a significant fever, it’s not an oh-my-god-my-baby-is-dying fever. The doctor thinks it might be Hand Foot and Mouth since he had a couple red spots on his feet. The spots haven’t spread at all though, so who knows. Either way, he’s doing MUCH better today, but still exhausted.
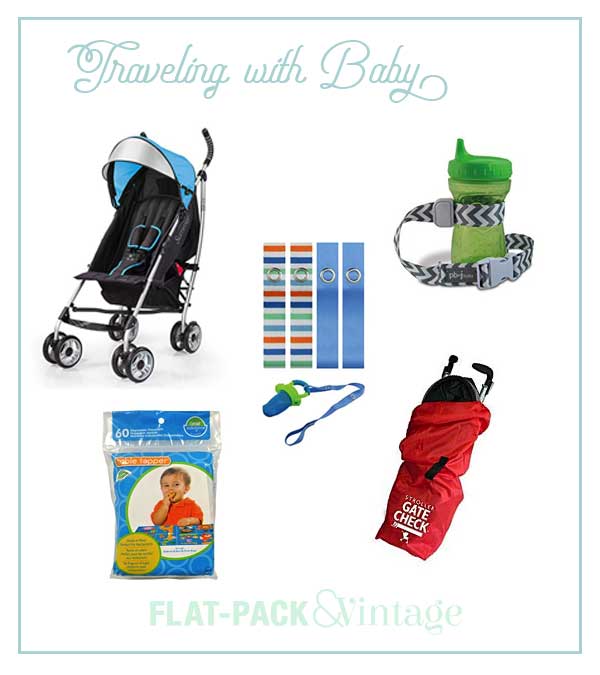
Traveling With Baby
Over Memorial Day we took Wesley on his first plane trip, fittingly enough, to North Carolina. It was actually a great choice for a first flight because it was 1) fairly short (2 hours in the air), 2) a direct flight, and 3) we were visiting family and they had a bunch of extra baby gear so there was less big stuff we had to lug. We’ll be doing a more intense trip later in the summer, but after this one I’m feeling pretty optimistic.
We got the Summer Infant 3D Lite stroller a couple months ago. Our travel system stroller was way too bulky to be convenient and we knew we’d be navigating airports in the near future. You can get super-cheap umbrella strollers, but the 3D Lite had some great features without being super pricey. We’ve been using it as our everyday stroller, but it small/light enough to work well in airports too.
1) It’s tall enough for parents. This is a common complaint when I was reading reviews of umbrella strollers–unless you’re super-petite the handles tend to be uncomfortably low. This does mean that it’s larger than a lot of other umbrella stroller and it barely fits in the trunk of my Chevy Sonic…but it does fit and all the other features make it totally worth it.
2) Storage! The 3D Lite has a generous basket underneath which I find to be incredibly useful.
4) Sun shade. While it won’t protect your baby from everything, it’s better than nothing for sure!
5) Recline options. The 3D Lite has multiple recline options, and can go almost horizontal, which is awesome if you need some nap time on the go.
Other useful things:
Sticky place mats for eating out (these are way classier, but personally I couldn’t justify the price difference for something that’s designed to be spilled on and thrown out)
Sippy cup/bottle tethers (If your cups have handles, you can just use toy tethers, but ones like these have a non-slip grip designed for bottles)
First aid kit (I already keep one in my diaper bag with some bandaids, and neosporin, for trips I add hyrdrocortisone, a thermometer, and infant Tylenol)
Alcohol wipes (good for cleaning off baby utensils on the go)
Gate check bag(s) (for stroller/car seat). This one worked ok for our stroller, but already has a small rip. At some point I may just take it apart to use as a pattern and make my own.
Mini bottle of dish soap
Travel bottle brush (we use the Como Tomo bottles which have a really wide neck so we didn’t need this, but depending on your bottle style it might be useful)
Fly Direct
Depending on where you’re located, this won’t always be an option. If you have the option to fly non-stop DO IT. There will be fewer pressure changes for baby, and less hassle of hauling all your crap around an airport.
Condense your Baggage
When it was just me and Matt flying, we’d travel with 2 carry-on suitcases + my purse. Easy-peasy. This time around we knew we were going to have to check luggage. We had 1 medium-sized suitcase we packed for everyone (rather than individual suitcases for each traveler). This not only cut down on baggage fees, but allowed us more free hands. Just keep in mind, airlines tend to charge an extra fee if your bag exceeds a certain weight so if you pack heavy, weigh your bag and check policies beforehand.
Be Prepared
In addition to our checked bag, I also packed an emergency carry-on suitcase. This was basically the everything-goes-wrong-and-holy-shit-now-it’s-the-zombie-apocalypse bag. I had a couple changes of clothes for Wesley (in addition to the back-up outfits in my diaper bag), one change of clothes for me and Matt (because babies tend to poop on you at the most inconvenient times), a 2 day supply of diapers, and extra formula.* Once we checked our bag we were left with one carry-on suitcase, a diaper bag, my purse, and a stroller. Strollers and car seats are typically exempt from baggage limits, but always check your airline’s policies.
You Don’t Need it All
If you’re going to visit family/friends, check with them ahead of time to see if they have (or can borrow) larger baby items–car seat, pack-n-play, highchair/booster. If you’re not, check with your rental car company to see if they also rent car seats, and check with your hotel to see if they provide cribs. Even if things cost a bit extra, it may be worth your sanity to not have to lug EVERYTHING around with you.
If you do need to Bring All the Things, you may want to invest in some travel-specific gear (which may not be worth it unless you’re a frequent traveler). The Cosco Scenera seems to be a popular choice for travel since it’s FAA rated (so you can use it on the plane), it’s lightweight (about 10lbs), and fairly easy to install. You can also get things that let you strap the car seat to your luggage, or convert it into a stroller. If you think you’ll need a highchair (like if you’re staying in an Air BNB, or with non-baby family/friends), I’m personally eying this one for our next trip. It’s inexpensive, condenses pretty darn flat, and still provides a boost to get baby at the right table height.
*Which promptly got my bag flagged by security because I was traveling with a large box of powder. They just had to run some magic swab over the box and we were good to go.
Spring has finally sprung in MN! One thing people say about the more Northern states is that it’s really nice to have four seasons… what they don’t say is that the four seasons happen all in one week and the rest of the year is half freezing cold and half boiling hot.
We’re reasonably confident that we won’t be getting any more snow, so I started to make some progress on the garden. Last time I talk about about my plans for the back yard, but I actually started with our front yard (probably because it was the smallest section).
We just recently got gutters so I was able to tackle the planting beds in the front of the house.
My first step was marking out the desired shape of the bed and clearing out the grass on the planting side. Then I picked up some inexpensive plastic edging so I could prevent the grass from encroaching again. The edging isn’t too hard to install, but I do recommend letting letting it sit in the sun for a couple hours to soften a bit (it says to do so in the instructions, but I didn’t because I’m impatient). Having a mallet to drive in the stakes is very useful as well (I could get them most of the way by hand, but needed a mallet to finish it).
While I was picking up the edging, I also raided the plant section. The selection wasn’t what I was hoping for (but then, it’s been a looooong winter). I knew I wanted to get a large-ish bush for the corner of the house. I was thinking forsythia, but settled on a Purple Leaf Sand Cherry. Not only does it flower, it also has lovely red-purple leaves so it will add color for most of the year.
Now that I had the red bush, I wanted a few other things for color that wouldn’t clash horribly. I settled on Eureka Bronze Leaf Begonia (annual–purpley leaves, white flowers), Chelsey Coral mums (annual–coral-pink flowers), Vista Red and White Salvia (white to pinkish-red flowers), Wine and Roses Gladiolus (pinky/purple/burgundy flowers), and some Snow-in-Summer (ground-cover, silvery green leaves, white flowers). I already had some white hydrangeas; they’re still in their early stages but they should fill out nicely against the house over time.
I planned by layout by separating the individual plantings and placing them before actually digging any holes. This helps you get a better idea of the final look… especially if you’re like me and can’t visualize gardening to save your life. I’ve been watching a couple gardening shows on Netflix and the best advice (for me anyway) was to not think about it as gardening, but to think about it as an art installation, or (in my case) a design-build project. I pay attention to the light requirements and the estimated heights and then I rely on the basic design principals in the same way I would for an interior project.
And then I cross my fingers and pray nothing dies off immediately.
I did manage to get everything dug in this weekend. Like I mentioned earlier, I still need to thin out of the lilies on the left and I have a sedum I want to migrate, but after all the other work I was spent.
It doesn’t look like much yet. Over time I plan to work in more perennials, but I’d like to see how the more dominant plants fill over time before I make more permanent additions.
Matt has plans to re-build the front steps, probably some time this summer, which should also increase our curb appeal. I’m also anxiously awaiting the day we decide to repaint/reside the house–getting rid of the drab brown should drastically increase our curb appeal!
I’m on the hunt for some shade-loving plants for the right side of the house. My quickie online research shows that hydrangeas are shade tolerant, I’m not sure if they’d like quite as much shade as exists under our pine tree (which is less “shade” and more “complete absence of light”). I also need some red/purple/pinky shade plants to balance out some of the color. Any plant-savvy people out there with suggestions for me? I’d love to hear them!
8 months??? Already?! I feel like I just wrote up his 7 month update last week.
He’s still quite the little chunker and has passed the 20lb mark–22lbs 10oz! We just had to retire pretty much all of his 9 month clothes because they were getting too snug. Some of his 12 month clothes ride up over his giant belly already too.
Still no teeth, but the drool is pouring out of this boy! I’ve had to start keeping drool bibs on him so he doesn’t soak through his shirt. No locomotion yet either. I’m not concerned about his disinterest in crawling from a developmental standpoint, but I am anxious to see him moving just because I think it will be fun. I’ve been told to enjoy his immobile phase while it last though.
Even if crawling hasn’t really made his radar, Wesley is showing more and more interest in food. Baby Led Weaning didn’t work out as we planned so he’s still mostly on purees. We do keep offering soft/disolvable foods so he can work on mashing them himself, but he hasn’t quite mastered that yet.
Wesley does really seem to prefer food blends over a single pureed fruit/veg puree. I started picking up pouches by Happy Baby to use as taste tests. If Wesley seems to enjoy the combo then I’ll work on making my own version at home since relying on the pouches can get pretty pricey and making your own baby food is really easy.
The best way to cook food for baby is apparently steaming or roasting. Personally I tend to roast veggies, but steam fruits.
Don’t be afraid of seasonings!* I’ll roast carrots with a little olive oil, a pinch of salt, and some pepper or dill and then puree. I’ll add a dash of cinnamon to an apple/sweet potato blend. Think about what flavors you like in your food, but start off on the mild side
You can make a big batch at once and freeze off portions using an ice cube tray (a standard ice cube tray compartment seems to be approximately 1oz). Once the cubes are frozen I just dump them into a freezer bag, labeled with the type of food and the date made, then defrost as needed.
And a couple of recipes that have been a hit:
Beets & Apples (aka Beeples)
1/2 large beet (or one small beet)
2 apples
Peel your beet, then wrap in tin foil (with a drizzle of olive oil). Roast until tender.
Peel and chop your apples. Cook on the stove until soft (think applesauce).
Puree beets and apples in a food process. Add a small amount of water if you’d like a thinner consistency.
Oh, and a word of warning if you feed your kid beets. That red color? It goes right through them. So if your baby has purple poop the next day, don’t panic.
Carrots and Strawberries
2 cups carrot (peeled, roughly chopped)
1/2 cup strawberries (roughly chopped)
Toss the carrots with a drizzle of olive oil and roast until tender.
Puree the carrots and strawberries in a food processor, adding water to achieve your desired consistency (I probably added about 1/4 cup).
Apples and Sweet Potatoes (haven’t made this one yet, but trying it tonight!)
1 apple
1 sweet potato
Cinnamon to taste
Peel your sweet potato, then wrap in tin foil (with a drizzle of olive oil). Roast until tender.
Peel and chop your apples. Cook on the stove until soft (think applesauce).
Puree sweet potatoes and apples in a food process. Add a small amount of water if you’d like a thinner consistency. Blend in a sprinkle of cinnamon if desired.
If you take the time to measure out how much applesauce 1 apple makes you can use store-bought (unsweetened) applesauce in its place. Or you can make a big batch of applesauce and divide it out between a couple recipes at once.
I also tried making him British-style mushy peas, but that one kind of flopped. I blamed it on my use of frozen peas so I’ll have to try it again the proper way…maybe with a little mint.
*As always though, check with your pediatrician if you’re unsure about what is appropriate to introduce when.
This not-so-little kiddo is now weighing in at 19lbs 3oz and measuring 26 inches long. His 12 month clothes are fitting him shockingly well… it’s madness! There are a few other babies I see monthly FB updates on… they’re all older than he is, but still smaller (I see your 17lb 7 month old, and raise you a 20lb 6 monther). It must be kind of nice to have a kid who doesn’t outgrow their clothes quite this fast…
Wesley is currently sitting up unsupported (and providing most of the muscle to pull himself into a sit if you offer him your hands). He’s also discovered his feet, which is actually stupidly cute. Still no teeth, but he’s chomping on everything like crazy so I’m sure it won’t be long. We now have to keep an eye out for what’s within arm’s reach of this kid because everything is going straight to his mouth.
Besides mouthing everything, this dude loves dancing (with help) and his current favorite song is Michael Jackson’s Rock with You. He may also have his first crush since Matt frequently catches him eyeing up one of the girls at daycare when he drops him off. In the stubborn department, Wesley also recently decided he hates breastfeeding. It’s weird because you hear about babies having a hard time adjusting to bottles. Not this guy, about a month ago he started screaming bloody murder anytime I tried to nurse him. He was fine with nursing first thing in the morning, but after that it was a no-go.*
We’re also in the process of transitioning Wesley from his bassinet to his crib at night. I didn’t think it would be difficult since he naps well in his crib, and sleeps through the night in his bassinet. Wrong. He apparently associates his crib with naps only. Awesome. I ended up rolling up a couple towels and putting them under the crib sheet to frame out a smaller, cozier sleeping space for him. That seems to have helped, but it’s only been a couple nights so far.
Cuteness overload: I was snuggling with Wesley and Schmutz wedged herself onto my lap as well. Wesley’s hand brushed her fur by accident, but his brain definitely registered “soft kitty!” so he started “petting” (read: grabbing and and bopping) her. I thought she’d be annoyed and get up and leave. Nope, crazy girl just sat there and took it. And started purring!
Right around Christmas we started introducing solid food to him. Our pediatrician recommended “Baby Led Weaning” so we’ve been giving that a shot and just moving slowly. He’s still getting all the real nutrition he needs from formula for a while yet, so we’re treating everything else as a low-stress flavor introduction. There’s a bunch of info on Baby Led Weaning out there (I’m definitely not an expert), but these have been our experiences so far:
The little mesh/silicone “baggies” with handles are awesome! (we have a bunch like these) They’re easy for the baby to grasp and you don’t have to worry about choking. We’ve been using them with strawberries and oranges.
Despite all the comments you read that choking isn’t a big issue with BLW, you WILL still be paranoid about it.
We’re offering Wesley a combination of “real” foods and purees. With the pureed food, I put a tiny bit on a baby spoon, but he’ll usually grab the spoon and put it in his mouth… occasionally being VERY disappointed with his life choices.
Mashed sweet potatoes may make your child projectile vomit on you with disturbing accuracy. But he’ll happily nom on sticks of baked sweet potato without incident.**
Larger raw carrots are big hit for him to just teeth on (but too big/hard for us to worry about him breaking a chunk off that he couldn’t mash down with his gums).
We use a combination of steaming and baking to cook food for him. “True” BLW is just giving him whatever you’re eating (although making sure it’s soft enough to mash), but I’m still picking fairly traditional foods to start him on*** so I’ll cook it separately but offer it to him while we’re eating. So far I’ve been steaming things I plan to puree and baking other things in sticks that are sized for him to grab, but leave some sticking out over his fist.
So far we’ve offered him:
Bananas (using the stem as a handle): win
Applesauce: win
Strawberries: win
Carrot: win (both raw for teething and cooked for actually eating)
Bell peppers: ok
Oranges: ok
Cucumber: ok
Sweet potato: debatable (see projectile vomiting comment above)
Pasta: uninterested
Rice: poison
*I’m sure other moms will relate to this–despite the fact that I have never judged another women for formula vs breastfeeding, I can’t help but feel like a bit of a failure for breastfeeding not working out. I know it’s stupid, but because I always just expected to breastfeed, having it not go well has always been particularly hard for me. Stressing out about it doesn’t do me any good either though.
**Please tell me this isn’t just my kid?
*** Sometimes I have to wonder what the cashier thinks when I show up with a one cucumber, one sweet potato, one pear, one apple, and one zucchini…
We’re off to our annual FriendsGiving with one of my BFFs. We’ve been crashing her family’s Thanksgiving for so long that it’s become a tradition.
And that little foot-turkey up there? That’s Wesley’s very first piece of (heavily-assisted) daycare art. I am so. damn. proud. I don’t know why I’m “proud” exactly since in all reality he probably didn’t contribute to much to this… but proud I am, so don’t burst my bubble. Am I going to turn into an artwork hoarding parent? Yeah probably.
This year my buddy M is taking the day off from cooking and ordered Thanksgiving-inna-box.* She’s pregnant and tired, but still wants to host so hey, compromise. I, on the other hand, had Wednesday off of work so I left Wesley in daycare and got my Thanksgiving bake on. I didn’t go crazy since we have to tote this + a baby + baby gear with us, but I did make pecan pie bars and a homemade orange-cranberry sauce.**
I caught Schmutz trying to help with the pecan pie bars. Then Mort lost his tiny-kitty-mind when I dropped a cranberry on the floor. It rolls! I CAN HAZ TOY! See why the boy stayed in daycare? I can only take so much help.
I hope you all have a wonderful Thanksgiving! May it not be filled with political arguments over turkey.
*Not to be confused with CMOTD’s sausages-inna-bun.
**I actually zested the orange, peeled off the remaining pith, then blended it all together. I also started off with 1/3 cup of sugar, then slowly added more to taste (maybe another tablespoon?). Some may like it sweeter or tarter, so just start small and build up.
Hey hey, we’ve actually got some bedroom progress! At the time of writing this we don’t currently have a bedroom door,* and we have a house guest because that’s how we roll around here.
We’ve been meaning to replace our mattress for some time now. Not just because our existing mattress is older, but also because we’d like to upgrade from a full to a queen size bed. Both Matt and I have always had traditional inner spring mattresses, but this time around we were a little intrigued by the mail order, vacuum-packed, foam mattress trend. We ultimately narrowed it down to Leesa and Tuft & Needle (Casper and Purple were the others we looked into). Leesa had the benefit of also being in West Elm showrooms so we could actually test it out before it showed up on our door step. Now, pretty much all these mail-order mattress companies have a risk-free trial period so you can return it after trying it out at home too.** I still wanted to do a pre-test since I really had no idea what to expect with a foam mattress. We were ultimately swayed toward Leesa because West Elm was having a 20% off bedroom furniture (and mattresses!) so we got a pretty good deal on it.
We ordered a bed frame the same day (saaaaale!) and chose to pick it up at the store rather than paying the $150 delivery fee. This also meant we had to assemble the frame ourselves***, but since we’re IKEA pros we didn’t think that would be a problem (spoiler alert: it was super easy).
There’s really nothing to unpacking the mattress. Open the box, pull off the plastic wrap, unroll an unfold, cut away the vacuum packing, and watch it inflate. It actually inflated faster than I expected and looked more or less full size in a couple minutes (although you are supposed to leave it alone for an hour).
I’ve been sleeping really well on it so far. I happen to like a soft mattress and you do feel like you’re just sinking into this. Matt thinks it’s ok, but not great, so it all depends on what you like in a mattress. If you prefer a firmer mattress you could try Tuft & Needle since the reviews say they’re on the firmer side. One thing that’s been especially nice is that the foam has been awesome at absorbing movement so if Matt moves around at all I don’t feel anything (and vice-versa). The only weird thing is that the side of the mattress don’t have the same structure as an inner-spring so if you sit on the edge you sink down more than you would expect
*I mean, we have the door but it’s sitting on the porch getting painted.
**If you order from a third-party seller, like Amazon, make sure the trial period still applies. Apparently sometimes it does not.
***I’m supposed to give a shout-out here to our house guest who took over baby watching so Matt and I could deal with the bed frame and mattress (and obsessive photography). Thanks E!
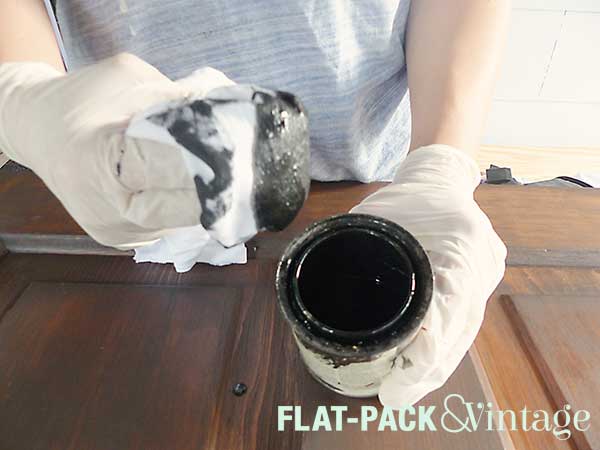
Gloves (optional, but stain is a pain to clean off of skin)
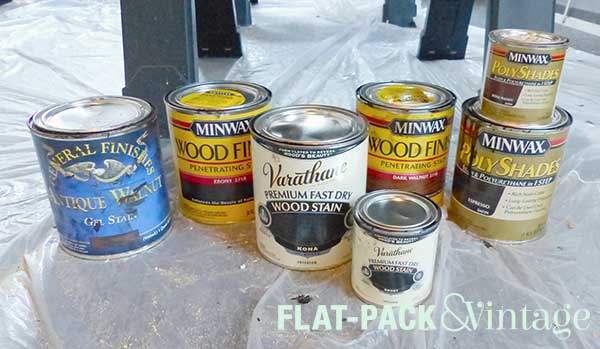
The hardest part of staining is getting the final color/finish that you want. I had to experiment a bunch with our doors so our first one took forever.
Round #1 was gel stain over the existing finish–fail. It didn’t cover well… it may have with enough coats, but it would have been really opaque.
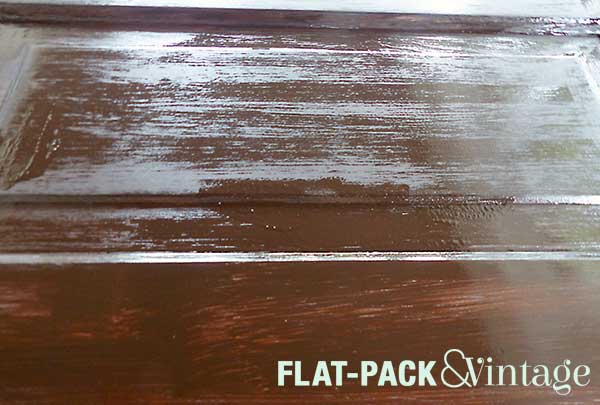
Round #2: strip door, 2 coats of gel stain + polyshades–too opaque, splotchy, not lovin’ it.
Round #3: strip door, 2 coats of traditional stain + polyshades–still splotchy and uneven, whomp whomp.
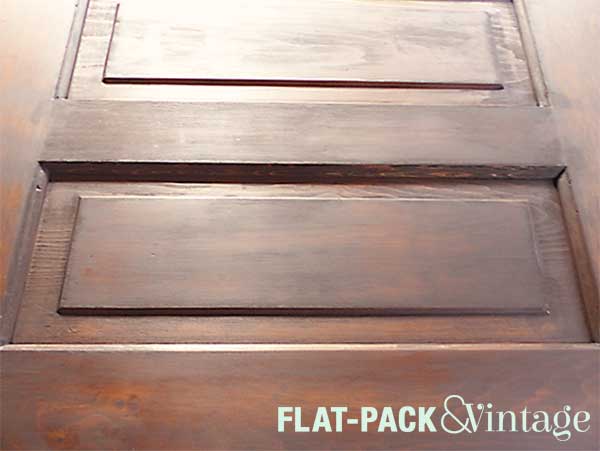
Round #4: strip, traditional stain, “wash” of a darker shade of stain, and a regular polyacrylic–we have a winner!
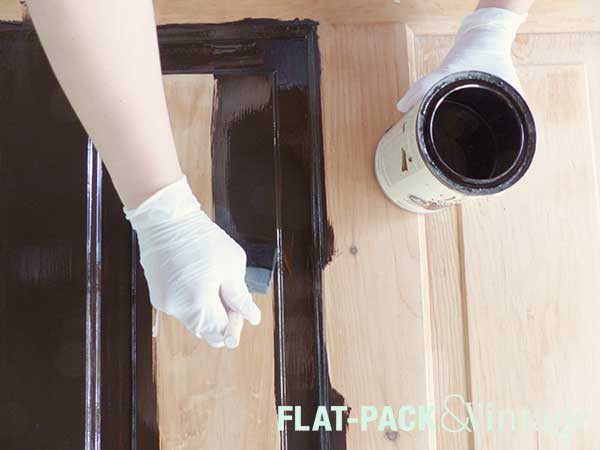
I ended up going with a traditional stain because it will let the wood grain show through. It’s also super easy to use! Seriously, you can’t mess this up unless you walk away for the entire day.
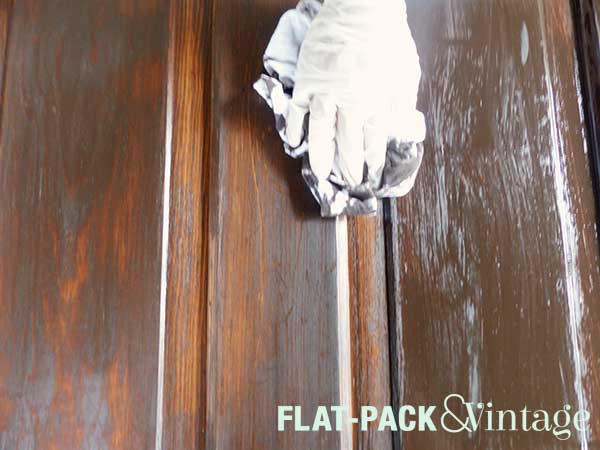
I applied the stain with a foam brush (mostly because I’m lazy and didn’t want to deal with clean-up of an oil-based product). Working with the grain, brush on the stain in a heavy-ish coat. You don’t want to glob it on, but you don’t need to be super careful about evenness either. The longer you wait, the more the stain will penetrate the darker the finish will be–I waited about 5-10 minutes or so after I had covered the whole door.
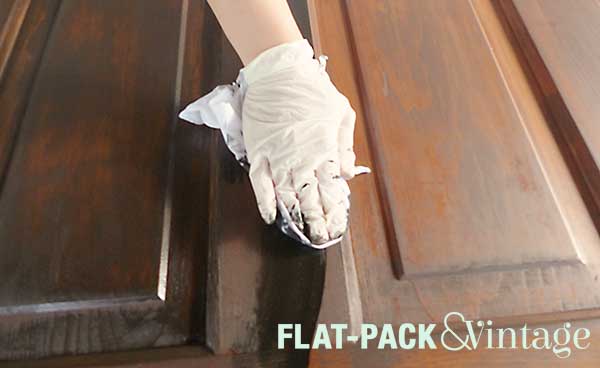
Then you’ll want to come in with a clean rag and wipe off all the excess. You want to take off everything that hasn’t soaked into the wood.
To get the color I wanted, I did another coat in a darker stain. This one I rubbed on a thin coat with a rag (as opposed to brushing on then wiping off) because I didn’t want it getting super dark.
I followed up the stain with 2 coats of polyacrylic (I chose a satin finish to match the sheen of our trim paint). Like the first coat of stain, I used a foam brush to apply it. Unlike the stain, you will want to work in thin coats and try and apply it as evenly as possibly. You may see some bubbles in the poly, do your best to smooth them out, but small amounts will smooth out on their own.
For the bedrooms and bathroom with opted to paint the inside white like the trim. I always stained first because the stain is more likely to drip to the other side the of the door. I also chose to stain the edges of the door, but that shouldn’t make a big difference either way. I used a small foam roller (and a brush to get into the trim details) to prime and paint. If you’re doing a two-toned piece go carefully along the edges without too much pressure and you should get a pretty smooth edge. If you get too much paint over the edge you wipe it off with a rag.
Our doors took 1 coat of primer and 2 coats of paint (Benjamin Moore Advance, like our trim). I didn’t bother doing a poly coat on the doors because the paint I use already has a really nice finish on it’s own.
We now have all the upstairs doors refinished! I have no desire to change the downstairs doors so I completely done with doors! Wheee!
I would love to refinish the floors in the house to be similar in color (I love me a dark wood floor with white trim!*) but I honestly don’t know if we’ll ever get around to that. I do want to darken up the stair railings though since I think they look a little odd with the dark doors.
*Plus, based on the finish on our stairs I think the original floor color was quite dark.