Do you know how hard it is to juggle two kids, a full time job, and house projects? We’re still getting things done around here, just… slowly.
One of the projects we were DIYing for the kitchen was a built-in bench for the mudroom. Minnesota went into lockdown just as I was starting it, but thankfully we had already purchased most of the supplies.
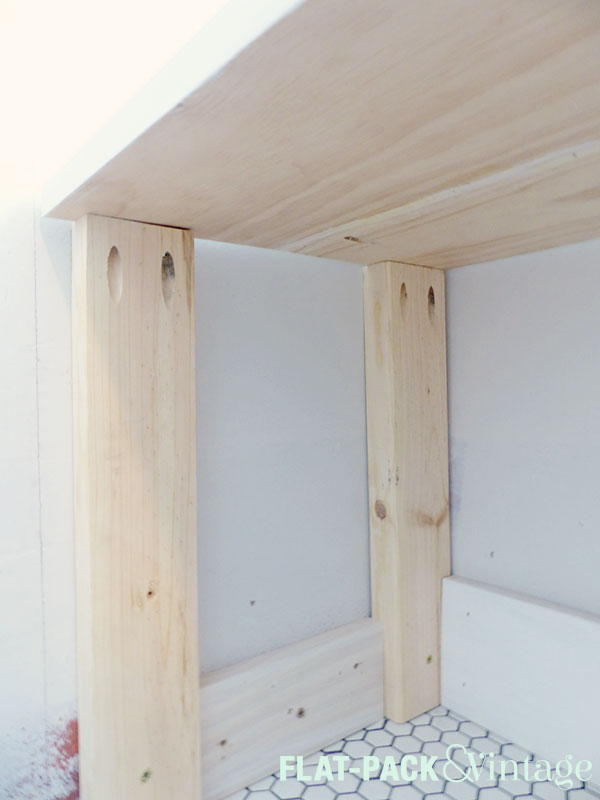
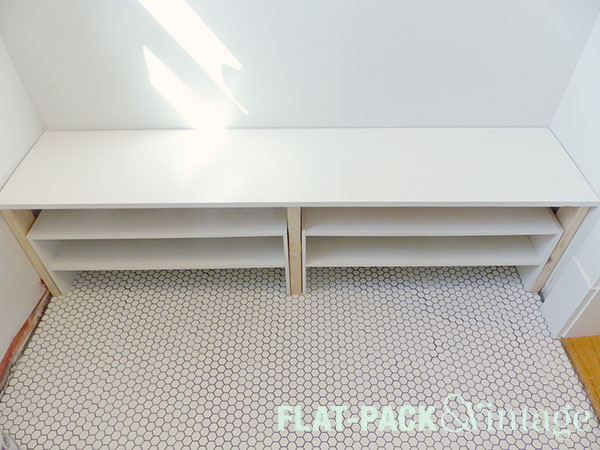
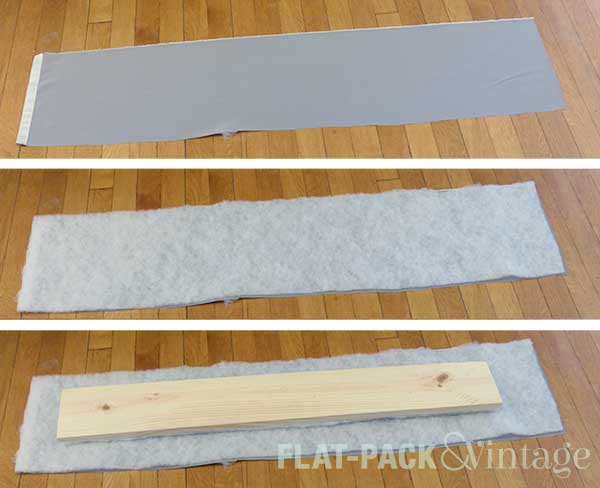
The bench plan is pretty simple. We already had existing shoe racks that we decided to reuse, especially since they fit the space almost perfectly. To encase the shoe racks I just had to add a top, support legs, and some finishing details..
The top was built out of 2 1×8’s joined with pocket holes, giving us a depth of about 15″. I used 2x4s for the support legs and connected them to the top with pocket holes as well. Why pocket holes? They allow for the strength of screws without any fasteners being seen. I officially love my Kreg jig!
Our shoe racks fit perfectly between the legs and once some trim is added it will look like a perfect built in while still utilizing some existing pieces.
The top, however, is deeper than the shoe racks since people’s butts are usually bigger than their feet. I don’t want the shoe racks to get pushed back so I needed a spacer between them and the wall. Enter the 2×4….which I don’t have and which probably isn’t considered an essential item at this point in time.
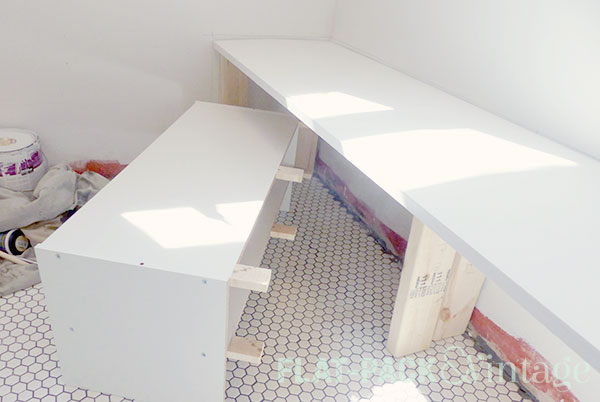
I did have a small scrap of 2×4 though, just not enough for my ideal solution but needs must when the devil drives… so I sliced it into thin bits and glued it to the back the shoe racks.
Elegant? No, but it should do the job at least and allow me to get on with this project.
With the structure in place and everything lined up it still needed some finishing work. We cut and painted some scrap MDF to hide the 2×4 legs on the inside then ripped down a 1×4 to hide the supports on the outside. These pieces just got brad nailed into place.
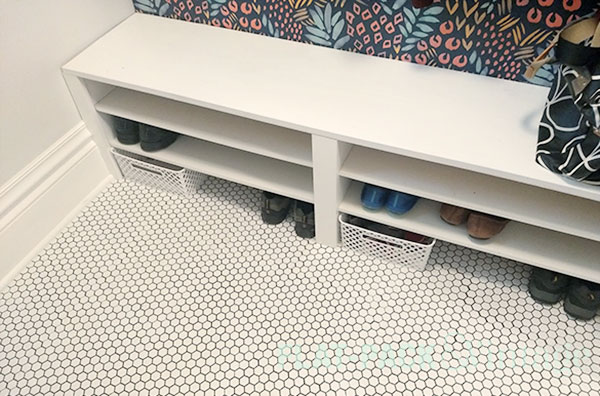
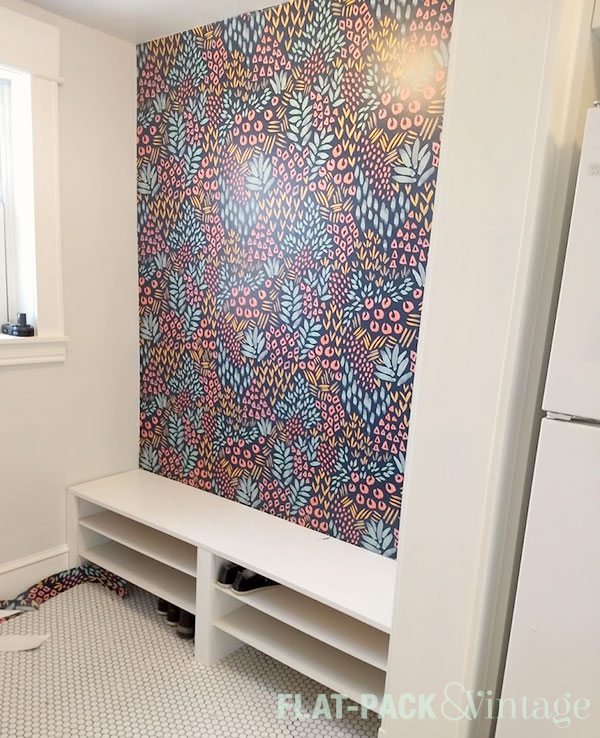
While I was working on the bench I was waiting for my wallpaper to arrive. Oh yeah, that’s right, MORE wallpaper. People still think I’m completely nuts, but that’s ok!* Matt even helped me hang it on his birthday while the kids were sleeping since it goes much more easily with two people.
I think it look fabulous! We don’t have much wall space for art in the kitchen so it also adds a much needed pop of interest. Once I’m free to go to the hardware store again I still have a few more details to add. I want to paint the inside of the back door a brighter blue and add a little more trim to bench to camouflage the fact that the walls are not at all square. This room was even more modern addition and it’s STILL not remotely square. Or level.
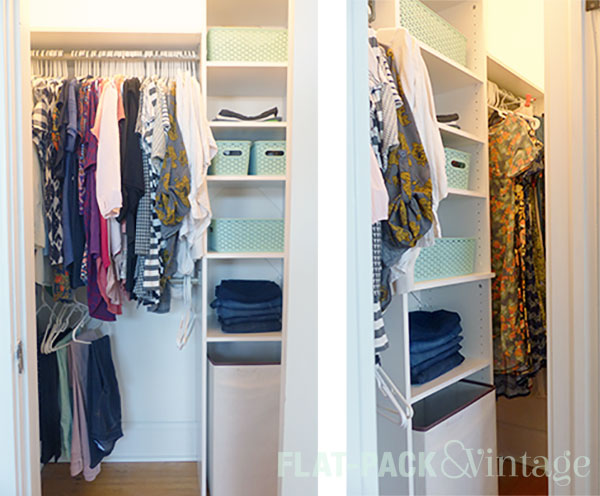
When I started my closet makeover, I thought it was going to a weekend…maybe a week (factoring in a full-time job and toddler). Well, two and half weeks later, I’m finally able to put my clothes away (although there’s still a little bit of work I’d like to do)
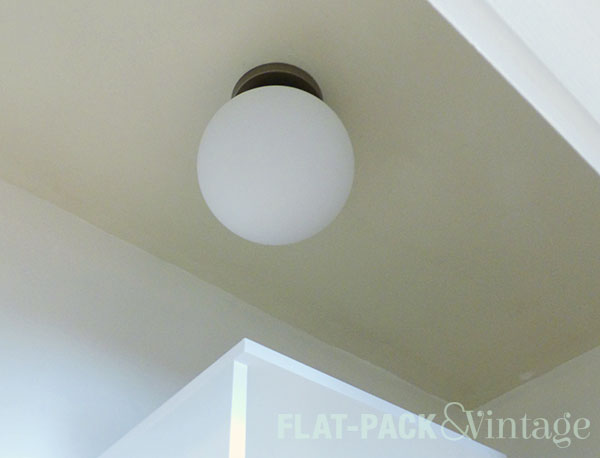
When we last left my closet, I had destroyed everything and finished repairing the walls. After that, I got everything painted and mostly-assembled the shelving unit of the organizer I bought (I’d need it for spacing and such). Then Matt installed a new ceiling light.
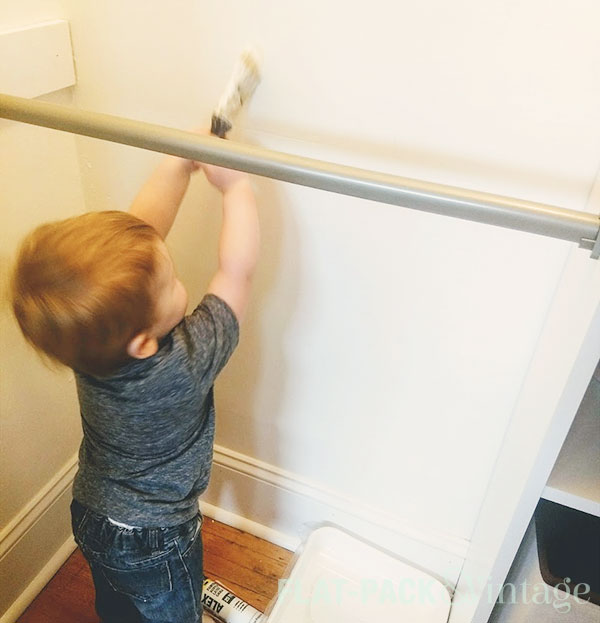
And I got some help with touch-up paint.
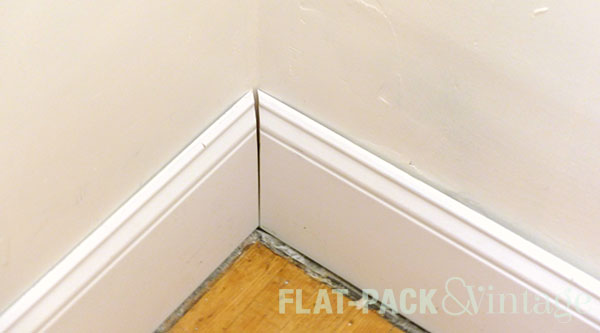
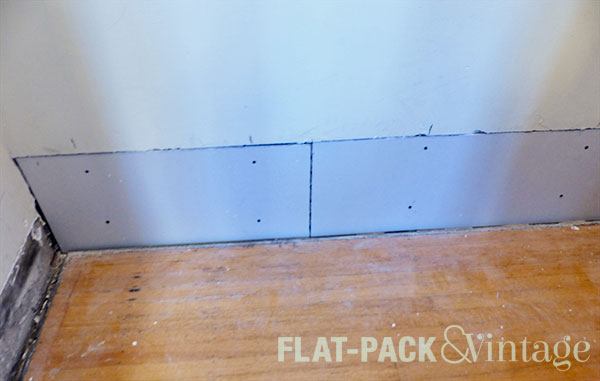
Next up was re-doing the baseboards. I had originally planned on just getting 1×8 pine boards…unfortunately the pre-primed 1×8’s at Menards looked suspiciously moldy. Ew. Pre-primed baseboard was only slightly more expensive so I decided to go that route rather than spend the time is priming.
You know Newton’s Third Law: for every action, there is an equal and opposite reaction? Well, it’s not just for physics anymore… While I saved time by not priming the baseboards, I lost time having to miter all the corners (yes, I had originally planned to take the lazy way out and use butt joints).
I also had to deal with the joy of old houses:
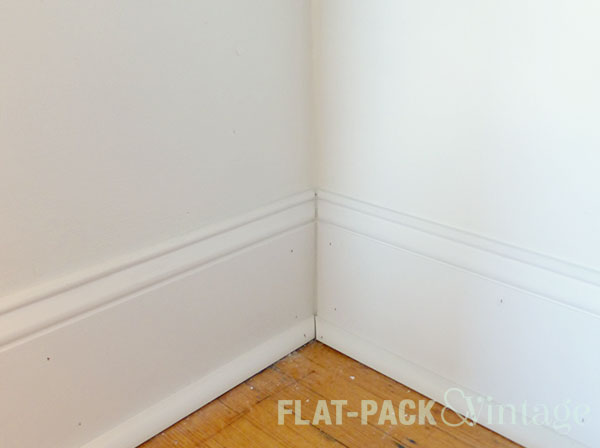
No matter how careful you may be with your cuts, if your walls aren’t square you’ll still end up with a mess (it’s harder to see, but the boards don’t sit completely flush against the wall either). If this was somewhere more visible than inside a closet, the options would be recalculating the angle, or using a coping saw. However, since this was inside a closet, I chose the super-unprofessional method of just filling the gap with caulk.
I also further half-assed things by using quarter round instead of shoe molding…but we had a bunch of (already painted!) quarter round from when I accidentally bought for our dining room so I figured the closet was decent place to use some of it up.*
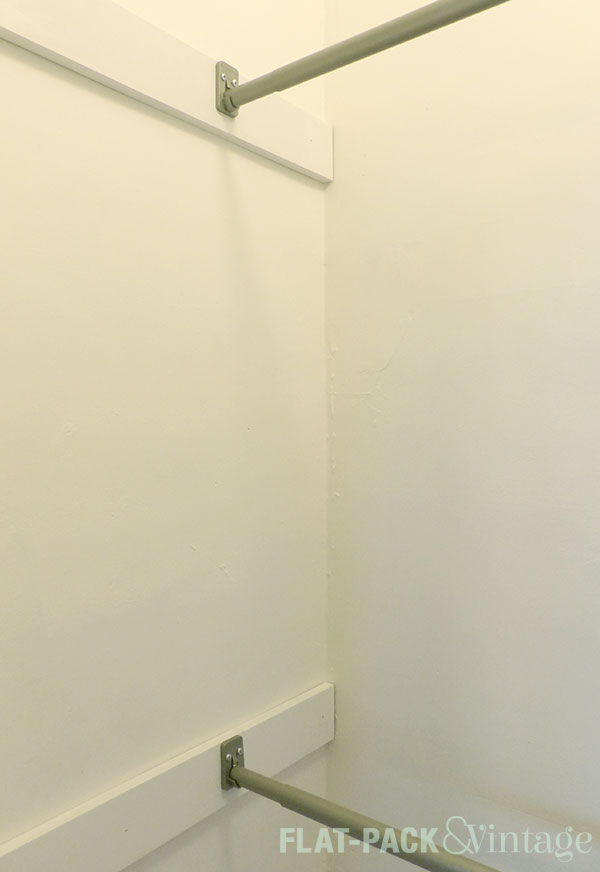
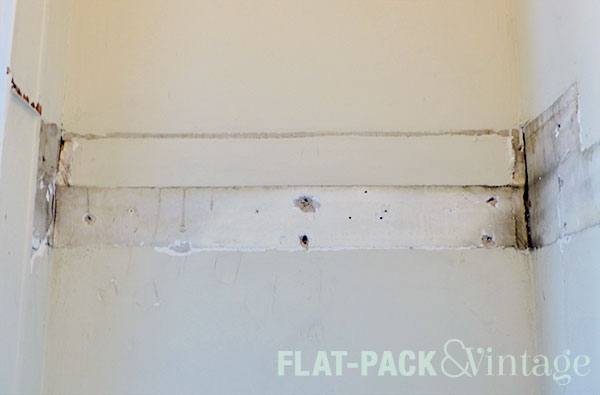
Along with re-installing baseboards, I also put up 1×4’s to support the curtain rod brackets. The previous closet system had the brackets attached to boards as well and I decided that was probably a good idea. In newer construction this probably unnecessary, but plaster doesn’t play especially nicely with anchors so I want to make sure I had the stability of studs to support the weight of my clothing.
Securing the shelving unit was one of the last things I did. I saved this for the end because I wanted to be able to move it out of the way while I crammed myself into an already tight corner to nail and caulk baseboards (sometime I make good decisions). Because the shelves were reasonably stable on their own and there wasn’t going to be anything pulling away from the wall, I was fine securing it with the anchors that came with the kit.
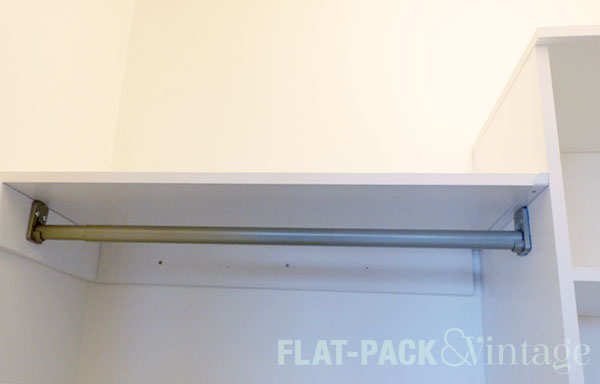
Once the tower was completely stable, I added the support brackets for the clothing rods. On the left side I used the rods and brackets that came with the kit. With careful measuring and a level…I still managed to eff up the first one. Matt, being the awesomely supportive husband that he is, walked in after I finished up, grabbed a level, and immediately pointed out that it wasn’t straight. Thanks dear…
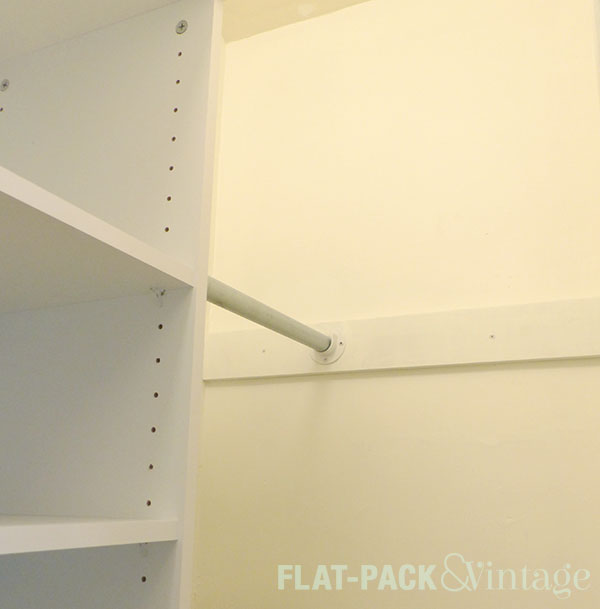
The area to the right of the shelves was too small to use the rod that came with the kit. I could have cut it down with a hacksaw, but the rod is two pieces, each of which have a notch at one end to lock into the bracket…basically it would have been very annoying to cut everything. Instead I cut my old closet rod down to size** with a pipe cutter and re-used the old brackets.
Once the main components were in place, I decided to add even more shelving over the rods. I bought the upper shelf support brackets designed to work with this system, a couple laminate shelves, and another 1×4. I only needed one package of the brackets since 1×4 the rods connected to on the walls would already be serving as some shelf support. I attached another 1×4 to the back wall to support the back of the shelf.
The laminate shelves only came in 48″ lengths so I had to cut them down to the right sizes (this left me a couple bonus shelves for the tower too!). Cutting laminate is a little intimidating since it’s prone to chipping so I did a a bit of a research first. The common method seems to be scoring the laminate with a utility knife first, then running it through a table saw with the blade height set to only cut through about half of the board, then flip the board over and cut the other side.
Well, I tried this and my board kept getting stuck so I decided to throw caution the wind and just run in through like a normal board…and this actually worked! If your board is going to be pretty visible I don’t know if I’d recommend this (I think I just got lucky), but if your cut edges aren’t really going to show, it might be worth the risk if you’re struggling with the “safe” way.
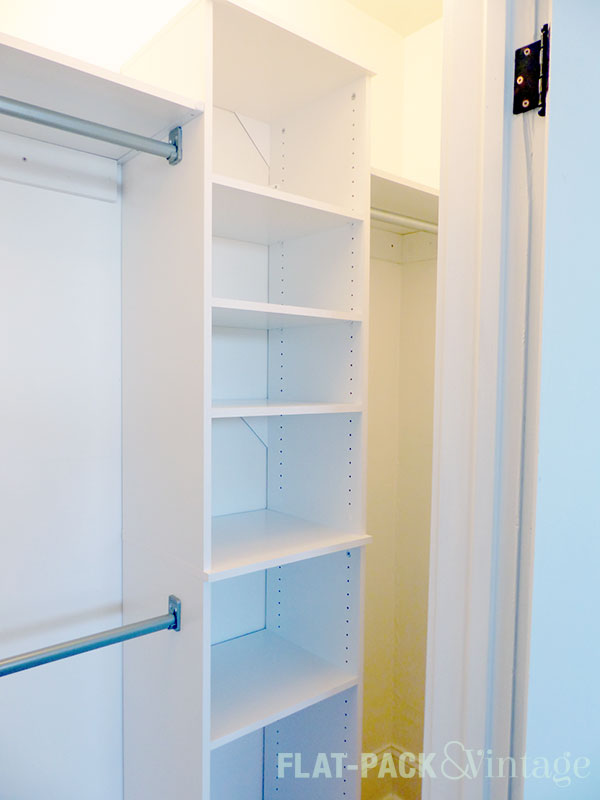
Now the light is up! The shelves are all up! The rods are up!
And I can put my clothes away at last!!!
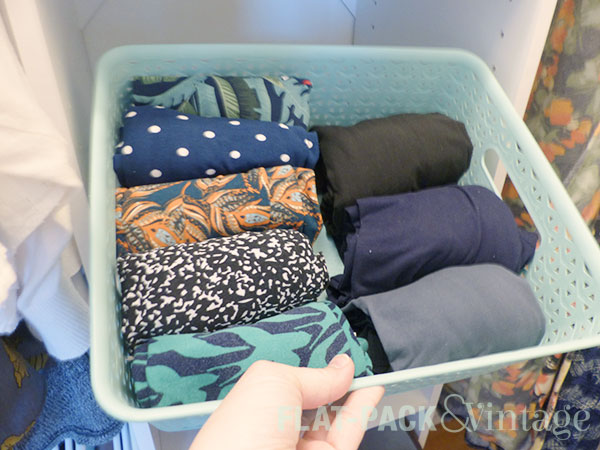
I have some t-shirts and jeans folded on shelves and a handful of inexpensive baskets from Target for things like swimwear, belts, tights, and leggings. (I KonMari’ed my leggings BTW and it feels sooo good!)So a weekend project ended up taking around 3 weeks to complete, but I am incredibly happy with the result.
*More so than I had planned because I could not for the life of me get one of the cuts right and effed it at least three times.
**Technically Matt started this part, only first he cut the rod to exactly length between the shelf and the wall and didn’t account for the width of the brackets. Then he tried to re-cut a slightly smaller piece, but the pipe rebelled and he gave up after getting some blisters. I jumped in at this point and finished cutting it in about a minute…because he loosened it for me, right? To his credit, he cut the first piece without issue so it wasn’t like he didn’t know how to use a pipe cutter.
The closet in our master bedroom is a shockingly good size for a 100+ year old house…which pretty much means it’s on OK size for one person.
The current configuration is decidedly meh–a single rod and some small shelves on each end. I added another hanging rod for a nice tiered effect, but the height isn’t ideal and it’s wobbly.
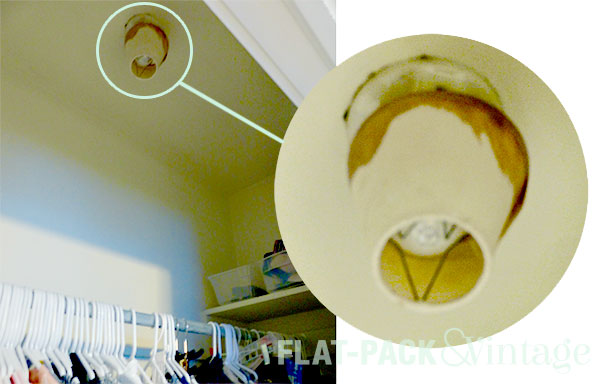
There is a light in the closet, which is a nice feature…except the light is simply a bulb with a really gross-looking clip on shade.
Meanwhile I’m sitting around waiting for the wallpaper for the micro-bath,* so it seemed like a good time for a closet makeover.
I found a stock closet organizer that had everything I was looking for–double rods on one side (for shirts and pants), single rod on the other (for dresses and longer skirts), and usable shelving in the center. Plus, the 16″ option was wide enough to slide my hamper into the shelf area with some minor adjustments. All we had to do was rip out the existing rod, shelving, and baseboards (so the organizer would fit flush against the wall). Sounds pretty simple, right?
Hahaha!
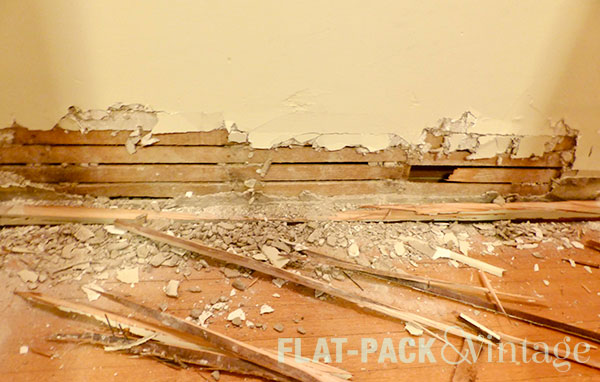
Last Wednesday night I decided to start on some demo. I knew some repair would be needed, so I was hoping to get the demo done and joint compound any dings in the wall during the week so I’d be able to throw on a coat of paint over the weekend and hopefully even get the organizer up and functioning.
Although it sounded like a good plan, this is what happened once I started to pry the baseboards off:
*twitch*
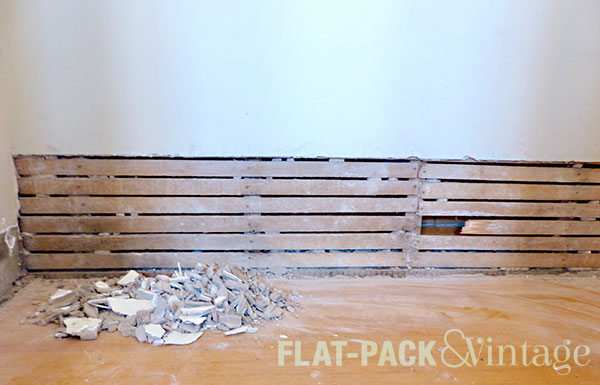
It turns out that part of the problem was that the corners where not actually mitered and the butt joints that were used were pushing the back section of baseboard into place. Unlike me, Matt figured this out and by the end of the evening he had almost finished removing the boards…which went much more smoothly when you weren’t fighting against the butt joints.
Matt could have made more progress, but I made him stop because I actually wanted Wesley to go to bed at his normal time.
Thursday saw the removal of the upper shelves:
I just love the smell of demo in the morning… only not because 1) this was all happening in the evenings after work and 2) it really just smells like dust and sweat.
And on Friday, she rested. With a glass of wine.
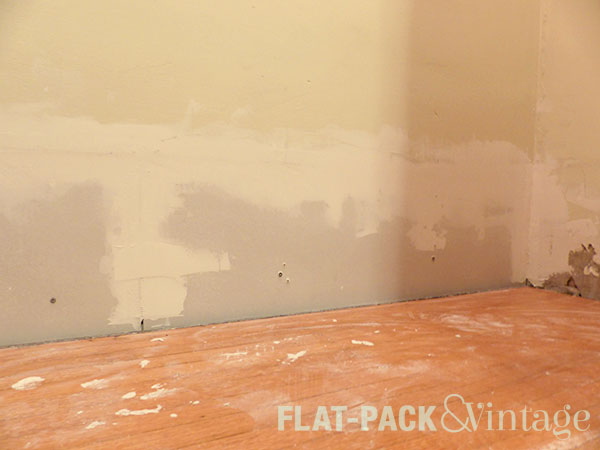
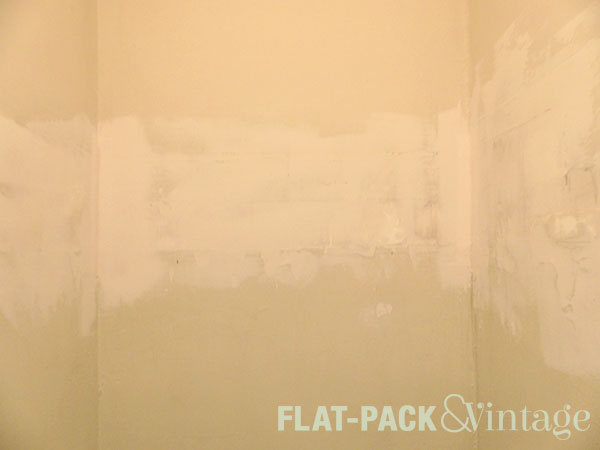
My plans of joint-compounding any “dings” were looking incredible optimistic. This was going to a full-on patch job on the back wall. So on Saturday, I squared off the holes in the plaster (and knocked off any remaining plaster where my patches needed to fit) and filled in the large damaged areas with drywall. Then I taped and finally joint compounded. Sunday brought on a couple more rounds of sanding and joint compounding. Because this was in a closet, I didn’t go full-on perfectionist in my patch job. That being said, I was probably more neurotic than most people would be while working on a closet.
The upper part of the walls also got a layer of joint compound to fill in nail holes and dings, repair corners, and even up the paint build up that accumulated around the edges of the shelves.
I feel like I could make millions on this as a abstract painting–White on Dirty White.
We’ll see how this week goes and if I’m feeling ridiculously productive I may be able to get the walls painted some evening…more likely I won’t do much else until next weekend.
A few nights ago Matt commented to me that our house has too much flat-pack and not enough vintage.
CHALLENGE ACCEPTED!
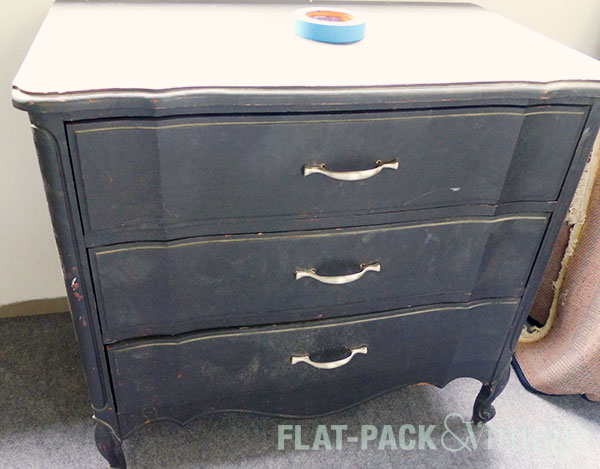
The very next day, I found this beauty on the side of the road.
I literally did a double take as I drove by, but continued on to pick up my son from daycare. We swung by on the way back home for some Mommy-Son bonding time (read: he cried while I muscled this thing into my minuscule car and drove a block with my trunk open #safetyFirst). The drawers need some repair and the whole thing needs refinishing, but it’s all completely doable and I even have a spot for it in our living room.
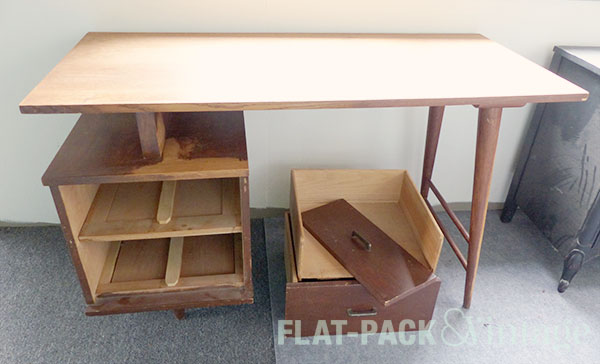
On Saturday I had a friend visiting from out of town, so naturally we went to the cluster of antique/vintage stores. Outside of one was a shabby looking MCM desk that was clearly in the process of being rehabbed. All the repair/refinshing work was stuff I could do, so I scored this puppy for $40!
One of the drawer fronts needs to be re-glued, the damaged edging needs to be pried off and replaced, and the whole thing needs to be stripped and re-stained. Someone must have refinished it at one point and did a TERRIBLE job with the stain. It’s splotchy and streaky and horrible, which means it just needs to come off. I’m currently planning a dark stain with white drawer fronts, I just need to figure out what hardware I want on the drawers…possibly cup pulls, we’ll see.
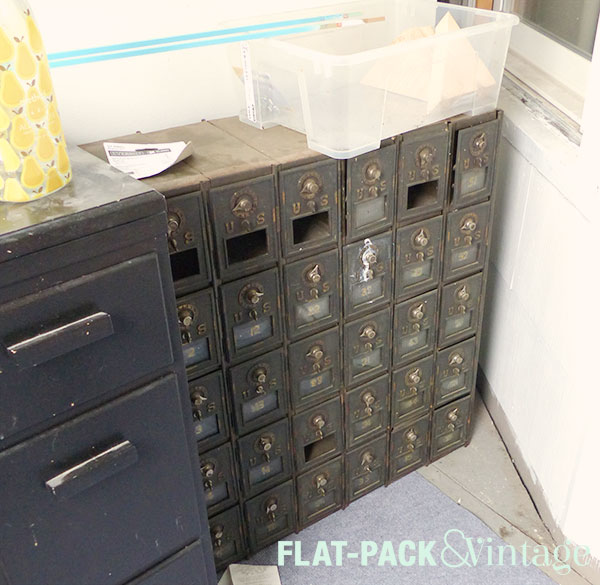
I also (still) have my bank of vintage post office boxes. I love these SO much, I’m just unsure how I really want to finish them.
They also got some paint on them while I was working on another project. I tried to wipe it off right away and failed, so now it just looks like a bird crapped on it. Classy.
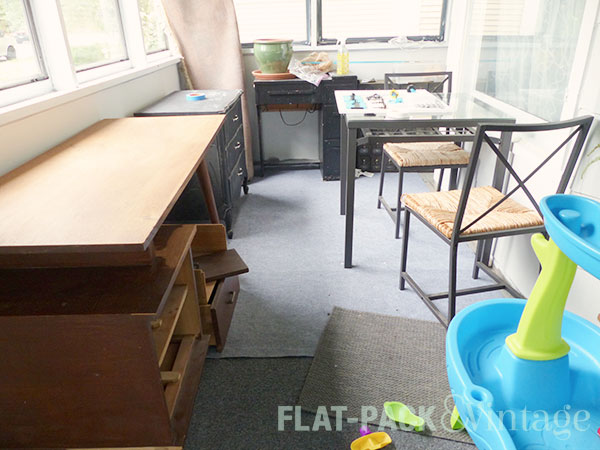
On top of all of that, I have a vintage sewing machine table. The machine is fabulous, but it’s built into the table which was causing space issues in our study layout. I bought a new sewing machine and this one is going to my mom. If I get in a serious refinishing groove, I’d like to try and strip and re-stain this as well… especially since I’m responsible for the black paint. We all make poor life choices at some time or another….
So with all of that, this is the current state of our front porch:
Please don’t report me to Hoarders…
In the past I’ve done refinishing work out here because the space is well ventilated and enclosed (plus, the carpet’s crap so I don’t have much guilt if I drip something and it misses the dropcloth). Unfortunately, I don’t want this to be a working space with Wesley crawling around because there’s too many dangerous things a baby can get into in a refinishing project. I’m probably going to end up setting up shop in our garage and trying to get everything done before it snows.
In semi-related news, I passed a furniture refinishing and repair place that’s hiring. Not gonna lie, I’m really tempted to apply just so I can put “stripper” on my resume. Unfortunately they’re only hiring part-time. Still might be worth it if I could get an employee discount on reupholstering my couch….
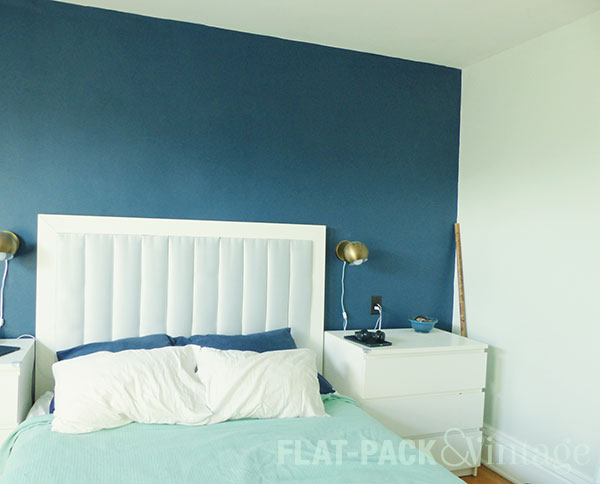
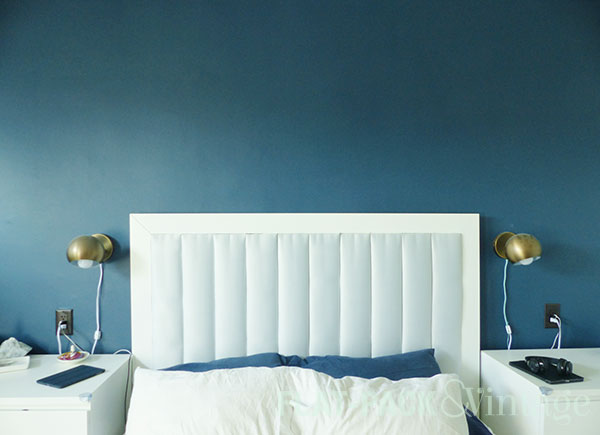
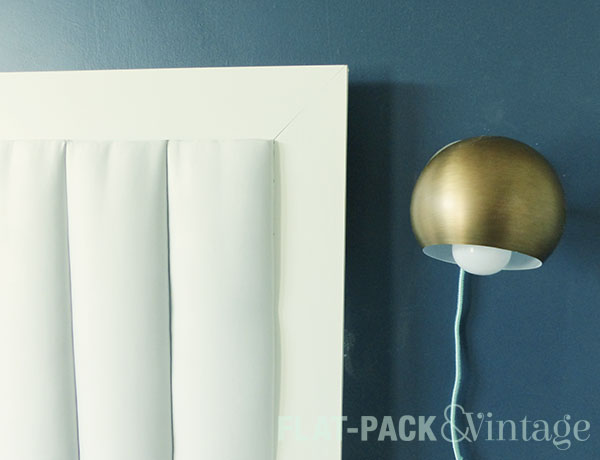
Hey hey hey! We have a new headboard! Did you think you had lost me to baby posts? Yeah… hopefully those will be slowing down and I’ll be focusing more on the house again. If you are interested in some down-to-earth baby talk, I finally did something with my Twitter account. Yup, I’m officially a Twit.
And our new sconces? How cute are they???
We seriously haven’t had a headboard since we moved into this house, so it’s been really nice to finally get this project out of the way. And yes, this was all custom-made and not terribly difficult. If you can use a miter saw and staple gun without losing a hand, this is for you!
Staple gun (+ 1/4″ staples)–an electric staple gun is totally worth it!
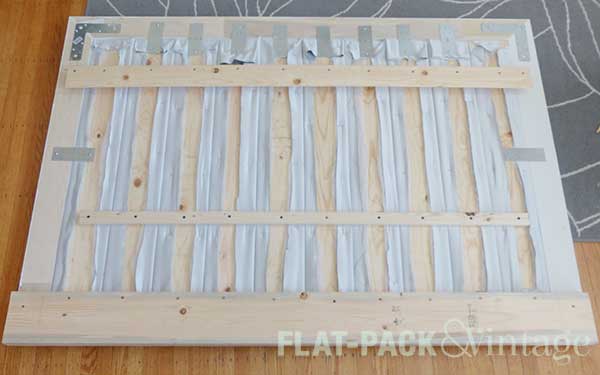
Because we didn’t take our headboard all the way to the floor, we measured from the top of our bed frame (without the mattress) to our desired height. We cut 8 1x6s to this measurement.
I used spray adhesive to adhere 2 layers of batting to each board. The adhesive will help prevent your base layers from shifting, but isn’t necessary. I rough-cut the batting first, then trimmed it to size after gluing it down.
Cut your third layer of batting a few inches longer on each side–you’ll need enough to wrap around the board and staple down. Cut your fabric about the same size.
Lay your fabric on the ground right-side down. Layer your batting, and then your board (fabric side down).
Oh hey, look! I finally remembered to take some pictures! I blame mom-brain (it’s a convenient excuse for everything).
I also cut out the corners of the batting to de-bulk when I got to wrapping the ends.
Starting from the center, staple the batting and fabric to the back of the board. You’ll want to pull the fabric snug, but not super-tight. Work your way around the board, alternating sides.
Once all your board are wrapped you’ll need to attach them all together. Cut a 1×2 a few inches shorter than the entire width of the boards. Use a convenient stretch of baseboard to keep the top of your boards lined up evenly (because of our shoe molding, I put an extra board in front of our baseboards). Recruit a helper to pull the boards tightly together as you screw the 1×2 into them. Depending on how you choose to mount the headboard, you may opt to do more rows of 1x2s, but we were attaching some additional boards.
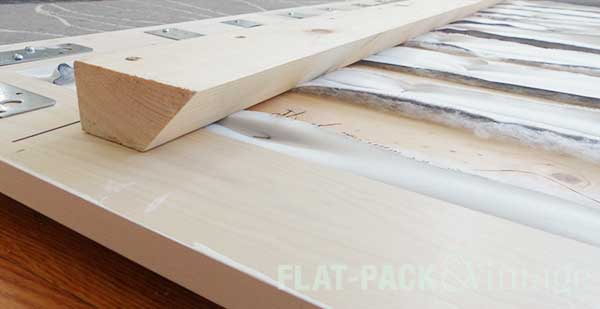
After the panels were secured together, we measured, cut, and attached the frame. First I dry-fit everything to check that everything was cut right. Then I attached the corners together with L-shaped plates. The frame then slipped around the panels and got attached to each board with straight plates.
We added a 2×6 along the bottom to give us an area to screw our bed frame directly into the head board. Our bed was constantly inching forward on our hardwood floors so we wanted to put a stop to that. Only about half of the 2×6 overlaps the headboard, the remaining overhang fills the gap between our bed frame and the wall. If you have less-chunky baseboards, you may not not need a 2″ board here. Just measure the gap between your bed frame and the wall when your frame is pushed up as close as it will go.
At this point, some of you may be wondering why one of the boards of the frame appears to be painted on the back side. This is because my husband–the math major–forgot how angles work.
Matt: I probably shouldn’t have bothered getting the pre-primed boards. I still had to prime one of them again anyway.
Me: Why?
Matt: Because after cutting the first the side piece you need to flip it over to cut the angle for the opposite side.
Me: Or you could just reverse the saw.
Matt: No no, because see, this side needs to be angled this way so to get the opposite angle on the other side you need to flip the board over and…. oh… well I feel stupid now.
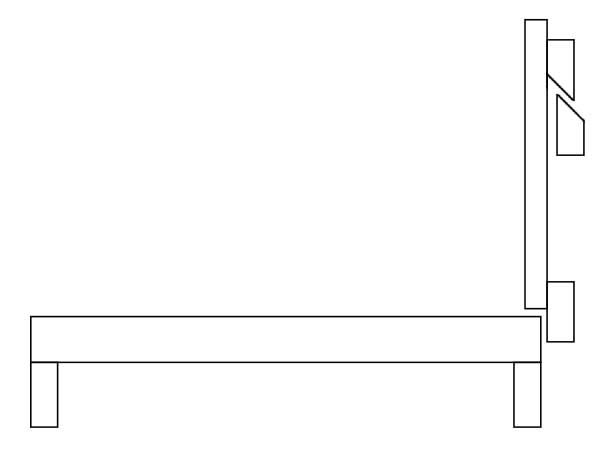
The picture above also show the cleat on the back of the baseboard. Cleats are a great way to mount heavy objects on a wall–the length helps distribute weight while allowing you to hit multiple studs. If you have a table saw, they’re also super easy to make.
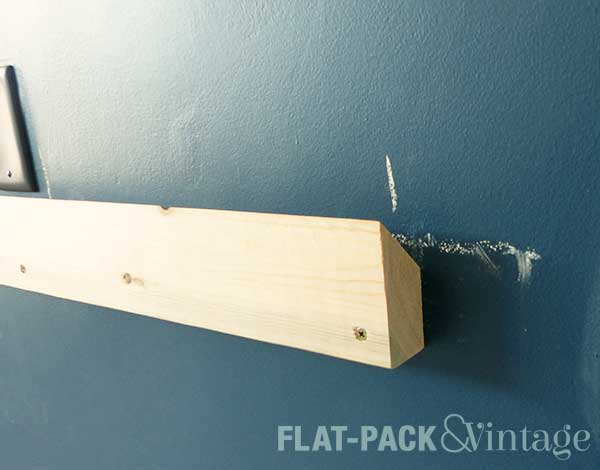
We chose to mount half of the cleat on the back of the headboard first and then measure for the correct height for the corresponding wall
I don’t have a lot of specific guidance for lining up each half of the cleat other than measure. Measure lots. And make chalk mark for guides. It probably easier if your headboard rests on the ground, but ours rests on the top of our bed frame (because we just like to be difficult here).
FYI: That’s not a phone resting on the cleat, it’s just one of the 50 million awkwardly placed outlets in the room. Matt removed the outlets, capped the wires, and put a solid plate over the electrical boxes.
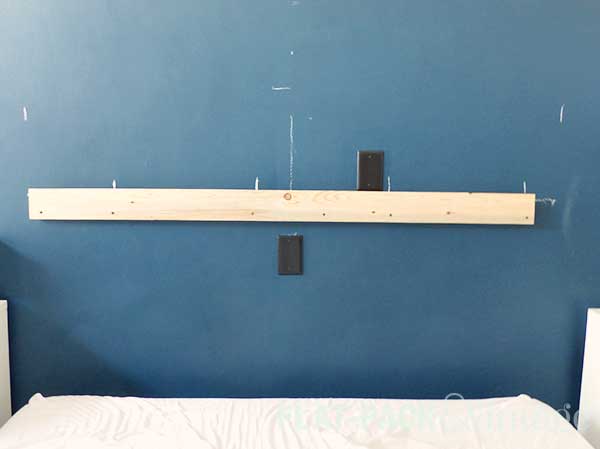
So to recap: The headboard is attached to both the wall and the bed frame. It’s secured to the wall with a French Cleat, and bolted to the frame using a spacer.
.
Awesome diagram, no? One of these days I’d like to install Windows XP on my old (Windows 7) laptop so I can install my copy of AutoCAD again…but that’s a lot of work. #lazygirl
So yay! We have a headboard! And new sconces! Our bedroom is actually starting to come together! I have one wall left to paint (that I won’t be able to fully finish until we take out the window AC unit). I have an area rug ready to go (I just don’t want to put it down until I’m done painting). The biggest element I’m missing at the moment is a pair of nightstands. The dressers aren’t really working there, especially with a lower bed frame…but hey, we’re getting close to done!
Around 3:30am on Saturday our smoke detector decided to lose its shit. It started beeping and loudly announcing “low battery!” Around 4am Matt decided to go an rip out the batteries. That was when he discovered that the smoke detector in the hallway is hardwired. Yup, our smoke alarm woke us up at 3:30am because the backup battery was bad.
Luckily we had extra batteries, so Matt grabbed a replacement…only to find that the previous battery was also rather corroded and the gunk left on the battery connectors was now impeding its ability to sense the new battery.
Now, I’m still in bed at this point so all I hear is Matt shuffling around the house like he’s playing some twisted game of Marco Polo with the smoke alarm. Then the alarm suddenly starts shrieking “Fire! Warning carbon monoxide! Fire! Warning carbon monoxide!” I start laughing like an idiot because now I’m convinced our smoke detector is just straight-up broken and of course that would happen at 4am.
Turns out Matt hit the test button to see if that would act like a reset and get the alarm to recognize the new battery. It didn’t work. Obviously. So now it’s 4:10am and I start googling how to remove a corroded battery because it’s either that or flee to a hotel.
In case you’re wondering, vinegar will clean off battery corrosion. You should really use gloves/eye protection, and of course be very careful around the electrical workings of anything–especially when it’s still connected to power.
You’re welcome.
After Matt and I properly woke up for the day, we went on a walk to get breakfast since we’re having a January heat-wave at the moment.* When we got back, I went to haul in the baby gear and the baby, and Matt stayed out to salt the walkways. I left Wesley snoozing in his stroller next to the door while I dropped the diaper bag and pastries inside, then turned to go back out and grab the baby.
Only the backdoor wouldn’t open.
I checked the locks. It was unlocked. I fiddled with the locks (both the deadbolt and the simple lock for the latch we never use). Nothing. Was it stuck on something? Nope.
W.T.F.?
I finally went out the front door, walked around the back and tried to shove it open vs pull it open. No dice. So I tried and force it open with my shoulder TV cop style. Ouch. Finally I gave it a good swift kick (just to show it who’s boss), collected Wesley and schlepped around to the front door.
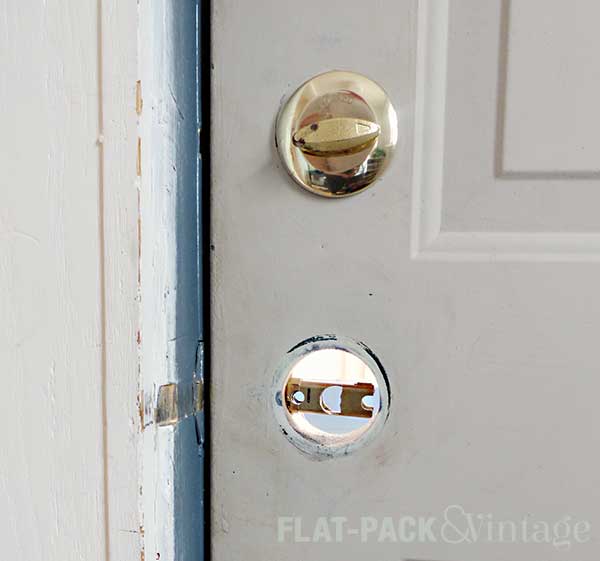
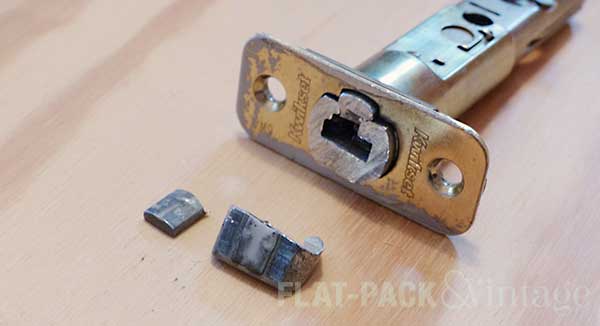
When Matt was done salting, he repeated everything I had just tried and nothing worked for him either. It turns out that the bottom doorknob (which controls the latch) had inexplicably broken, so the knob could no longer retract the latch. This is a vital part of being able to open a door.
Step 1 was to run to the hardware store and buy a new latch set. I also picked up a matching deadbolt because I really didn’t like the existing brass one we had so hey, excuse to update! We thought Step 2 would be as simple as taking off the door knob and wiggling the inner workings around. Nope. The inner workings were well and truly busted.
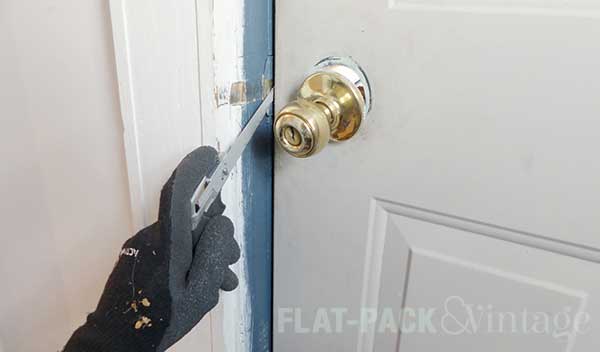
Matt went through our tool stash to try and find something he could shove between the frame and the door to push the latch back in,** but it still wouldn’t budge. He asks me if I have any brilliant ideas, to which I reply “sure” and then immediately get to googling.***
It turns out this sort of thing is not unheard of and found a fairly lengthy thread in a DIY forum dedicated to it. Long story short, if your latch is properly busted (like in our case) there isn’t an easy fix. The general consensus is 1) don’t bother taking the door off the hinges because that often doesn’t help and 2) either bust out your hack saw or call a locksmith.
We chose the hacksaw option and it took Matt around an hour to cut through.
(We set the knob back in place to block some of the draft)
Thankfully installing our new latch and deadbolt was a piece of cake. Matt was very confused because I decided to try Kwikset Smartkey locks that let you re-key them yourself. They were more expensive that the standard locks, but cheaper than bringing in a locksmith (and we really didn’t want 3 different keys for our house). They are SUPER simple to use to, so we were able to get our 2 back locks on the same key as our front lock in about a minute.
Once the weather legitimately warms up we’ll also paint the the rest of the door frame and repaint the door, since it looks a little sad at the moment.
Matt looked up the security of these locks and it sounds like they’re no better or worse than a lock that would require a professional to re-key. Plus, as one person put it: your house is only as secure as its weakest point and we all have windows.
So that was our Saturday. We woke up to a demon smoke alarm and later I got locked inside the house. I have a feeling I’ve offended the DIY spirits in some way or else our house has spontaneously acquired a poltergeist. Maybe I should turn on our gas stove and shake some sage from our spice cabinet over it… If that doesn’t work, we are surrounded by churches so I could probably round up an old priest and a young priest.
*In Minnesota a winter heat-wave means anything over 30 degrees. Over the last 2 days I have seen 2 people outside in short sleeves, one guy in shorts, and several without jackets.
**During all of this we’re working from inside the house, so you have access to that tiny gap. The outside of the door frame has trim pieces covering up this space.
***This is how I solve problems at work too. People think I’m smart, but really I just figure out good search terms.
Sorry, couldn’t resist. Matt’s propensity for punning is apparently rubbing off on me.
One of the (many) random “features” of this house was the lack of a closet door in Wesley’s nursery. We originally put up a tension rod and curtain, but that just didn’t look terribly finished and we’ve been meaning to get a proper door up there for ages.
By some crazy stroke of luck, the door frame was actually a standard size.* By some other crazy stroke of luck, I was able to find a 5-panel door that was a reasonable match. Not perfect, but for $50 it was pretty damn good! I’m pretty sure the only way I could have found a better match would have been to order a custom door which would have been super pricey. I’ve already mentioned that our house work is much more renovation than restoration, so the investment in a custom door just wouldn’t have been worth it in this case.
So door. $50. Good deal. Part of the reason it was so cheap is because we ordered a door slab vs a pre-hung door. The difference is just what it sounds like. A door slab is just a slab of wood–no hinges, no pre-drilled anything. A pre-hung door is both the door and door frame already connected by hinges. One of these is a little easier to deal with, but we didn’t choose that one.
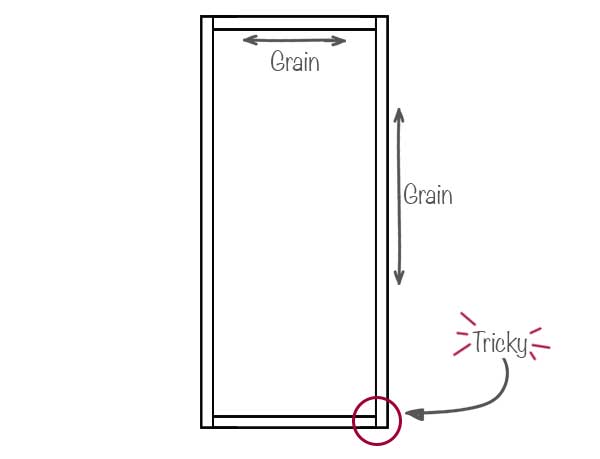
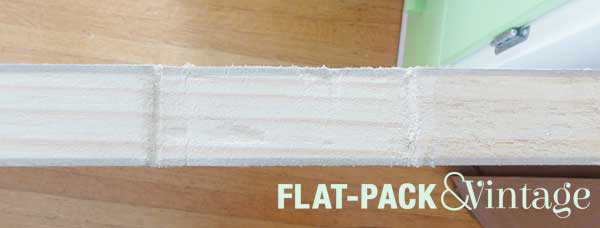
Because we had an existing frame, we first needed to check the fit. The frame may have been a standard size, but unfortunately it wasn’t square.** In order to get the door to fit properly, we had to plane off a good chunk from every side. This would have been super easy, except for the way hollow-core doors are constructed.
Planing is meant to happen with the with the grain, but at the top and bottom of the door you hit the vertical supports of the frame, and it’s REALLY hard to go against the grain. Matt ultimately took a hand saw to the edges–he figured out how much we needed to take off from the corner, sawed that off, and planed the rest down to that point.
After planing (lots and lots of planing), I took a palm sander to all the edges to smooth them out nicely. And yes, we were totally working on our upstairs landing since we had to keep checking the fit of the door and didn’t want to be constantly hauling it up and down the stairs.
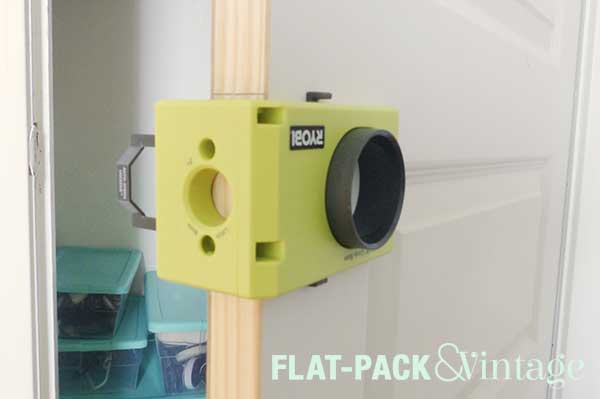
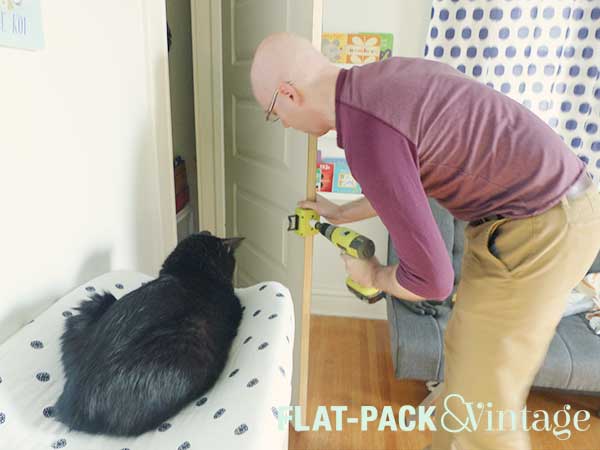
To add the door knob, we bought a simple kit that came with a guide and hole saw bits for a drill. The guide clamps onto the door and then you just drill on through. We managed to position our door knob right over one of the cross supports on the door so it was a little more difficult to drill through, but not a huge problem.
Mort likes to supervise things.
The hinges were a bit more problematic. The frame already had places for the hinges, and we even had some extra hinges that were original to the house… we just had to mount said hinges to the door itself. You can get hinge kits like the door knob kit, but they usually require a router, which we don’t have, so we decided to half-ass it. Typically you would route out only the exact size of the hinge, so you’d leave a little strip of wood along the edge. Instead, Matt just planned out the entire depth of the frame to accommodate the depth of the hinge.*** It’s only noticeable from inside the closet though (and only if you know what to look for), so not a big deal.
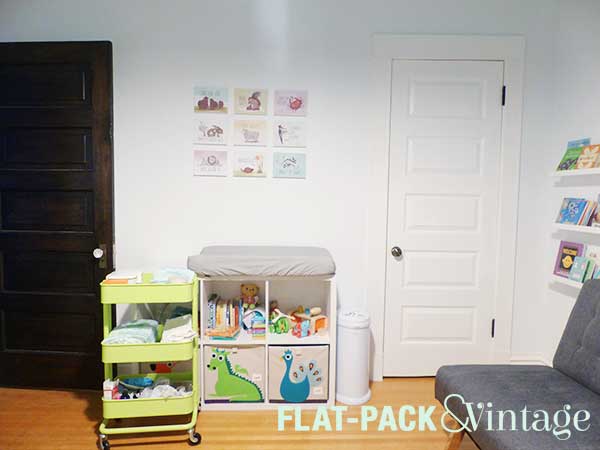
Whoa! It’s a door! That opens and closes! Craziness!
Don’t mind the random futon. We did some furniture shifting and need to figure out a permanent home for it.
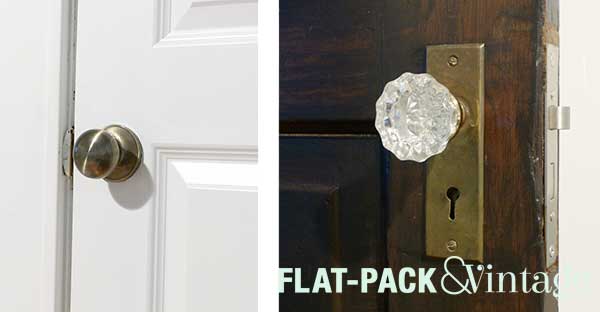
My only real disappointment with this door is the knob. I assumed I’d be able to switch out the actual knob on a new latch set. Wrong. Current latch sets are designed to interlock and screw together in a way that makes switching out any one part of them impossible. House of Antique Hardware has vintage-looking knobs/latches designed to fit modern construction, but I can’t quite justify spending $140 on a closet door knob… although I am scoring an extra bonus this year at work…
* “Standard,” “square,” and “level,” are terms that don’t tend to exist when dealing with 100+ year old houses.
** See what I mean?
*** And only planed off a small amount of his thumbnail in the process.
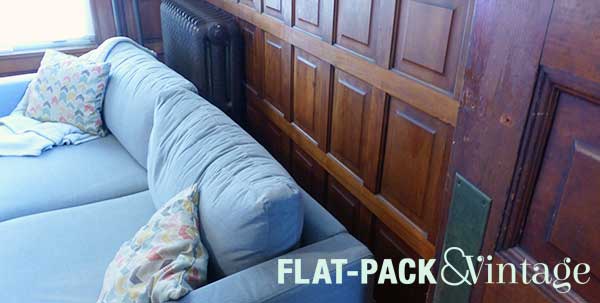
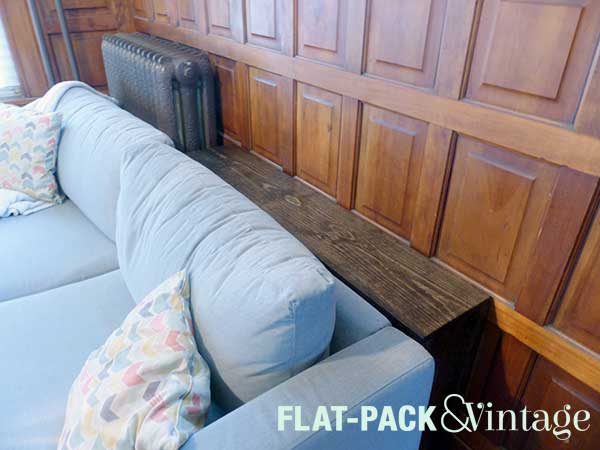
The room we use as our TV room is slightly awkward for furniture placement since it would have originally been used as the dining room. We happen to like it as the TV room since the built-in buffet acts as a killer bar and we really like the openness between this room and living room for entertaining purposes.
The layout in the TV room has the couch in front of the radiator, which means…
…the couch has a tendency to angle back since there’s nothing to stop the other side from shifting.
Luckily, there was super easy fix. Full disclosure: As easy as it was, I totally half-assed this project. I had no plan and had to redo it once. But it the end it all worked out. I also failed at taking progress shots since I was just trying to get this done in the evenings while Matt was on baby duty.
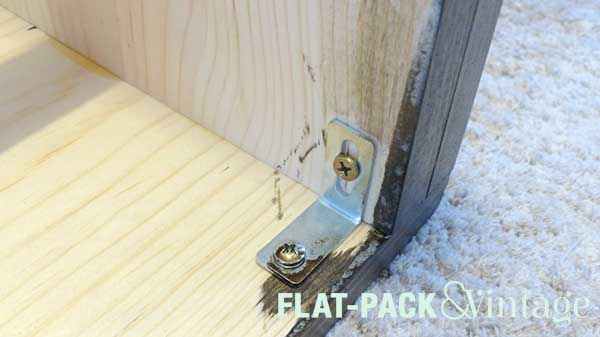
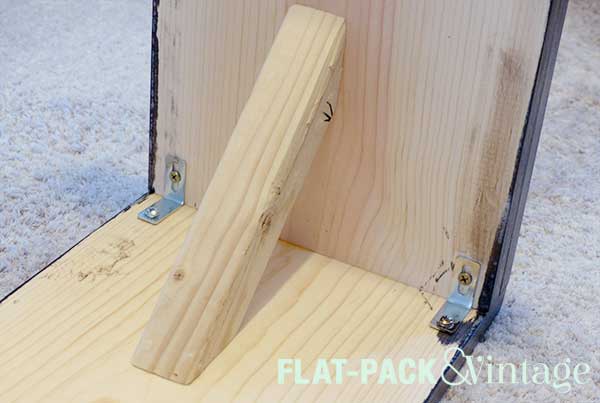
First I picked up a couple 1×10 pine boards, along with a couple 1×2’s. I cut the 1×10’s into 1 board the length of my finished table, and 2 boards the height of my finished table (if your goal is a really exact finished size, technically it’s the height minus 3/4″).
You could move on to construction at this point, but I wanted a little extra detail, so I cut the 1×2’s down to 4 pieces the height of the table, then glued and clamped them down onto edges of the table legs. (You can also glue, then cut everything down to size at the same time)
Once the legs were dry, I glued the tops of them onto the bottom of the table top, making sure to line up the edges as smoothly as possible. After that dried, I reinforced the joint with a couple of small L brackets and assorted tiny screws we had left over from random projects.
The table was still a little wibbly-wobbly, so I cut down a scrap 2×2 with 45 degree angles at each end to use as a brace on each side. This also got simply wood-glued into place.
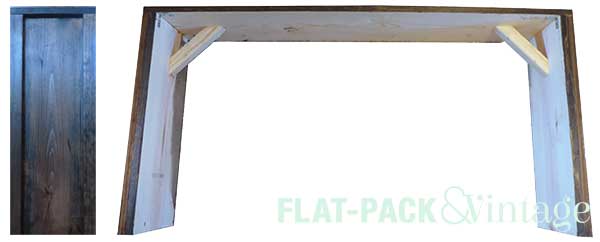
Once everything was nice and solid, the whole piece got a light sanding, a couple coats of stain (Minwax: dark walnut), and 2 coats of polyacrylic. I didn’t bother staining the inside faces of the table since it will be completely hidden behind the couch. #lazygirl
Et Voila! No more shifting couch + a great place to stash drinks and a basket of baby items since this couch is my go-to nursing spot (and a great spot to stash a cuppa).
Still have the old finish on your project? Make sure you check out Step 1: Stripping.
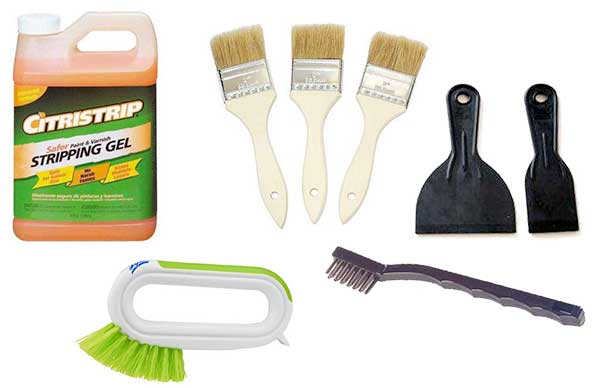
Supplies
Palm sander and/or sanding block
Coarse, Medium, and Fine sandpapers (roughly 80, 150, and 200 grit)
Wood filler
Putty knife
How To
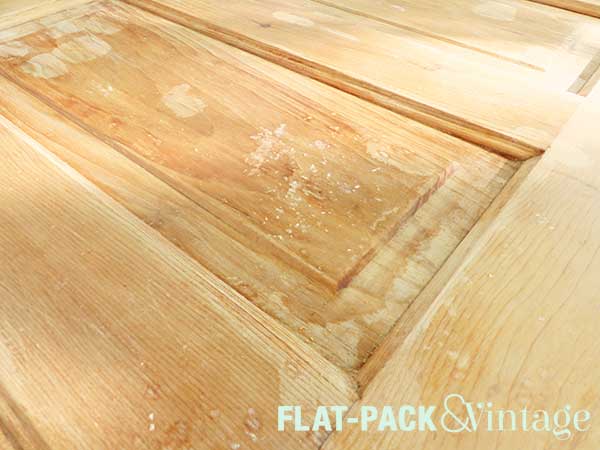
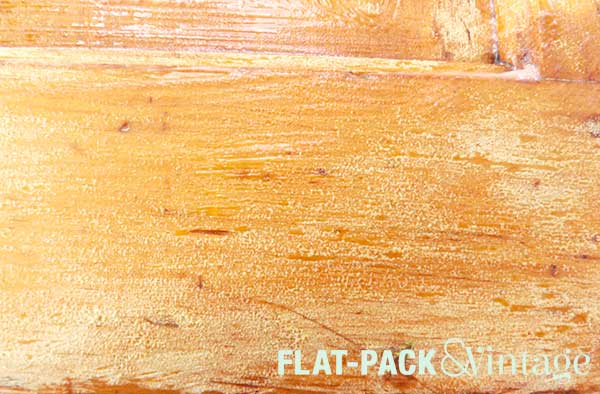
Alrighty, by now you should have bare wood, but it’s still probably seen better days. If you have weird white residue in spots, don’t fret.
See? It happened to me too and it’s nothing to worry about–just dried up bits of stripper that didn’t get completely wiped off. It will come right off with some sanding. It can be washed off too, but you need to sand anyway, so why make extra work for yourself?
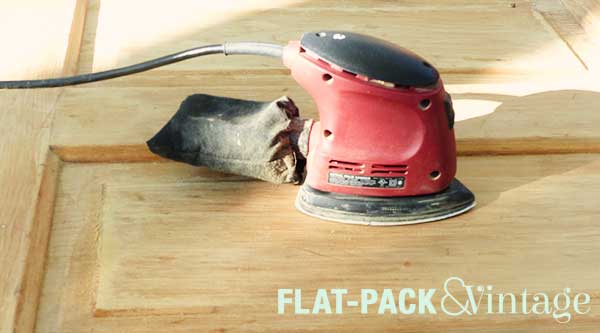
I started sanding with an 80 grit paper and my palm sander (I still used a sanding block and loose sand paper to get into the smaller and more detailed areas). The coarser paper will even out any small scratches in the surface and also take off any tiny bits of varnish you may have missed with the stripper. When sanding, always sand with the grain of the wood as much as humanly possible.
After going over everything with 80 grit, dust everything down with a tack cloth (an ever-so-slightly damp rag works too). This is when I inspect for any significant gouges. Since these doors are old I wasn’t aiming for a perfectly smooth surface. That just feels disingenuous. I did however want to patch the worst of the worst. Some of the doors had dog scratches down the front. One had NO carved into it, probably by some angsty asshole teenager. Several had assorted old screw holes. These were all things that I didn’t really feel added to the character and would need to be filled in.
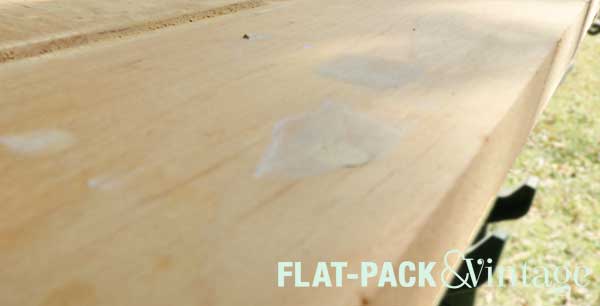
Using wood filler is easy, blob it over the hole/crack/gouge then use your putty knife to scrape off the excess. Set the edge of your putty knife flat against the surface and with a firm, even pressure pull it over the putty you laid down. It sands off very easily, so don’t panic if it looks a little lumpy. Also don’t panic if you didn’t completely fill in the hole–let the first layer dry and add another.
If you’re going to be staining, make sure to use stainable wood filler. I’ve tried a few different kinds and my favorite so far is Plastic Wood. Don’t bother buying a giant tub though. It dries out fairly quickly and is difficult to work with if it gets too dry (I’ve had the same issue with other fillers I’ve tried too). Personally I also think a metal putty knife works better for wood filler, but you could definitely use a plastic one if that’s what you have.
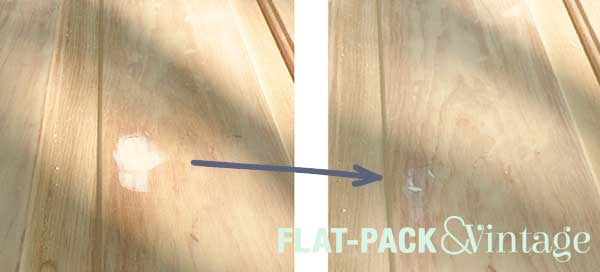
Now that all your holes/dents/gouges/graffiti are all filled in, it’s time to sand with a medium grit paper. I used 150-120 grit,* again with my palm sander. This will smooth out your 80 grit sanded layer and smooth out any blips left from the wood filler. If you find areas that need a filler touch up, dust them off, fill again, let dry, and sand.
When sanding over the filled spots you want to remove an filler that’s sitting on the surface and leave only the filler left in the divet. Pretty much just keep sanding until you see the original shape of the hole you filled.
Finally, I went over everything with a fine grit sandpaper (I used 200 grit). I chose to used just a sanding block instead of a palm sander since all the real work should have been done on the coarse and medium sands.
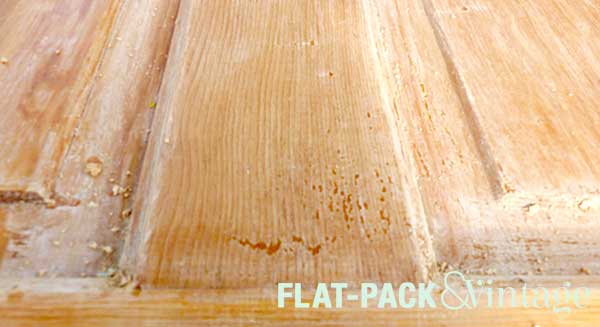
At this point you’ll want to clean everything off really well. Vacuum, tack cloth, canned air–whatever it takes. If you find dust congregating in any crevices you can dig it out with a tooth pick. Basically you want your surface to be completely dust free before finishing it.
Up Next: Staining (or Painting)
* I had a mix on hand… have I mentioned I am SO not a professional?
Sexy music is optional, but I highly recommend it.
Anytime you want to refinish a piece of wood furniture with a different stain, the first step is to strip off the old finish. Even if you plan on painting you may still want to strip off the old finish if it’s lumpy. If you’ve been looking into re-staining a piece you may have discovered gel stain and its claims of little-to-no prep work. I’ll get into more detail on stain later on, but if you’re interested in preserving the wood grain you’ll want to skip the gel stain and read on. Like a lot of DIY projects it’s time consuming, but not technically difficult. Actually, it’s really hard to screw this up too badly at all.
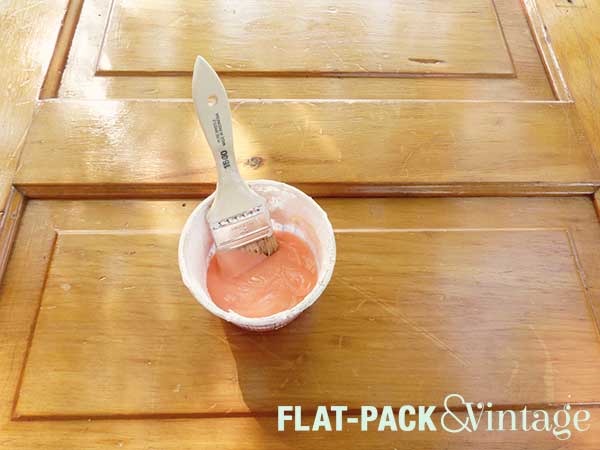
In the past I’ve used Smart Strip but this time around I decided to give Citri-Strip a go. It’s still low odor and biodegradable, but it more readily available at pretty much every big box hardware store. The process is the same with both, just make sure to work in a well ventilated area with appropriate skin protection.
Paint the stripper on your surface in a fairly thick coat. If you’re using Citri-Strip do NOT use a foam brush, the stripper will start eating through the foam. Yes, I learned this lesson the hard way and inexpensive chip brushes are definitely the way to go. Do your best to cover the entire surface, but the Citri-Strip can be hard to see so you may end up missing something (but don’t worry!). For my particular project I found that waiting about 15-20 minutes after applying the stripper was perfect.
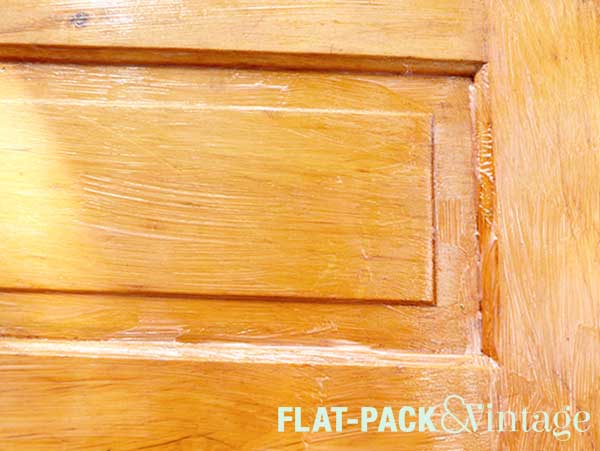
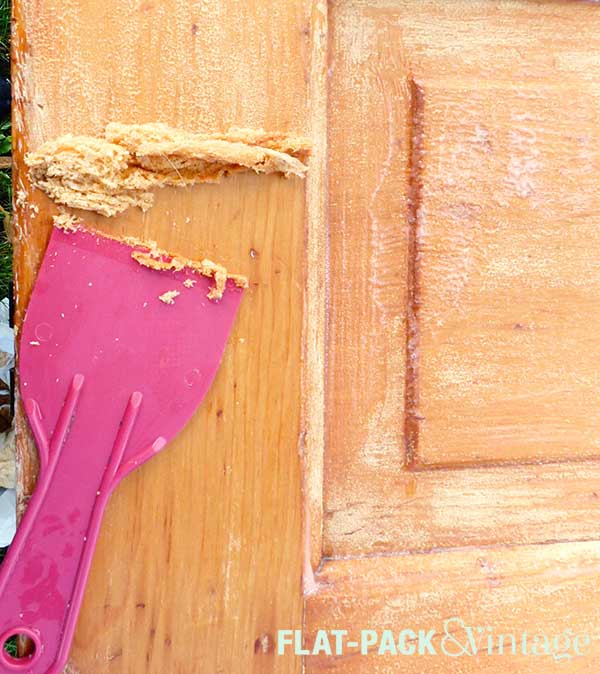
Once your stripper has kicked in (it will change color a bit and show some bubbling) it’s time to scrape it all off. I was working over a plastic (disposable) drop cloth, but I also lined a metal bowl with a plastic bag to catch most of the gunk. Use a plastic (less likely to scratch) putty knife to scrape off all the stripper and all the finish it’s taken off. Not gonna lie, it’s pretty gross. If you have any intricate corners or trim, you can scrape them out with a stiff scrub brush.
Side note: did you know it’s near impossible to find a putty knife narrower than 1.5″? If you have a raised panel door like I do the indents around the panels may be less than 1.5″…. argh! I eventually picked up 1.5″ plastic putty knife and used a hack saw to shave just a little bit off the edge–perfection for under $1 and about 2 extra minutes of work.
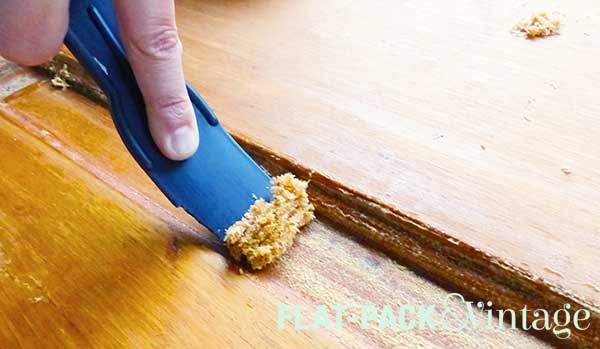
There will probably be some little bits of gunk that get left behind. If you let them dry out a bit you can brush the off with a clean scrub brush or vacuum them up with a shop vac. Then I looked for any areas that were still shiny with varnish and, if needed, dabbed on some more stripper.
Any areas that were proving especially stubborn I would scrub with a wire brush instead of scraping with a putty knife. This was especially helpful in the more detailed areas. I only used the wire brush on the toughest spots because it can scratch up the wood. Use it sparingly and only scrub (medium firmness, no need to put your back into it) with the grain and you should be fine. If you plan on re-staining you’ll want to make sure you have every bit of varnish off otherwise the stain won’t absorb into those areas and you’ll get an uneven finish. No bueno.
 So a weekend project ended up taking around 3 weeks to complete, but I am incredibly happy with the result.
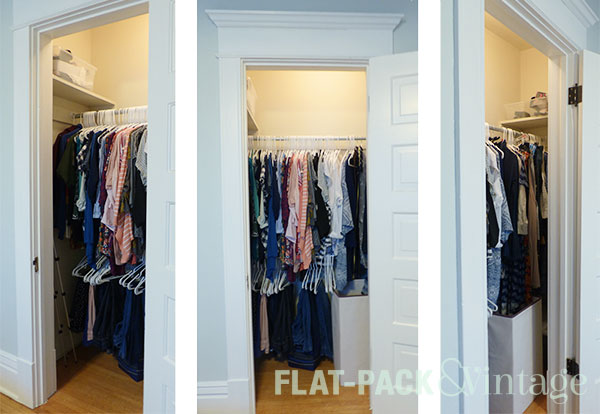
 .
.