The eagle-eyed among you may have noticed we did this before adding the baseboards, but I was on a baseboard kick and got that post prepped first.
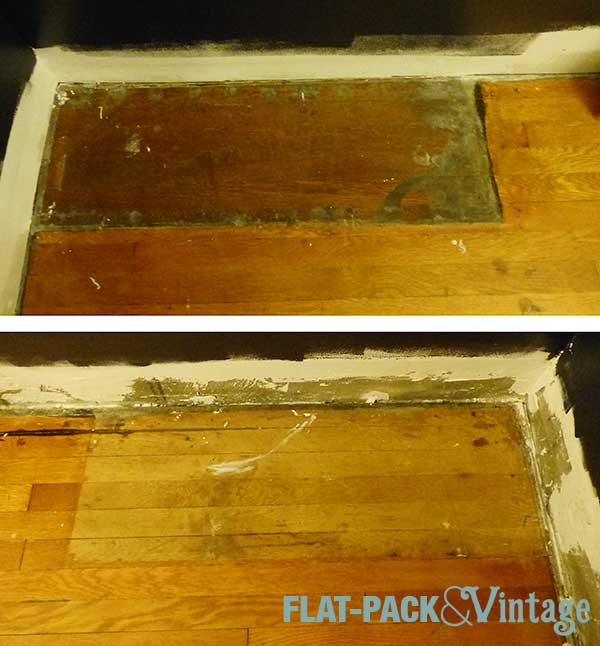
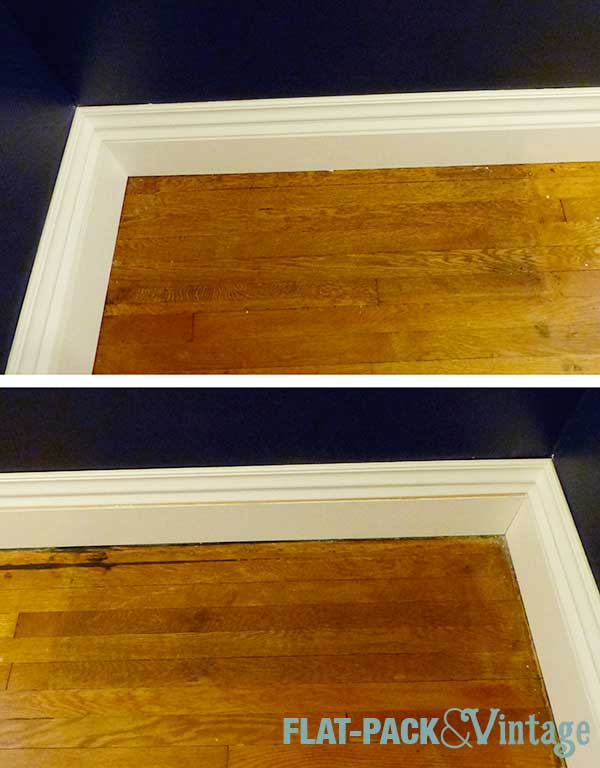
After we removed the built-in bookcases in the dining room we uncovered patches of floor that were a completely different finish from the rest of the floor.
Whomp whomp.
I didn’t really want to refinish the entire floor at this point, nor did I want to invest in heavy equipment rental since we just had 2 small patches we needed to blend in. I decided to try stripping the old finish off with just my little palm sander and if it was too difficult or if I royally effed it up then I was really only back where I started.
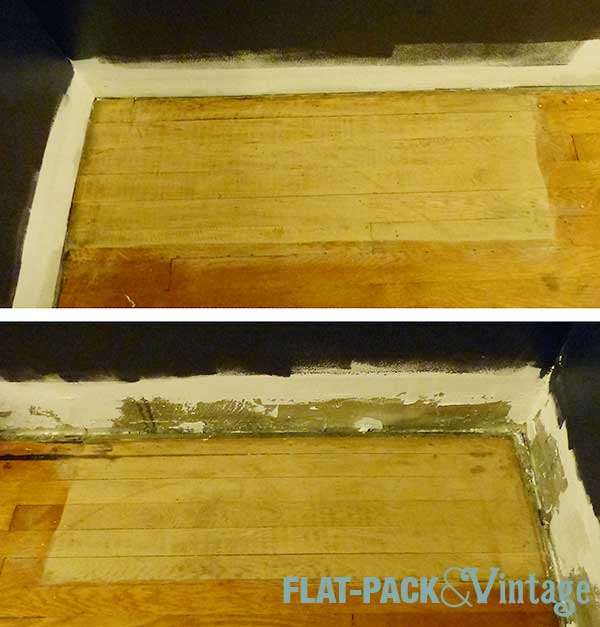
Since a palm sander really isn’t designed for stripping floors this was a little bit of a pain, but Matt turned out to be a sanding champ! I left him to the sanding while I worked on painting our baseboards and after a few evenings (and about 10 replacement pads for the sander) we were down to this:
What’s even more remarkable is that the patch with the darker stain had some kind of ancient adhesive built up around the edges and Matt was able to get that all off.
Now that we were down to bare wood I had to find a stain. I took a picture of the rest of the floor, compared it to the actual floor to make sure it was a pretty good photo match and off we went to the hardware store. When choosing a stain color you want to be looking at actual wood samples rather than the picture on the can, and most hardware stores I’ve been to have these. After quite a bit of of waffling we decided on Minwax Cherry. Not the color I would have expected based on the name or the can, but you know what? It was actually pretty darn close.
Because, as we’ve already established, I am fairly neurotic, I went back out to buy a slightly more yellowy stain to do a second coat with and decided on Minwax Golden Oak.
It’s not a perfect solution, but I didn’t expect to get a seamless match unless we redid the entire floor which is more time, effort and money then we want to add to this project at the moment. Most of this section will also be covered by a buffet so I think by the time we’re done here it won’t even be noticeable unless you specifically point it out to someone.
After fighting with them for a week, the dining room baseboards are now installed and they look FABULOUS! Trying to mimic Victorian baseboards with trim you can find at an accessible hardware store can be a bit of a pain in the ass, but guess what? It’s doable! It’s not exactly cheap (it cost us around $200 for a 150sqft room), but it is still reasonably affordable.
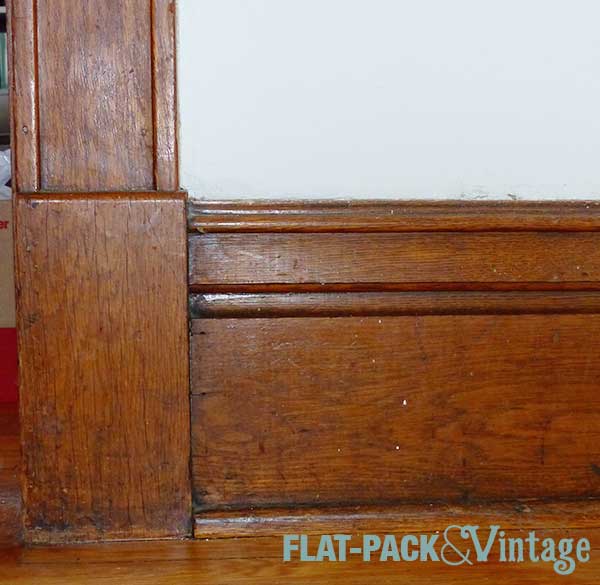
To recap: This is what the rest of the house has that I was trying to at least somewhat match.
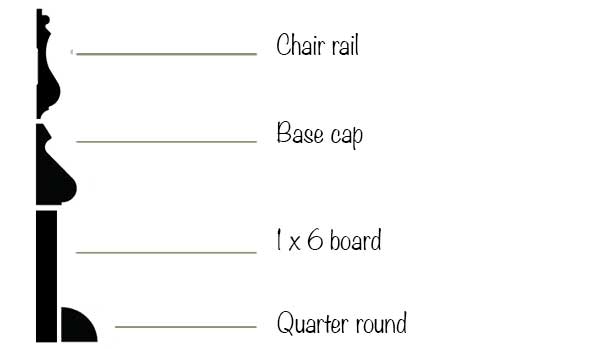
And I ended up being my neurotic self and choosing a 4 part baseboard option.
(This image isn’t exactly too scale since, so the base cap really isn’t that chunky)
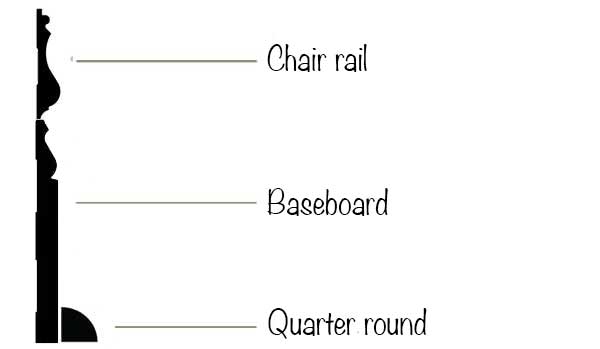
If I hadn’t had a specific plinth height to work around at all the doorways, I probably would have gone with a 5 1/4″ baseboard, the chair rail, and quarter round since the look would be very similar, but about an inch or so shorter than what I needed.
I’m pretty sure I saw all the same pieces at Home Depot, Menards, and Lowes (I’m positive of everything except the base cap), but I ended up buying the Chair Rail and Base Cap from Lowes and the 1×6 (select pine) and quarter round from Home Depot, just because I happened to be at Lowes when I had my trim meltdown.
When buying your trim pieces, not only do you need to measure your total length of trim, but you should also calculate how many pieces you’ll need to avoid as may same-wall joints as possible. Example: our longest wall was 15′, we could only fit 8′ boards into our car so after cutting pieces to fit that wall we’d have 1′ of board that would effectively be dead to us since we don’t have either a 1′ long run or a 9′ long run anywhere and piecing in a 1′ long piece unnecessarily would look a little awkward (you want to try and limit as many seams as possible). Basically just be aware that you may have to overestimate more than you might think.
I decided to paint everything before installing it (although you will still need to fill and touch up your nail holes later on). I used 2 coats of primer (the bare wood absorbed quite a bit of the first coat so I decided to play and it safe) and then one coat of Benjamin Moore Advance.
After everything was dry, I moved on to the install. Matt and I decided to buy a brad nailer for this very purpose since, let’s be honest, while you can definitely hammer everything in by hand it will be a beast. We also have other trim we’ll be replacing in the house later on so buying seemed like the best option. Most hardware stores have tool rental options you could look into as well.
We started off with the easiest section of wall–single length of board, no miters. You want to measure as precisely as possible because if you cut your pieces too short they’ll be gappy, too long and they won’t fit.
I dry-fit after each cut: cut my 1×6, dry fit; cut my base cap, dry fit; cut my chair rail, dry fit. This way I could figure out after one cut if I screwed up my measurement somewhere before possibly ruining any of the other pieces.
I felt like a champ after doing this bit! It fit together like a dream and looked perfect! I was on top of the world! I was going to conquer this dining room in less time than I thought!
And then I moved on to a corner.
Oh sweetzombiejesus kill me now.
A pretty well known fact about old houses is that nothing is square. As a teenager I once watched my dad, my aunt, and my uncle work to install a hardwood floor into a 150 year old farm house… you think I would have learned something from that. Apparently not, but here’s my best advice for tackling a baseboard install.
1- Dry-fit ALL your pieces before nailing anything in.
I started by working wall-by-wall (luckily only with the 1×6) and at my very first corner I hit a snag (see above re: walls not square). So I had to rip off the first board and yank all the nails out of it. Ugh. THEN I did the same damn thing while trying to join the boards on the long wall. *headdesk*
Also, pick a start point and work consecutively from there. If you have sections of walls that don’t have corners you can do those independently. Otherwise though you want to go in order rather than trying to make something meet in the middle. We had a couple spots where we had to shim up the 1×6 to make it level with the previous board and other places where we had to grind off a bit of the floor to make a piece sit level (what we took off from the floor was entirely under the previous baseboard and was a combination of some sort of adhesive and a height change from years of refinishing the exposed floor).
2- Keep your saw close by
We keep our miter saw in the basement so I had maneuver 8′ boards up the stairs and around a couple corners and sometimes the cuts require a bit of tweaking so I’d to haul them BACK downstairs and back up again. This virtually destroys my motivation. After 2 days of not much progress we shoved the dining room table into the living room and I moved the saw into the same room I was working in.
3- Saw blades have width
I actually knew this before starting, but if you’re new to power tools this is worth noting. Basically, when you’re going for very precise cuts where you line your saw blade up with your cut mark matters. It’s also why if you’re cutting multiple lengths out of one board you don’t mark off all the measurements an then cut–you’ll get progressively more off the more cuts you make.
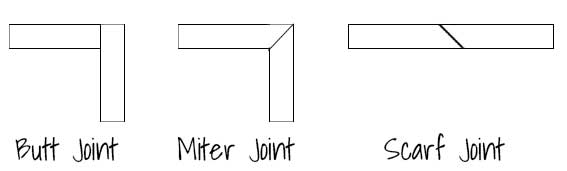
4- Know your joints
There are 3 main types of joints you’ll deal with for trim: butt, miter, and scarf.
You can use a butt joint for corners when you have straight pieces (I used it for the 1×6’s). You can also do a version of a butt joint with fancier trim pieces; this would be a coped corner.
The other option for corners is a mitered joint, but this can get finicky when your walls are not square. If you’re painting the trim and it’s just a little off, it’s not a big deal because you can caulk the gap unless it’s ginormous.
The scarf joint is for joining two straight pieces of trim because most trim you find will be 8-10′ long and many walls are longer than that.
5- Cut your longest pieces first
This way if you screw up you can just keep cutting them down and use them in a shorter space. I managed to do this without even thinking about it–go me!
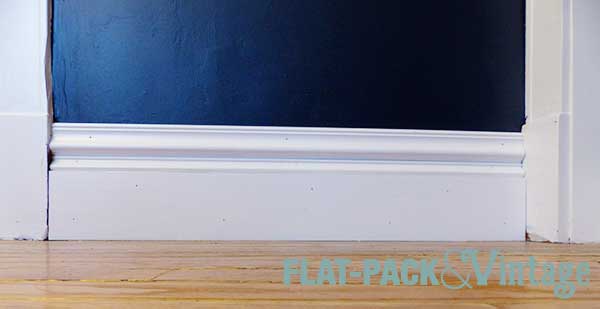
So after a couple of false starts and a few headaches we got all the baseboard molding up!
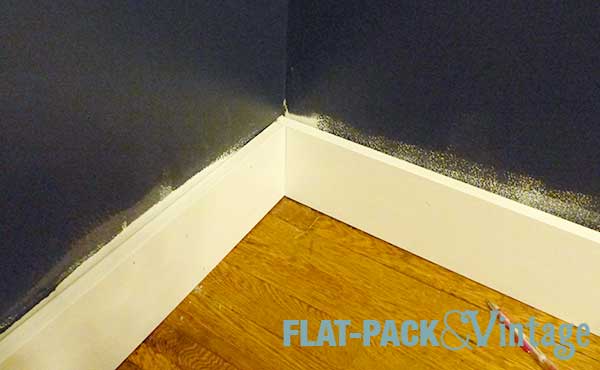
The 1×6 was the worst to deal with–it’s not flexible and has the most area to line up well for corners. I opted for butt joints with this because the mitered corners were not lining up well at all. It also didn’t help matters that the miter saw would slide a little on our hardwood floor, making some of my cuts off because the board I was cutting would no longer be square against the blade. ARGH!!!! This took a couple evenings of work, but getting the first layer installed well would make everything else a lot easier.
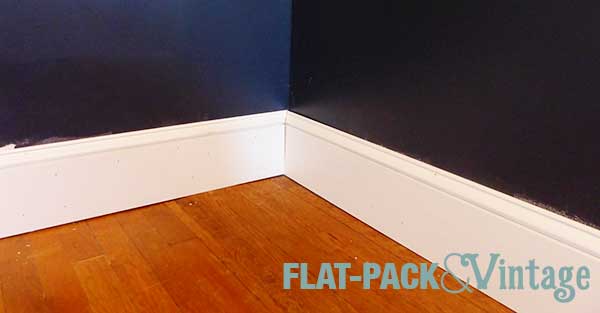
Next up I added the base cap. SO much easier. I was able to knock out this layer in about an hour and my scarf joint were much, much cleaner.
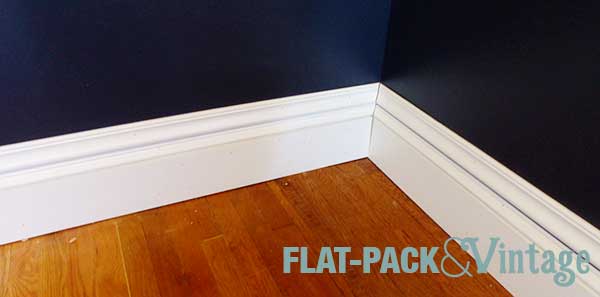
And finally, the chair rail.
I still have to add the quarter round, fill the holes, caulk any gaps, and touch up with paint. The worst is over though and it’s looking good!
*I don’t think any reasonable person could truthfully admit that they wouldn’t have even considered that title.
I’ve been on the hunt for baseboard molding for a couple weeks now. We have to replace all of it in the dining room because chunks were cut out behind the bookcases and we’d never get a perfect match unless we had someone custom make it. So I’ve been trying to find something with a similar weight and style to the rest of the house.
Finding something comparable to Victorian trim in today’s shops is hard. The existing trim was about 10″ tall and you can’t detour too far from that height because there are 10″ tall plinths at the base of all the door moldings and it’s designed to be a similar height as the baseboards.
I figured I’ve have to get two different trim pieces (technically 3 once you figure in quarter-round) and that’s even how the existing trim was made. The trouble was that I couldn’t find two pieces of trim that, when combined, gave me the look I wanted at the height I needed.
At this point normal people may have settled. It’s clearly what happened in our kitchen and it’s not bad… but the base trim is barely visible in the kitchen and will be quite prominent in the dining room given the contrast with the walls.
Also, I am far from normal.
After being disappointed with Home Depot and Menards I trekked out to West St Paul to hit up Lowes. At this point I was ready to buy trim come hell or high water. I spent a good 45 minutes there laying out different combinations of trim on the floor and muttering to myself and eventually I settled on a 4 part baseboard plan. (FYI: All the stores seem to have nearly identical trim options).
It goes as such:
Because that’s not going to be a pain in the ass to install at all.
Since we’re painting, I went with pine for all the pieces since it’s inexpensive (and the MDF was more warped and I think the plasticy stuff is just gross). I chose Select Pine for the flat base piece because it’s straighter and less knot-y than standard pine boards and paint won’t hide knots.
This weekend we also picked up a new toy to help us with the install.
Wheeeeeee! I did NOT want to hammering in 4 different types of trim pieces by hand. Plus, we’re also going to end up adding on to the crown molding AND we’re going to redo all the moldings in Matt’s study at some point* AND fixing some broken quarter-round throughout the house so this seemed like a reasonable investment vs renting. Plus it’s cordless and doesn’t require a compressor, how cool issat???
Pro-tip: If you go with cordless tools, try and stick to the same line so the batteries are interchangeable. We’ve opted for Ryobi since it seems pretty well reviewed for the price point (not necessarily for the professional user, but good for the homeowner with some projects, i.e. us). Added (and completely useless) bonus: I love the green color.
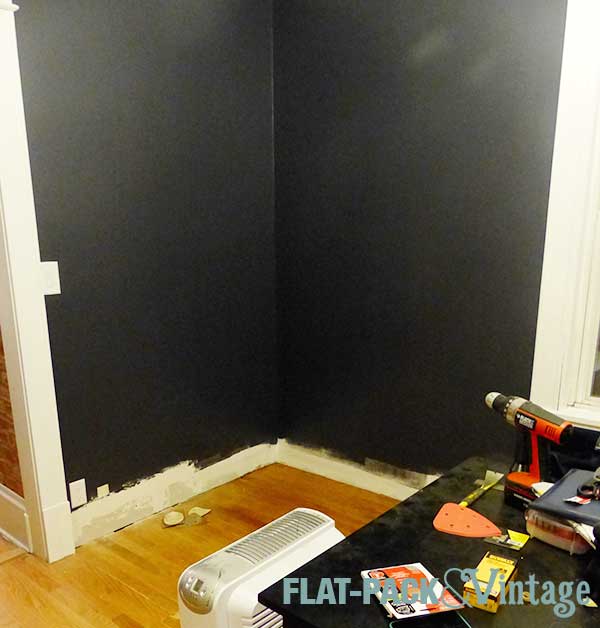
We were originally hoping to install the baseboards this weekend, but since I didn’t pick out trim until Thursday night and it all needs to be primed and painted, this is the current state of things:
(Isn’t our basement lovely?)
and this:
But it’s going to look spectacular!
*Somebody really hated that room. It has the same janky ceiling tile as the dining room, trim that belongs in a 1950’s ranch and walls that appear to have been paneled and then heavily painted? Poorly skim-coated? Something… Needless to same that room does not quite match the rest of the house.
Last week I went over my favorite tools and products for painting. Today I’m going to cover my process for painting walls. Painting walls really isn’t difficult so if you have the time and aren’t afraid of getting a little messy it’s probably not worth hiring out,* especially if you’re working on a budget.
There are multiple different techniques for painting, but this is what works well for me. If you’ve got your own awesome tips, tricks, and techniques feel free to chime in in the comments!
If you have carpeting, you’re going to want to drop cloth the bejeezus out of it (unless you’re planning on replacing it, then make sure you paint first and voila! Built-in drop cloth). I’ve had hardwood floors for years and, um, don’t actually do much of anything to protect them. If you drip a little paint you can wipe it right off while it’s still wet and even if you don’t catch it before it dries you can scrape it off or use some Goof Off. I really just use a big scrap of cardboard to pile my roller tray and paint can on and just shove it around the room with me as I go. Carpet is not as forgiving, so you’re going to want to be careful about protecting it.
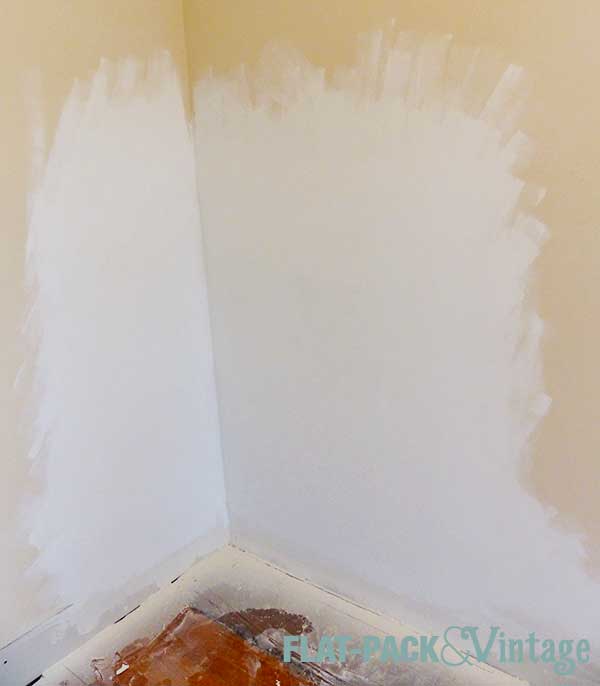
Cutting In
I start by cutting in. In a perfect world you’d keep a wet edge everywhere you go, but if you’re working solo that’s not always practical. I cut in using a 2″ angled brush (I hardly ever tape anymore) and make sure I cover at least 4″ or so away from the edge so I don’t have to worry about my roller bumping the ceiling or trim. When cutting in you also want to feather out your wet edge so you don’t end up with a line as it dries. Basically, once you have most of the paint off your brush (or edger) come back over inner edge of your paint and smooth it out any excess paint.
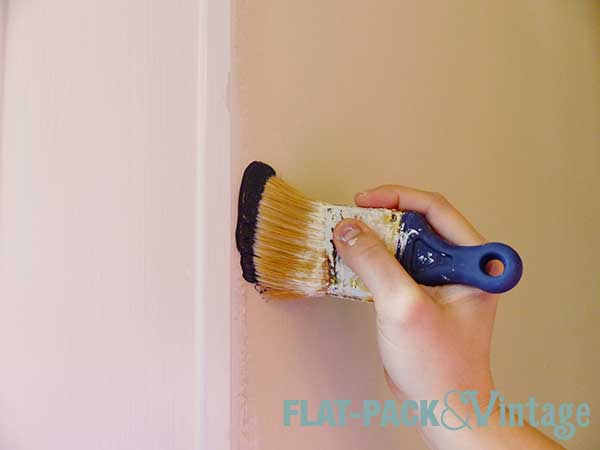
To get a nice clean line (without tape!) I start by dipping just the tip of my brush into the paint.
***It’s important to have a good brush if you’re going to do this. I used a crappy one once and it was a gigantic mess! I’ve been super happy with the Wooster Shortcut for cutting in and I think the short handle makes it very easy to control.***
Set the brush down on the wall a little bit away from the edge,
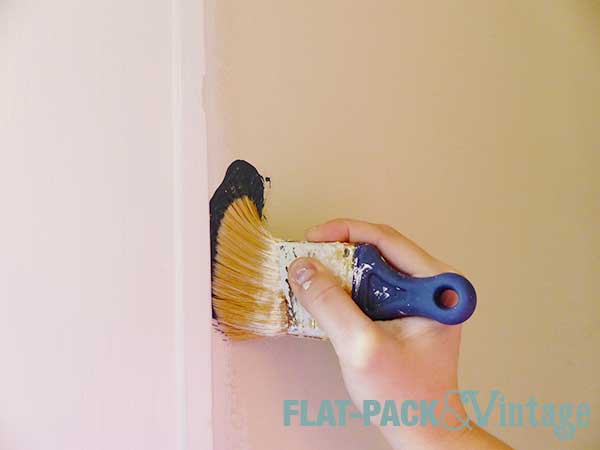
Then smoosh the bristles down a bit so they fan out slightly.
Then slowly sweep the brush towards the edge.
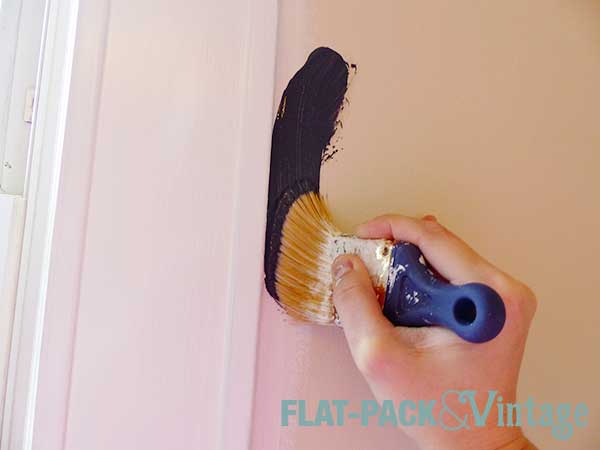
And finally, drag the brush downward (or across for horizontal edges) keeping only the very tip the bristles against the edge. You can see I also still keep the brush at a slight angle so only a small section of it is coming into direct contact with the trim.
Work slowly and don’t load too much paint onto your brush. If you’re worried about your cutting-in skills, you can still tape your edges and practice to see how much paint really ends up on the tape.
Walls
The open areas of walls are the easy parts. Load your roller up with paint and then use the textured part of your paint try to roll off excess.
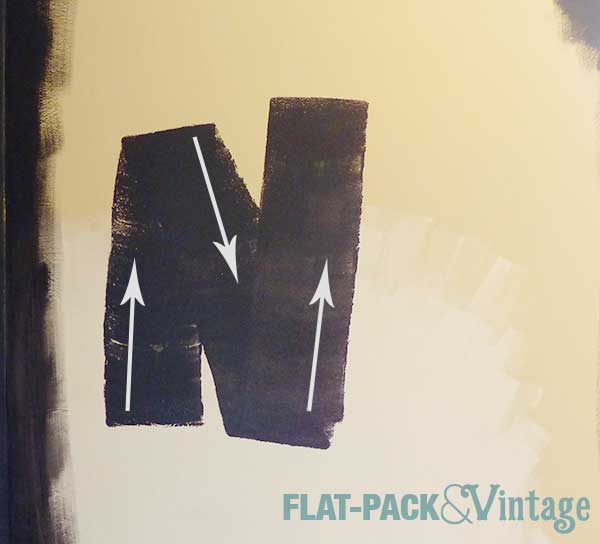
I work in a N pattern on the walls (most people say W, but I tend to actually make an N or M)–roll your paint on in a 2-3 foot N….
….and then roll right back to fill it in. This distributes the bulk of the paint from your roller and then spreads and evens it out as you come back over it. I set my roller down to get the picture so I starting rolling again on the same side I started with. If I’m not pausing in between I’d naturally roll my N then double back the way I came, just slightly off-set… whatever works.
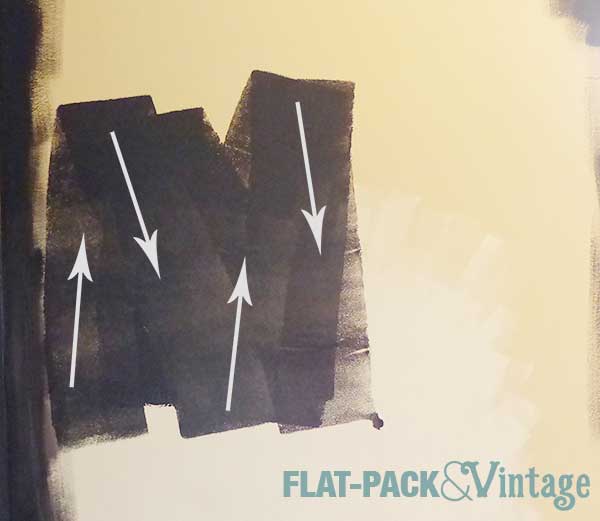
Your may have to go back and forth a couple times to fill it in nicely, but don’t add more paint to your roller, just work with what’s already up on the wall.
Once you’ve filled in your N then you can go back for more paint. Start a new N (or M or W) shape, slightly overlapping your previous section and repeat.
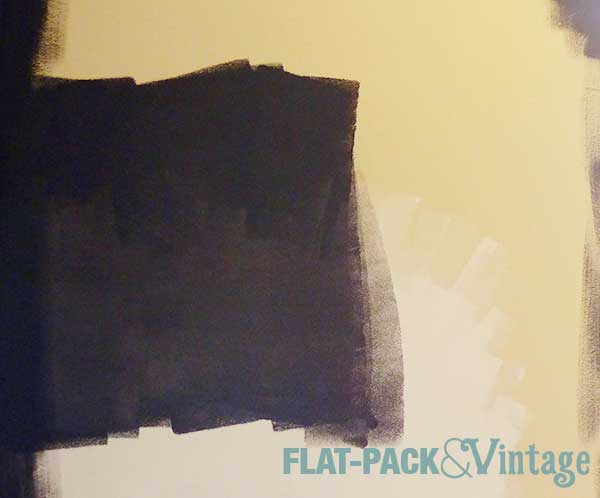
When working with a roller make sure you don’t have too much paint on it (it should be saturated but not dripping) and roll slowly. This will minimize both paint drips and spray from the roller. You also want to slightly overlap your previous section each time. This keeps a wet edge and helps each section of paint better blend into the other. You also don’t need to put a lot of the pressure on the roller–remember, you’re rolling, not scrubbing. If you find yourself scrubbing with the roller it’s probably a sign you need a new cover.
If you need to stop partway through (waiting a couples hours until the next coat, ran out of time for day, etc) you don’t have to wash out your brush and roller. Wrap them in plastic wrap, and if you’re not picking back up until the next day, stick them in a cool place like the fridge (we were out of room in our fridge, but our basement’s pretty cold so I stuck mine there).
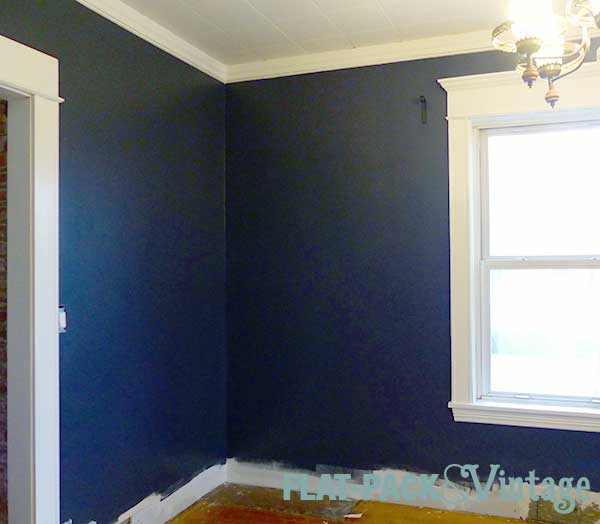
No too scary, right?
Also, how absolutely amazeballs does this color look????
*Super tall walls and stairwells are TOTALLY worth hiring out in my opinion, but I’m not so good with ladders. Also ceilings. Painting ceilings is a bitch.
I started painting the dining room today. I got about 1/2 done but now have to shove the furniture into the other corner so I can paint the other 2 walls. I’ve done quite a bit of painting over the years–walls, trim, furniture.* I know not everyone has painting experience though so I’m going go over the supplies I use, and then run through my process.
At the time of writing this I have no sponsors, no advertisers, no one slipping me convenient wads of cash behind the scenes. This is what I use and my honest, unbiased opinions.
Priming:
Almost all paints I see these days are a paint + primer, but a separate primer is still definitely worth on some things. If you’re painting over bare wood or drywall, you should probably prime. If you’re painting over a finish that may be a little grimy (kitchens, homes previously owned by heavy smokers…. that sort of thing) you’ll probably want to prime. I’ve been using the water-based Bullseye 1-2-3 primer and have been pretty happy with it. An oil-based primer will give you even better adhesion, but will also need more ventilation and special cleanup. Also, you can use latex paint over oil-based but shouldn’t oil-based over latex.
Walls:
I always use an Eggshell finish on walls in all rooms. Sure there are lists that specify certain finishes for certain rooms based on durability, but my go-to is always eggshell. It’s cleanable, but not shiny (quick n’ dirty breakdown: the shinier the finish the more scrub-able it will be, but shinier will also highlight any imperfections or texture changes on the walls). If you have kids who are prone to drawing on walls, you might want to bump up the sheen in problem areas.
My paint brands of choice for walls are Behr (Home Depot) and Clark + Kensington (Ace). They’re pretty inexpensive as far as paints go, but have pretty respectable coverage.
Trim, Cabinets, and Furniture:
I used to always use a high gloss on furniture, and then I discovered satin. To me the satin is more in the range of a “factory finish” level of shine for most things and the high gloss can leave things looking obviously painted. Painting my kitchen cabinets turned me into a Benjamin Moore Advance convert (fangirl!). I’d read good things about it so decided to give it a shot. It’s a little pricey, but the coverage is excellent and the finish is beautiful. I was raving to my sister about it and when she saw our cabinets her comment was “I can see why you liked this some much.”
We also used Advance (satin finish) on our trim… after the kitchen. I went to buy Advance but the Ace near us didn’t carry Benjamin Moore since they’re too close to another BM dealer and the guy there highly recommended Clark + Kensington. I’d used it on walls and been really impressed for the price point and at half the price of Advance I thought sure, why the hell not. 3 coats plus primer (and could probably use another) is why the hell not. And painting trim is a beast so I think it’s better to splurge on better coverage here (but I’ve personally never found the pricier paints worth it for walls). After the kitchen we switched over to my original plan of Advance. It still needed 2 coats + primer, but was definitely looking good at that point (and if you’re only using about 1/2 the amount of paint, it’s not really even a splurge anymore)!
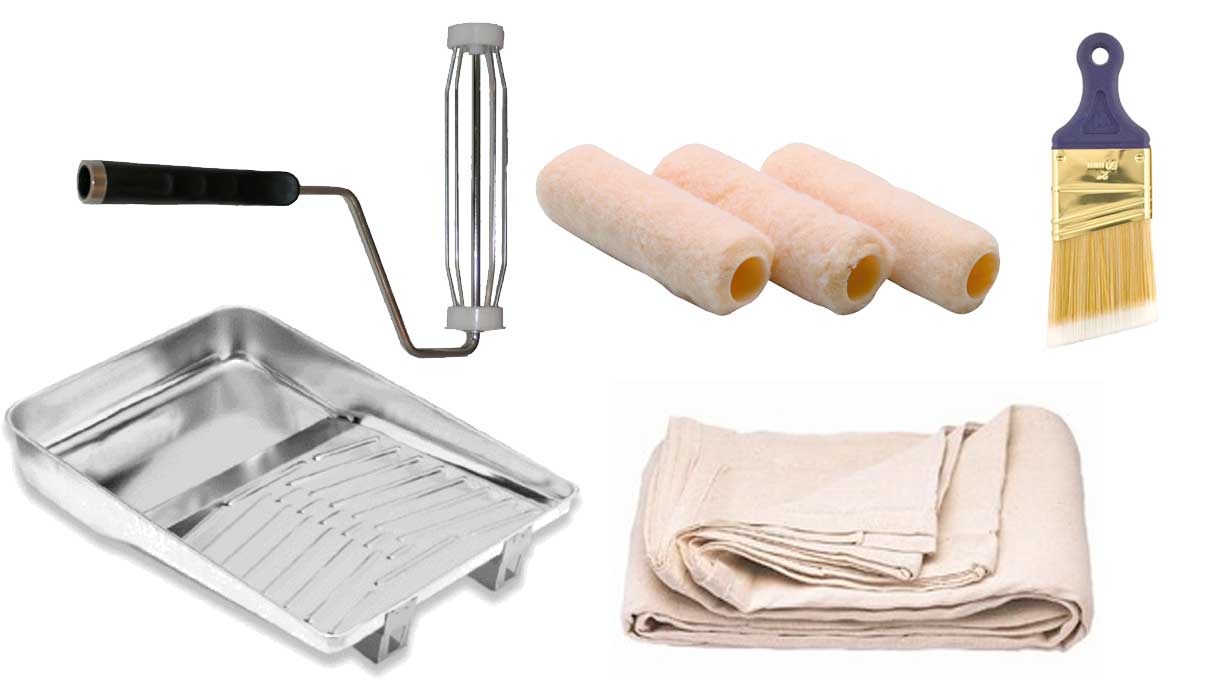
Tools:
The basics: paint tray, roller, roller covers (don’t be afraid to splurge on roller covers, or at the very least, don’t reuse your covers to death –>guilty) drop clothes, 2″ angled brush. I really like the Wooster Shortcut, but there is a little bit of personal preference involved. This is another area where you don’t want to choose the absolute cheapest option and take good care of your brushes.
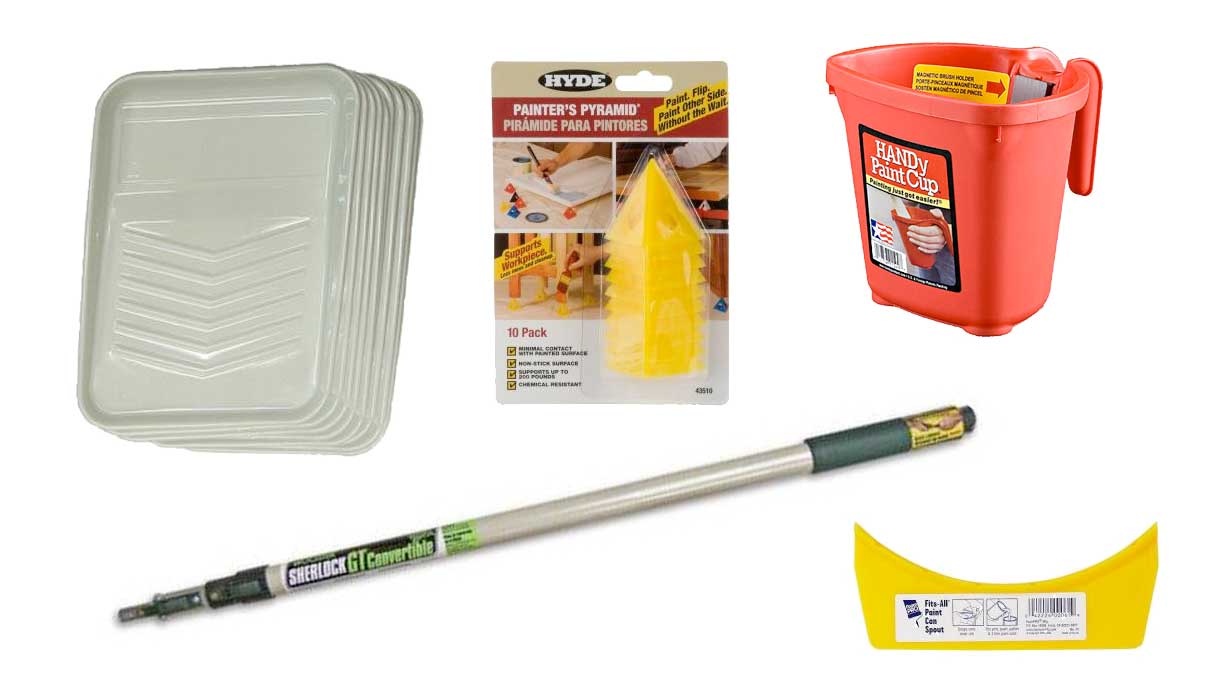
Very useful extras: pole/extender for your roller (I really wish I had an adjustable one!), painters pyramids (if you need to prop up something flat to paint the edges), paint pail (sure, you could use any old plastic container, but the handle and magnetic brush holder are pretty sweet), paint tray liners (they make clean up waaay easier, I dump as much extra paint back into the can, let the rest dry, and then peel it off and reuse the liner**), and a flexible pour spout (they conform to both gallon and quart cans, make the paint easier to pour, and prevent paint from clogging up the rim of the can).
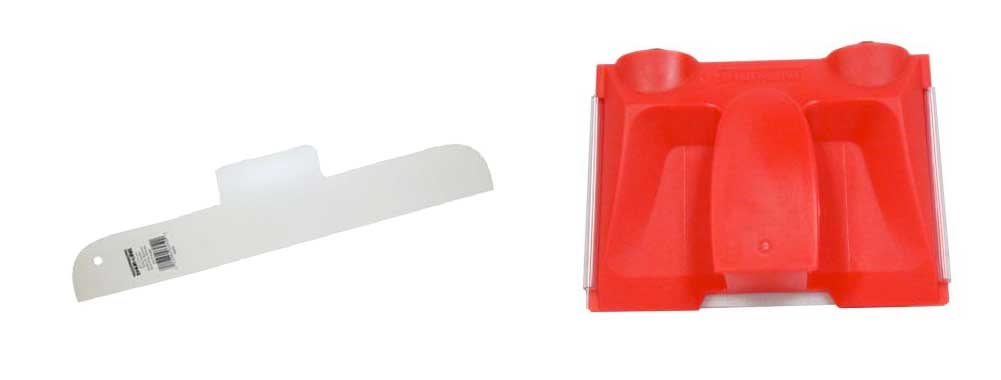
Marginally useful extras: Edger (I have had various levels of luck with these, they work well in some situations but not others, and some of them constantly fall apart or get paint where they shouldn’t), paint guide (like the edger it works well in some areas and less so in others, if you use one keep a damp rag around and wipe it down constantly).
To Tape or Not to Tape?
I used to be a taper because I was told that was just a normal part of prep work… then I read an article over at Apartment Therapy and it changed my life. They claimed that taping was actually more time consuming and even a little more risky than just cutting in by hand. So I tried cutting in the old fashioned way…and it was wonderful! You need a good quality angled brush and a steady hand, but if you go slow it’s not that hard.
The “risky” part of taping is that it can lead to overconfidence because if your tape is not perfectly sealed or you’re a little too globby with your paint it can ooze underneath. Also, there’s a risk of peeling off some of your new paint if you don’t time your tape removal right.
Ultimately it comes down to personal preference. If you’re new to the painting game you may still want to tape everything, but maybe still try your hand at cutting in carefully and see how much paint you really get on the tape.
*Ceilings are hands down the worst. If I ever want to repaint our ceilings I may just hire it out. Really.
I’ve been obsessing over this patch job for WEEKS now! The better the mudding comes out, the better your paint will look… especially if you pick a paint with any sort of sheen to it–that sheen will just make every imperfection pop. I happen to like eggshell for walls, it’s not shiny, but it’s not flat either (and if you have kids or a tendency to beat the crap out of spiders you find on your wall, you really don’t want a flat finish because it’s not cleanable At All).
Eyeballing your finish isn’t quite enough; if you really want it to turn out well run your hand over it. You’ll end up feeling bumps you might not have caught otherwise.* After things were feeling pretty good with the hand test (not perfect mind you, but pretty good) I went over everything with a coat of primer. Once everything’s an even color it’s also easier to pick out areas that looks a little off, just make sure to check it out as the lighting changes throughout the day.
I was crazy happy with how good the spot looked after priming. 1) It looked way more even than expected and 2) the texture left the primer and roller seemed to be just enough to match the subtle wall texture that was already there. I was a little worried about that and had started to look into some of aerosol texture sprays, but think we may be ok!
I also (mostly) finished painting the trim. I started last week on our day of rest after Vegas and got one coat of paint on about 1/2 the room. This weekend I got almost everything else done (I couldn’t reach everything since our table is shoved against one wall, so I’ll be working in sections). Trim is the most tedious thing to paint I think. Walls are a piece of cake, but trim… it’s more of a souffle–time consuming and finicky.
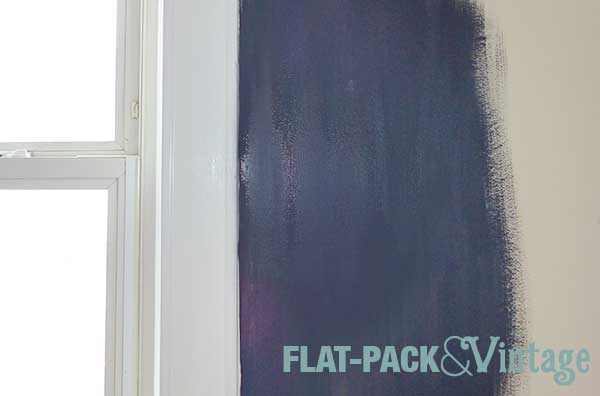
Because I’m impatient, I also put a little patch of paint up to see how it looked against the trim.
SO excited to get this room painted!
I switched my day off for this coming week from Monday to Wednesday to help out a co-worker and it ended up working well for me too. I get a break from manual labor and can hopefully dive into painting on Wednesday. Karma.
I spent the last week working on smoothing out the patch job. It’s a fairly timing consuming project since you have to wait for the previous layer of joint compound to fully dry before you can add another… which pretty much means waiting a full day in between coats.
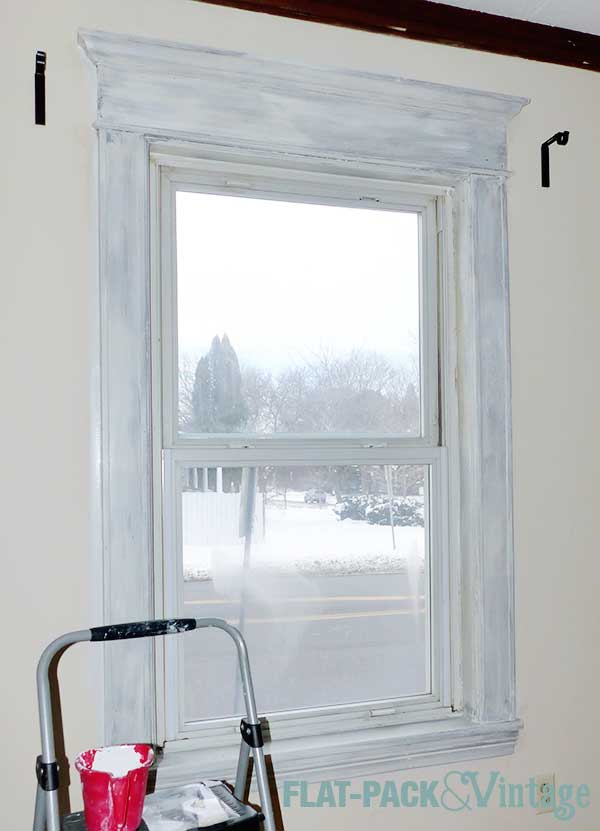
With the walls well underway I decided to start tackling the trim. The baseboards are going to come later, but I wanted to get the door and window trim and the crown molding painted before painting the walls. I think it’s easier to paint trim first (personal preference) and I could knock out the trim while still finishing up the patch job on the wall.
Priming isn’t that exciting, but solid prep-work is important. All the trim got wiped down with a liquid deglosser and then got hit with a coat of primer. What I’ve read about using deglossers is that they tend to lose their effectiveness if they sit too long, so I worked in small sections. Deglossed the kitchen doorframe, let it dry to the touch (about 10 minutes), primed. Then I moved on to one of the windows, degloss, dry, prime… next window, etc.
I’ve been using Bulls Eye 1 2 3 primer and have been pretty happy with it. If you can stomach it, an oil-based would be even better, but it’s cold here and the windows are staying closed. No matter which primer you choose just make sure to follow the directions on how long to wait between coats because if you don’t give it enough drying time it won’t end up bonding as well as it should.
If you’ve never primed anything before, don’t panic if it looks splotchy and awful, because it will. It will make your top coat(s) look SO much better though and it will reduce the number coats you’ll need.
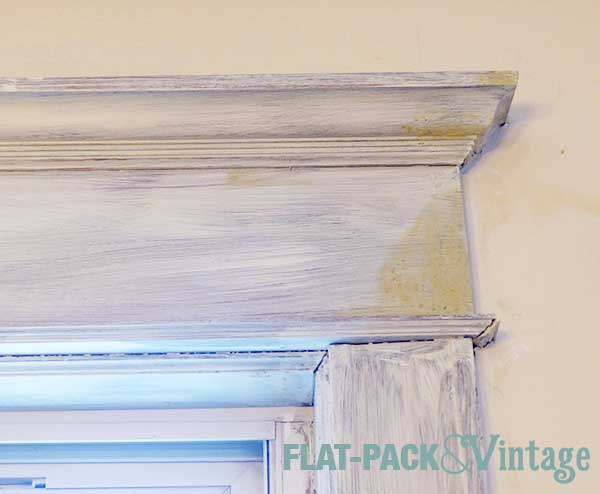
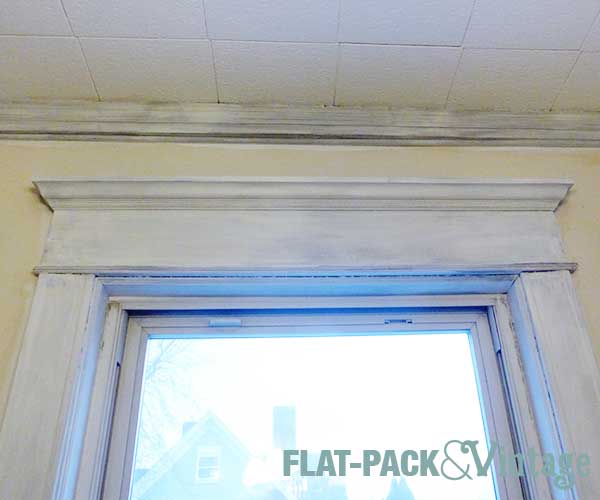
After priming, a bunch of old nail holes and assorted wear spots popped up. I should have touched them up before priming, but I wanted to illustrate the shape our trim was in.
All the top edges were like this from years of, I dunno, mounting curtain hardware directly to the trim? There were also holes and chips like this everywhere. Bits of the decorative moldings were chipped and the inside frame had gouges around the nail heads holding it in. I didn’t manage to get a good shot of the sill, but it was even worse.
I touched them up with wood filler and then went back the next day to sand and spot prime.
I’d say it’s looking better, but it really still looks like a construction zone here.
So on Day 1 we demoed out the bookcases and most of the baseboards and then patched in some drywall over the now exposed lath board. Today we started taping and mudding all the drywall seams.
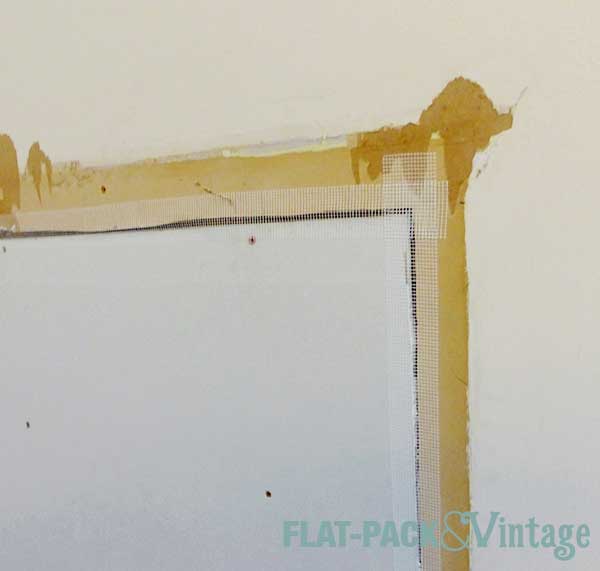
I started with a self adhesive mesh tape on the all the flat seams and then covered them in a layer of joint compound. I used the mesh tape because that’s what we still had from patching smaller areas. It’s not actually recommends for larger areas. Oops.* You can see how gappy the join is between the 2 pieces is here.
For joint compound we’re trying out this stuff since it comes pre-mixed (lazy) and claims to be dust control. We’ll see. If we were working on a much larger area I may have gotten the stuff you mix yourself, but we’re trying to keep things as simple as possible.
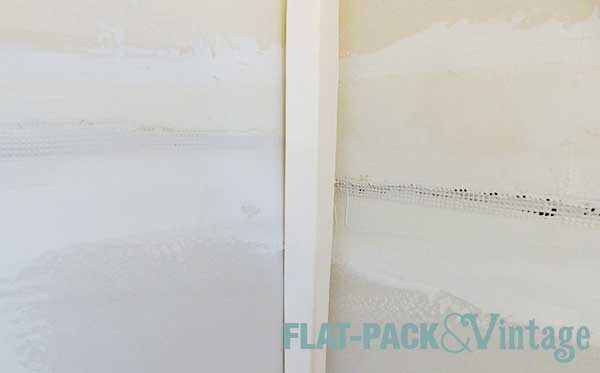
After the flat seam got a layer of joint compound I tackled the inside corner. The first video I watched recommend a corner trowel, but I have a about 4′ worth of corner… did I need to buy a specific tool? Really? Then I watched this video of how to tackle an inside corner without a corner trowel. Ok, I got this.
For corner seams you need the paper drywall tape (really need). It come pre-creased so you just have to rip a piece as long as your corner and fold it in half so it fits right inside the corner.
This stuff is not self adhesive so you will have to put down a layer of joint compound first. Be generous but not gloopy, and if you’re worried about how much you’re putting on err of the side of a little too much. I ended up with a small bubble since I didn’t lay down enough joint compound in one spot. Oops.
Once you’ve added a layer of joint compound on each side of the corner, press the tape into place with your fingers so it sticks. Next, take your putty knife and scrape down along the tape with a firm even pressure. This will more solidly adhere the tape and sort of squeegee out any extra joint compound. Then do the same thing on the other side of the tape.
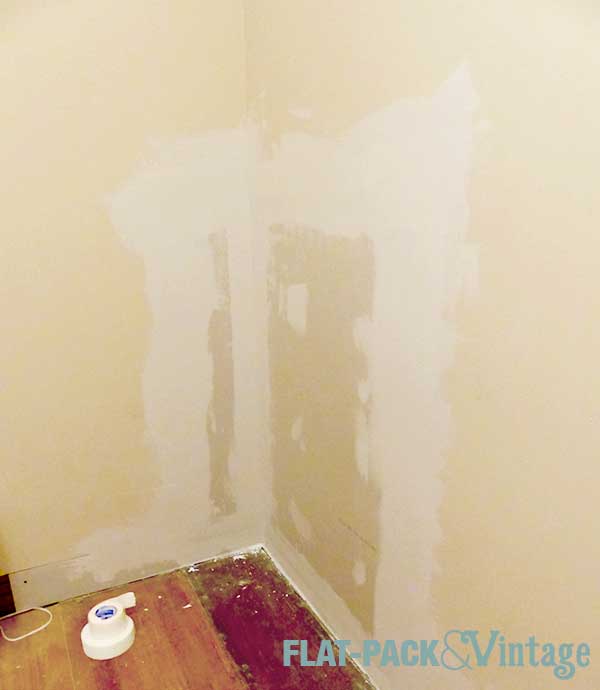
If you’ve decided to forgo the corner trowel to save yourself $6** you’ll just have to work one side at a time. Now you’ll layer joint compound over the tape like you would on all the flat seams. Wait for your first layer to dry before tackling the other side otherwise your putty knife will just muck up the nice smooth joint compound on the first side. Like everything else in drywall it will probably take several coats, so one side, dry, other side, dry, and repeat.
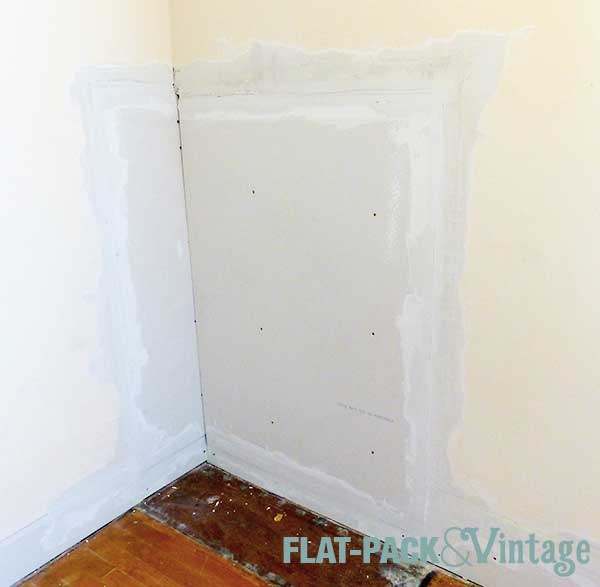
We’ve got some fun depth changes and assorted crappiness happening here so I’ve been working away on getting everything feathered out. This video was super helpful in getting a technique down.
After a few evenings of work it’s starting to look pretty decent, but I definitely have a little more work to do.
*There’s actually some conflicting info about which tape you should use when… but the general consensus is that the mesh is ok for small patch jobs, especially with plaster (but should be used a quick setting mud), but paper tap should be used for pretty much everything. Research first people. I think we’ll be ok though… I’d be a little more worried if we were doing the whole room.
After deciding on the Dining Room as our next project we detoured a little bit in January to follow along with Apartment Therapy’s January Cure. I think this was a good call to allow us to refocus a little bit on the house as a whole and tackle a couple of smaller projects.
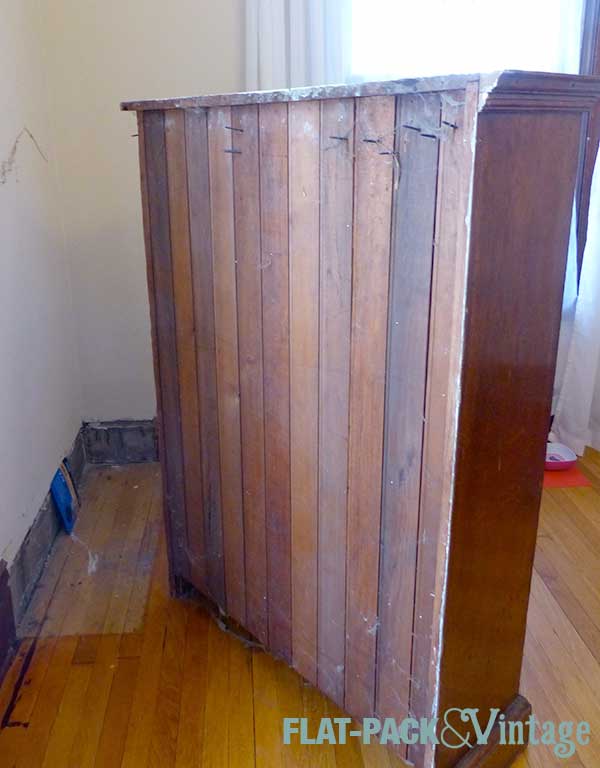
So, the dining room…. it will be a project, but we have a plan! We started by removing the bookcases.
The first one came out really easily. Despite all the screws it wasn’t actually attached anywhere so we just had to pull it out and haul it into our garage (without getting impaled by any of the screws).
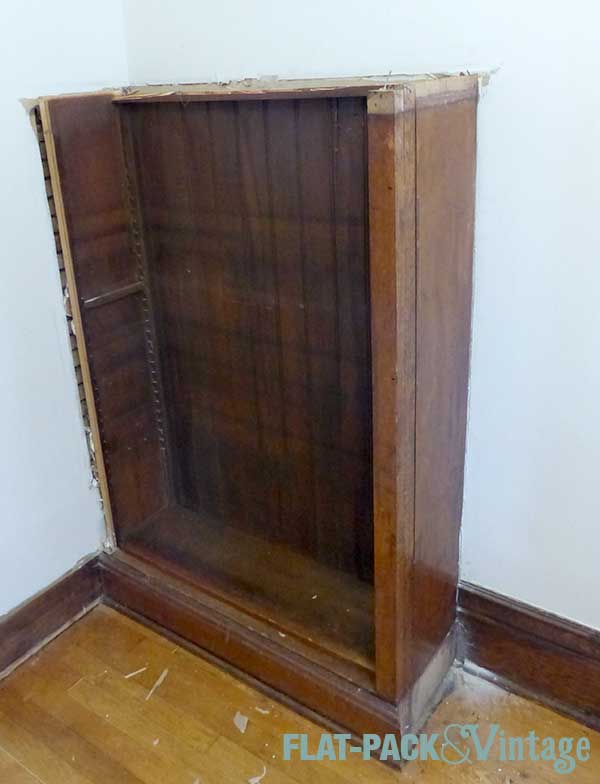
The second bookcase was an entirely different story. This guy was actually fully built in. We unscrewed any screws we could find (2) but there were still nails holding it in place. The nails were sunk deep enough that we couldn’t pry them out so the bookcase wasn’t budging. Demo time.
After some quality time with a crowbar, a hammer, and some brute strength the bookcase was in shambles.
And eventually we were left with this (and a bunch of suspiciously pointy scraps of wood so we are totally prepared for a vampire invasion!)**
Awesome, right?
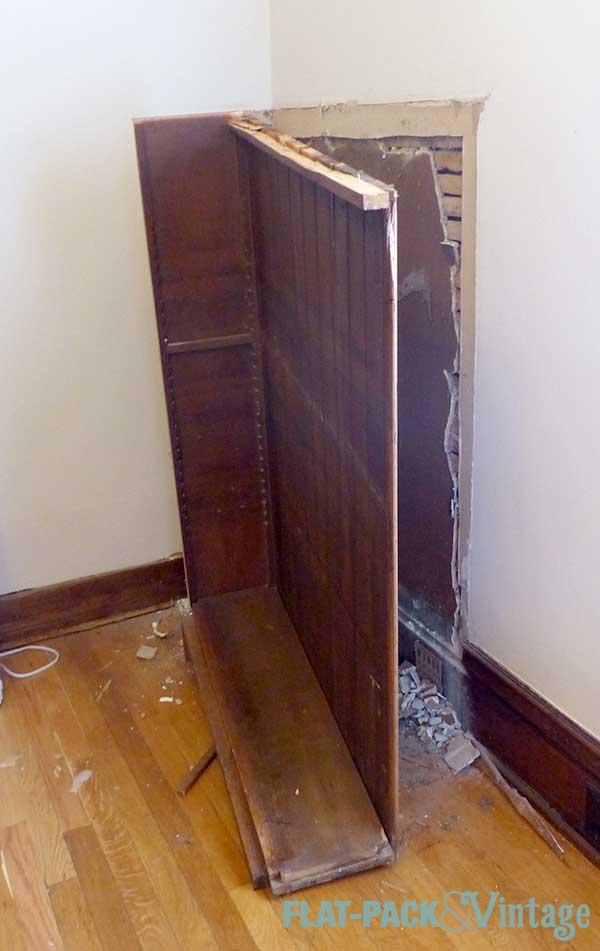
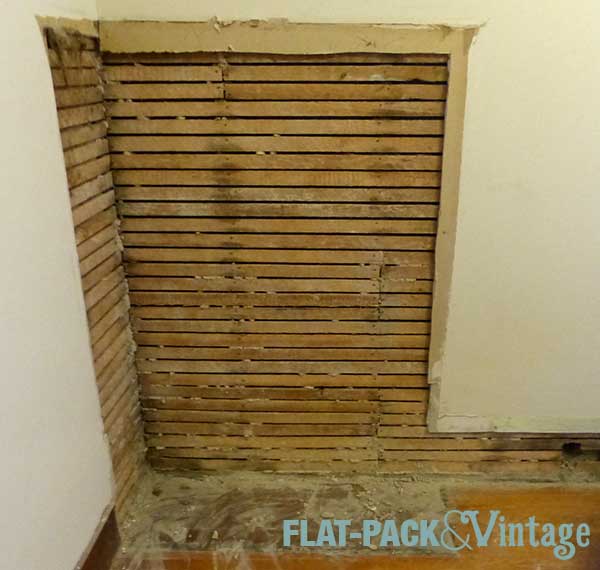
We already knew there was some wall damage behind this one. One of the side trim pieces popped off a while back so we could see some exposed lath board so this wasn’t a total shock. I had kept my fingers crossed that the wall behind the bookcase would still be ok… nope.
The weird thing going on here is that the main walls were drywalled at some point so what you’re seeing here is a combo of drywall and plaster.
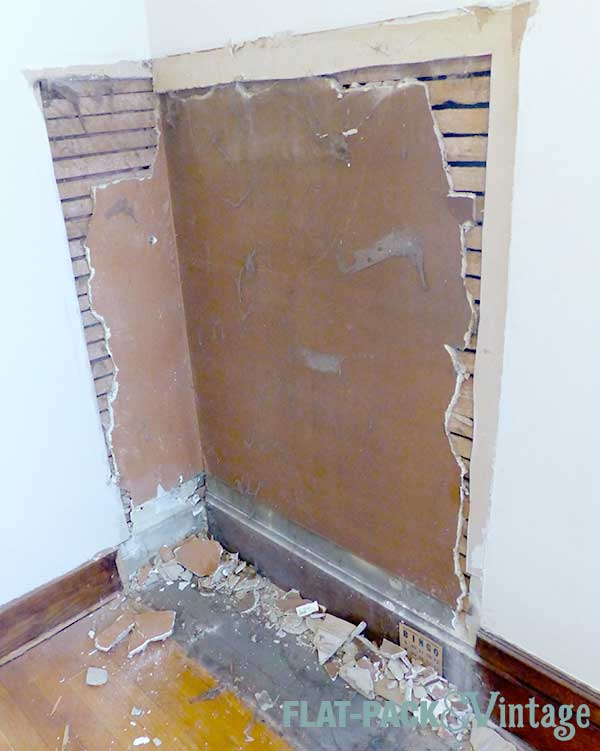
I demoed out the remains of the plaster (which is remarkable satisfying by the way) and Matt tackled the baseboard. The baseboard did not want to budge, but we need to replace all of it (patching would have been nearly impossible). I had to go make a hardware store run in the middle of it to get a large crowbar so we could get some more leverage now.*
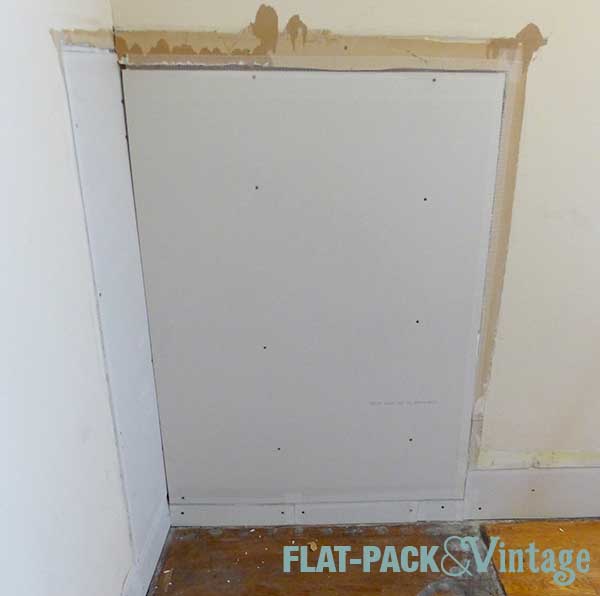
Now that the demo was done we had to start putting it back together. We had picked up some drywall*** and started cutting it down to size. Somehow whoever drywalled the first time managed to make wobbly cuts all around this opening. How is that even possible? You get a straight edge, a utility knife, score, snap, and voila! Straight line. How do you mess that up?
Our patching got a little wonky along the bottom because of the way we had to cut down the drywall to get it home in the first place, but that will all get covered up by new baseboards anyway so I’m not going to stress about super smooth finishes down there. Evening out the rest of the wall will probably take us a while though…
*The cashier asked me how my day was going and looked mildly frightened when I responded with “Well, hopefully better now!” while wielding a 3′ crowbar
**Don’t talk to me about sparkles. I really want the t-shirt I saw that said “Then Buffy staked Edward. The end.” Also, this is totally worth watching.
***FYI a 1/2 sheet of drywall barely fits inside a compact car and people will probably laugh at you while you try and wedge it inside (especially if you’re already mildly panicking because it started to rain) and you may slightly damage the rubber seal around the door frames. Thanks for volunteering my car Matt!
I know I’ve announced the Dining Room is our next big project, but I’ve spending January focusing on Apartment Therapy’s January Cure since it’s nice to spend some time doing a whole house refresh + clean. I haven’t been completely slacking on the Dining Room though. This week I made use of my media downtime assignment (which I mostly failed out by the way….) to work on curtains for the dining room.
Yes, I’m just going to need to take them down again once we start painting, but it looks nice for the moment and the hard part (getting the holes drilled in the right spot) is done.
Anyone who spends a lot of time googling decor advice/reading design blogs/perusing Pinterest can probably tell I broke one of the most common design “rules.” But rules are made to be broken and I’m a rebel.
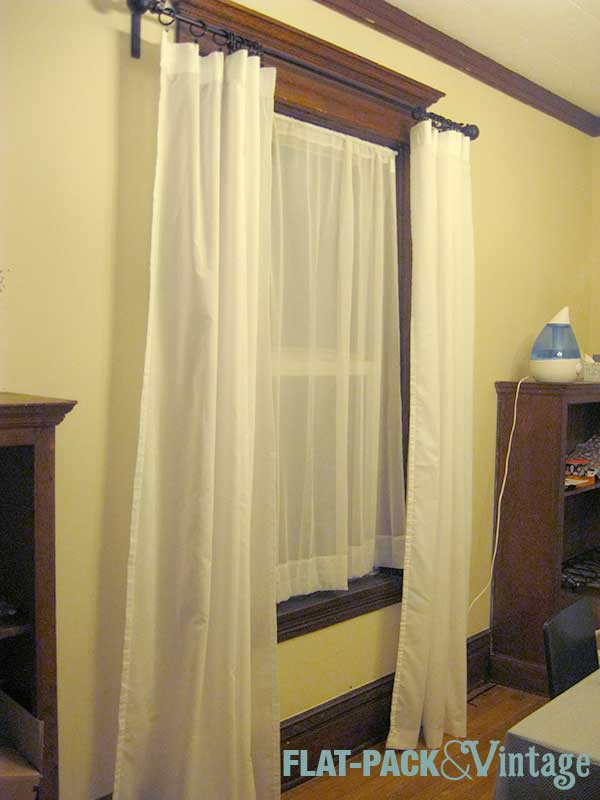
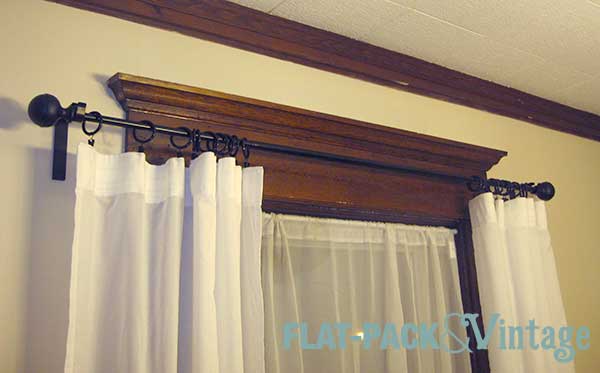
What is usually recommended when hanging curtains it to hang them higher and wider than the window frame. Wider, check. Higher… not so much. But here’s the thing, the logic behind this piece of advice is to make your windows look more dramatic and you can use it to fake a bigger window or a centered window. The problem is that I think there’s an underlying assumption that you’re hanging curtains in newer construction–dinky moldings, average ceiling heights, that sort of thing. Here we’ve got nicely tall ceilings, big, and some lovely window trim. If I had hung the curtain rod higher than the window it would get squashed in the space in between the top of the window molding and the crown molding. It would also hide our window trim. No beuno.
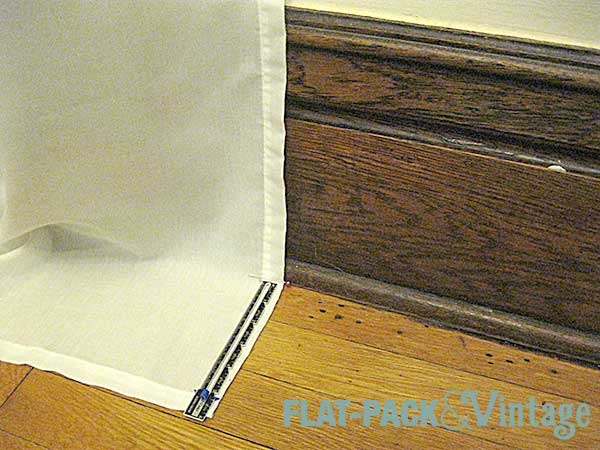
Instead I opted to hang the rod across the the “blank” area of the trim so the fancy molding peeks out over the top. It’s still nice and high, but not overly competing with the charm of our trim, which is one of the reasons we picked this house out in the first place.
Moral of the story, there are no hard and fast design “rules.” There are a number of really good suggestions out there that will make sense for a lot of people, but if it’s just not working for you, don’t fight it, no matter how often it pops up on Pinterest.*
The curtains are super cheap IKEA VIVAN panels (no longer sold apparently) that I spruced up with some curtain rings and chunky finials. The sheers are from Target and just held in place with inexpensive tension rods.** I opted for sheers again like I did on the kitchen because we’re on a busy-ish street and our windows are about 2 feet from the sidewalk so some semblance of privacy is nice.
Both the curtains and sheers needed to get hemmed so I pre-washed everything first. It’s usually a good idea to pre-wash anything you may need to wash again in the future since there can easily be some shrinkage. Even though I can’t say I wash my curtains with any regularity, they can get dusty (and furry around the bottom in our house) so being able to toss them in the washer and not worry too much is worth the added step of pre-washing. In my opinion pre-washing > hand-washing.
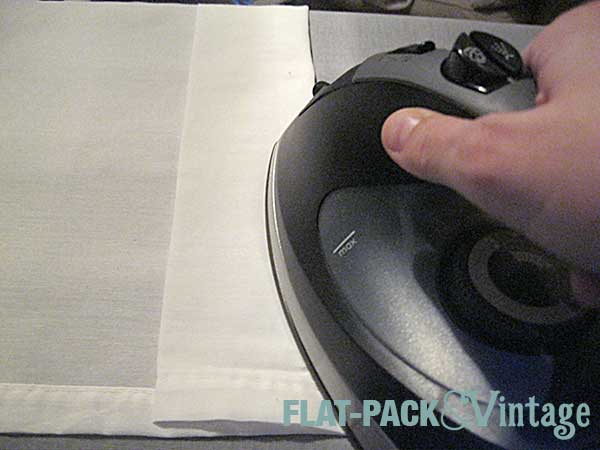
After everything was washed and dried I ironed it all nice and smooth and hung up a panel to mark my hem height. My personal preference for curtains to have them just skim the floor. I opted for a wide hem so I didn’t have to cut any of the fabric off (in my experience these curtains don’t rip straight at all), I just doubled the fabric over to make a nice smooth hem and give a little weight to the bottom to what are pretty light-weight curtains.
Press.
Press.
Sew.
You can either run it through a sewing machine or hand stitch. Hell, you could use some fusible webbing and I won’t judge you–if someone is inspecting your curtain hem when it’s within a few inches of the floor they’ve got some issues. I haven’t decided which I’m going to yet. I’m leaning toward hand sewing because it’s more subtle, but then I’m also lazy…. (no lie, those pins may stay in for a little while).
In unrelated news, I should be getting a new camera this weekend (!!!) so hopefully the picture quality will improve around here.
*You know what else Pinterest suggests? Self-tanning with coco powder. Yeah…. if you ever start feeling Pinterest envy, just remember that one.
**So Target only had one in stock when we were there earlier this week and it’s on the other window and not hemmed yet. This one is a little short because it’s from the bathroom in our old Apartment, but you get the idea, right?

 It’s not a perfect solution, but I didn’t expect to get a seamless match unless we redid the entire floor which is more time, effort and money then we want to add to this project at the moment. Most of this section will also be covered by a buffet so I think by the time we’re done here it won’t even be noticeable unless you specifically point it out to someone.